Thanksgiving is right around the corner, which means it’s time to break out the fall decorations! One of the best ways to get in the holiday spirit is by making festive DIY crafts with your family. A turkey pumpkin is a classic Thanksgiving decoration that is fun and easy to make. In this step-by-step tutorial, I’ll explain how to transform a plain pumpkin into an adorable turkey using simple craft supplies.
Overview of the Turkey Pumpkin Craft
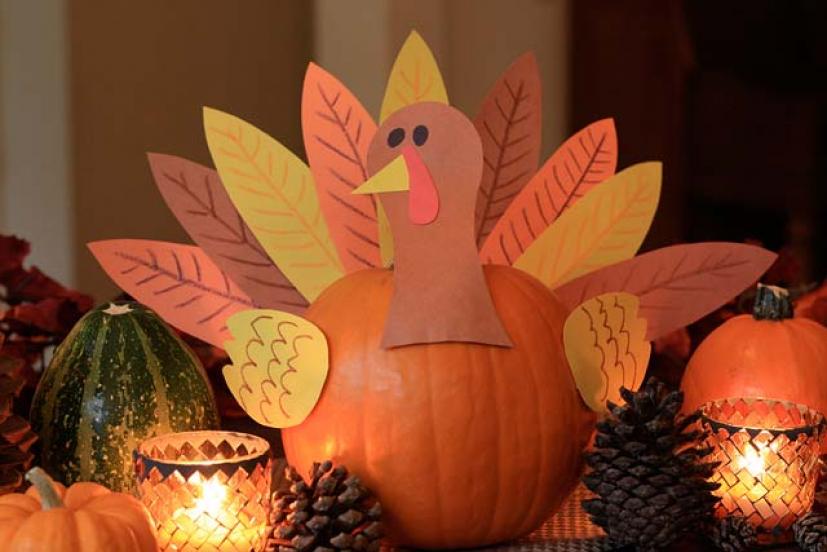
The concept behind this Thanksgiving craft is to take a small pie pumpkin or faux pumpkin and turn it into the body of a turkey. You’ll add colored paper for the feathers, clay or felt for the head and feet, and googly eyes and other embellishments for the face. The results are a whimsical turkey pumpkin that looks great displayed on your mantel, table, or front stoop. Kids of all ages will have a blast making this project alongside their parents or caregivers.
Supplies You’ll Need
- Small pie pumpkin or faux/craft pumpkin
- Construction paper in fall colors
- Googly eyes
- Orange craft foam or felt
- Hot glue gun
- Scissors
- washable markers
- Brown pipe cleaner
Optional
- Mod Podge
- Feathers
- Model Magic/Sculpey clay
- Wiggle eyes
- Twine
Step-by-Step Instructions
Follow these simple steps to make your own turkey pumpkin
Step 1: Paint and Decorate the Pumpkin
If your pumpkin is unpainted start by painting it orange using acrylic craft paint. Once dry use brown and yellow paint to add “feathers” in strokes, dots, and other textures.
Let kids decorate the pumpkin with washable markers in zig-zags, dots, and swirls to look like feathers. Mod Podge can be brushed over the marker when dry to seal it.
Step 2: Create the Head
For the turkey’s head, cut a teardrop shape from orange craft foam or felt. Glue on googly eyes near the top wider edge. Below the eyes, cut an orange triangle for the beak and glue in place.
Alternatively, shape a head and beak from clay and let firm up before gluing to the pumpkin. Add wiggle eyes for a fun touch!
Step 3: Add the Feet
Cut four small orange triangles from craft foam or felt for the feet. Glue or tape them near the base of the pumpkin, pointed tips facing outwards.
For sturdier feet, roll small balls of clay and press to flatten slightly before gluing to the pumpkin.
Step 4: Make and Attach the Feathers
Cut feather shapes from construction paper in fall colors like orange, yellow, brown, and red. Glue feathers across the back and sides of the pumpkin, staggering and overlapping them.
For extra flair, cut longer quill feathers and insert them behind the shorter feathers. The feather colors and placement create the turkey’s tail.
Step 5: Add Final Embellishments
Use a brown pipe cleaner to shape and glue on the turkey’s wattle below its beak. Add extra details like a red snood hanging from the head, twine wrapped around its neck, leaves and berries for garnish.
Get creative with additional feathers, glitter, fabric, raffia, pom poms, or anything else to customize your turkey! Display your turkey pumpkin and enjoy it throughout the Thanksgiving season.
Tips and Ideas
-
Use a small sugar pie or Cinderella pumpkin for easier crafting. Larger carving pumpkins work too.
-
Paint and decorate the pumpkin 1-2 days before assembly so paint has time to dry.
-
Let kids customize their turkey’s feathers, colors, and embellishments.
-
Insert floral picks behind feathers for extra stability and height.
-
Place your turkey on a tray or cake stand for dramatic display.
-
Save pumpkin guts/seeds to roast for snacking while crafting.
-
Construct turkey heads and feet early and allow to dry overnight before attaching.
-
Display your turkey pumpkin after Thanksgiving for a cute fall decoration.
Creative Variations
Part of the fun of crafting a turkey pumpkin is thinking of unique ways to make it your own. Here are some creative variations to try:
-
Use patterned scrapbook paper for fancier feathers
-
Craft feathers from faux leaves and metallic acrylic paints
-
Attach extra heads and feet to make a turkey family
-
Use bright colors like blues and pinks for a rainbow turkey
-
Incorporate mini gourds, pinecones, and foliage for an autumnal look
-
Turn the pumpkin sideways to look like a turkey drumstick
-
Use multiple mini pumpkins in a row for a turkey conga line!
Displaying Your Turkey Pumpkin
Once completed, your DIY turkey pumpkin makes an adorable addition to your Thanksgiving decor. Here are some ways to show off your creation:
-
Perch on the mantel or shelf surrounded by fall garlands
-
Use as a centerpiece on the dining room table or buffet
-
Place near the front door to greet guests with seasonal charm
-
Line a front walkway or porch with turkey pumpkins
-
Give as Thanksgiving hostess gifts or favors for friends and family
-
Decorate classroom doors at school for a festive spirit boost
However you choose to display it, your handcrafted turkey pumpkin is sure to put a smile on everyone’s face this Thanksgiving!
Fun Facts About Turkeys
Here are some fascinating turkey facts to get you inspired as you craft your pumpkin:
-
There are 6 species of wild turkeys native to North America. The most common is the Eastern Wild Turkey.
-
Today’s domesticated turkeys descend from wild turkeys in Mexico that were first domesticated by Native Americans over 2000 years ago.
-
Turkey feathers were used historically by Native Americans for ceremonial clothing and blankets. The bones were used to make needles.
-
Male turkeys are called “toms.” Females are called “hens.” Baby turkeys are called “poults.”
-
Mature male turkeys (toms) have colorful plumage and the identifiable “beard” of black, hair-like feathers on their breast.
-
The average lifespan of a domestic turkey is 3 – 4 years. Wild turkeys can live longer, up to 10 years.
-
Only male turkeys gobble. Female turkeys make a clicking noise.
-
The wishbone of a turkey comes from the clavicle bone and is considered lucky if you break it!
I hope these fun facts get your creative juices flowing as you craft the perfect turkey pumpkin. Enjoy bringing some handmade charm to your Thanksgiving celebrations this year!
Subscribe to get the latest
free goodies straight to your inbox
I planted this little Craftberry Bush in the hope its fruit would inspire you to create. Im grateful to have you here, where creativity is always in bloom.
Turkey Pumpkin for Thanksgiving Craft
How do you make a turkey pumpkin?
Cut out the turkey parts carefully, including the feathers, beak, wings, and other details. Assemble the turkey by gluing or taping the pieces onto your pumpkin. The feathers, eyes, and beak help bring the turkey to life! Add extras like googly eyes or real feathers to make your turkey pumpkin even more unique.
How can one prepare pumpkin to eat?
The pumpkin can be prepared boiled or baked. In both cases, it can be consumed with the peel and the seeds that will provide fiber. It can also be seasoned with oil and other aromatic seasonings, such as rosemary.
What is a turkey pumpkin craft?
This Turkey Pumpkin Craft is a fun and festive way to engage kids in pumpkin decorating without the mess of carving. Perfect for Thanksgiving, this craft will bring a smile to any fall celebration. Be sure to download your free printable and start crafting your adorable turkey pumpkin today!
How do you decorate a turkey pumpkin?
The feathers, eyes, and beak help bring the turkey to life! Add extras like googly eyes or real feathers to make your turkey pumpkin even more unique. Display your turkey pumpkin as part of your Thanksgiving or fall décor. Use cardstock: For sturdier pieces, print the turkey parts on thicker paper or cardstock.
How do you make a turkey pumpkin with a snood?
Download the turkey pumpkin template, print, and cut out the pieces you need. Begin making the turkey by gluing the snood to the back of one side of the beak. Set this aside. Glue the eyes in the middle of the pumpkin. Next, take the snood/beak combo and glue it in the middle of the eyes, slightly overlapping the bottom of the eyes.
How do you make a turkey tail with a pumpkin?
Let everything dry for a couple of minutes. Then glue the back of the head to the stem of the pumpkin. Place the turkey facing you and glue the feet to the front of the pumpkin. To create the feathers, glue three to four leaves in the back of the pumpkin to make the tail.