A miraculous way to roast a turkey that uses butter-covered aluminum foil to protect the breast from the high heat while basting it. The foil is removed at the end so that the skin can crisp up. This article also talks about brining and whether or not you should do it. It also has a lot of tips for roasting a turkey perfectly.
You probably know that my parents owned and operated restaurants when I was growing up. What you might not know is that they also did a lot of catering. We estimate that they’ve catered over a thousand turkey dinners, with each dinner requiring numerous turkeys. Their dinners have always gotten great reviews, and now I’m going to show you how my mom roasts a turkey perfectly. We will first talk about what size turkey you need, and then we will talk about how to cook it (basting and crisping the skin with butter!) so that the meat is perfectly cooked and juicy. Even the breast meat is juicy.
Roasting an entire turkey can take hours and all that dry oven heat can really dry out and toughen the meat if you’re not careful. That’s where aluminum foil comes in handy! Tenting the turkey with foil helps keep it nice and moist as it cooks. Here’s everything you need to know about how to properly tent a turkey with foil.
Tenting a turkey with aluminum foil is a simple but effective technique to prevent the bird from drying out while roasting The foil traps in steam and moisture as the turkey cooks, keeping it juicy and tender Perfectly tented turkeys are moist through and through—even the breast meat stays succulent.
Why Should You Tent Your Turkey?
Turkey has a tendency to dry out in the oven, especially the breast meat which dries out faster. Tenting traps moisture inside the foil so the turkey cooks in its own steam. The result is a perfectly moist bird from top to bottom.
Other benefits include:
- Prevents skin from getting too brown or crispy too fast
- Allows turkey to cook more evenly
- Helps retain juices and flavor
- Reduces oven splatter and mess
How to Create a Foil Tent
Tenting a turkey is simple:
-
Use heavy-duty aluminum foil, about 2 feet long.
-
Tear off sheet and fold lengthwise into thirds to make a thick, reinforced tent.
-
Once the turkey is in the roasting pan, loosely cover with the foil tent.
-
Crimp the foil edges over the sides of the pan to seal.
-
Leave at least 1 inch between the foil and turkey. This allows heat circulation.
The foil should create a tent-like dome over the turkey, not wrapped tight. Air flow is still needed for even cooking.
When to Apply the Foil Tent
There are two options for when to tent the turkey:
-
Tent from the start – Immediately after placing turkey in the oven, cover with foil tent. This prevents any moisture loss.
-
Tent halfway – Roast turkey uncovered for the first half of cooking time to brown and crisp the skin. Then apply foil tent for remainder of roasting.
The halfway method gives you the benefit of both crispy skin and a moist interior. But for full moisture protection, tenting from the beginning is ideal.
Monitoring Doneness Under the Tent
You’ll need to periodically check on the turkey and monitor its doneness with a meat thermometer. Carefully lift the foil to insert thermometer into the thickest part of the breast and thigh.
Target safe minimum internal temperatures are:
- 165°F for breast
- 175°F for thighs/legs
Remove foil tent during last 30-60 minutes if skin needs browning.
Removing the Foil Tent for Serving
Be sure to remove any foil covering the turkey before serving. The presentation should showcase the beautifully browned turkey in all its glory.
Let turkey rest for 15-20 minutes before removing foil, allowing juices to absorb back into the meat. Then transfer turkey to a platter for carving.
Foil Tent Tips
-
For easy foil removal, lightly grease roasting pan first so foil doesn’t stick.
-
Use non-stick foil or lightly coat dull side with cooking spray so moisture doesn’t cause sticking.
-
If breast browns too quickly, tent just that portion, leaving drumsticks/thighs uncovered.
-
Add herbs like thyme or rosemary under the tent for extra flavor.
-
Use broth, wine, or cider instead of water in the roasting pan for flavorful turkey juices.
-
Tent turkey evenly by molding foil over the turkey rather than draping flat sheets.
-
Make sure foil tent is loosely sealing pan edges. If tightly sealed, steam can’t escape and skin may not crisp.
-
Double up foil if using thinner foil. You want sturdy, reinforced foil so tent doesn’t collapse.
-
Check occasionally that foil tent hasn’t shifted or fallen onto turkey, which can cause steam burns.
Frequently Asked Questions
Should you bake a turkey covered or uncovered?
Uncovered for the first hour to brown the skin, then covered with a foil tent for remainder of roasting time to keep meat moist.
Can you put stuffing under the turkey skin?
Yes, loosen skin from breast and slide flavorful stuffing underneath to infuse flavor into the meat.
Should you baste a turkey while cooking?
Basting is optional. Some moisture may be lost when opening the oven. Just baste at beginning and end for browning if desired.
How long should you let a turkey rest before carving?
Let it rest at least 15-20 minutes tented in foil after removing from oven. This allows juices to reabsorb.
What is the best way to store leftover turkey?
Remove meat from bones and refrigerate in shallow containers within 2 hours of cooking. Use within 3-4 days.
Conclusion
Tenting your Thanksgiving or holiday turkey with a dome of aluminum foil is an easy trick to keep the meat ridiculously moist and tender. The foil traps in steam and moisture for succulent results.Follow the guideline of tenting for most of the roasting time, then removing foil at the end to crisp the skin. Your entire turkey will turn out incredibly juicy and delicious.
Delicious Tented Turkey Recipes
Here are two fantastic tented turkey recipes to try for your next holiday meal:
Herb-Roasted Turkey
Coat a 12-14 lb turkey with olive oil and poultry seasoning. Fill cavity with onion, celery, thyme and sage. Tent turkey immediately after placing in 300°F oven. Roast about 3 hours until 165°F breast temp.
Cider-Brined Turkey
Submerge turkey in a cider, salt and brown sugar brine for 8-12 hours. Rinse turkey, pat dry and coat with olive oil. Roast uncovered at 425°F for 30 minutes, then lower temp to 350°F. Tent and roast approximately 2 hours more until 175°F thigh temp.
For the juiciest Thanksgiving turkey you’ve ever tasted, try tenting your bird with foil on your next occasion for turkey!

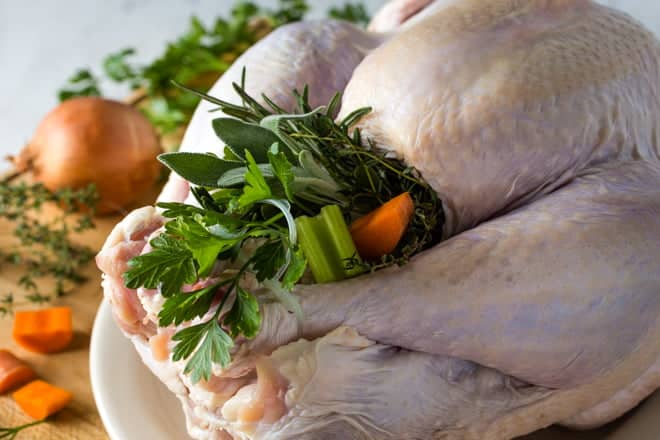
STEP #2 – Stuff The Cavity With Aromatics
Don’t stuff the turkey with stuffing or dressing. I know that to some people this may seem sacrilegious. I understand. But really, don’t stuff the turkey. That makes it take longer to cook, which means the turkey is drier, and it has also been linked to more infections. Instead, you’ve got to try my mom’s stuffing recipe. She bakes it in muffin tins, which makes the portions look so cute. The recipe is classic, and the bread is soft on the inside and slightly crispy on top.
Instead of filling the turkey with stuffing or dressing, you can put some aromatics in there. I really don’t think it’s necessary, especially if you used the dry brine or the very flavorful wet brine I talked about earlier. But if you really want to, you can. Fresh herbs, carrots, onion, celery, orange wedges, lemon wedges, and garlic cloves all work well. You don’t need very much though. It should be really loosely tucked into there. I think for this picture, I had too much. You also don’t really want it sticking out like that. I did that to make the picture look pretty, I think. But, it’s better to have it all tucked in.
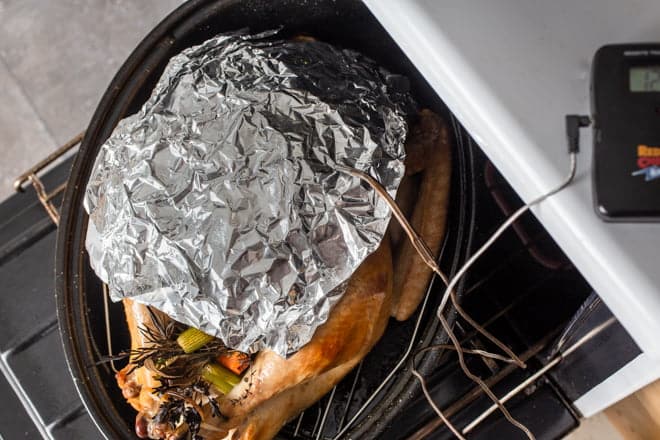
STEP #4: Roast The Turkey
Preheat the oven to 350F. Once it’s ready, put the turkey into a roasting pan and then into the oven. If you have an oven-safe rack that fits into your roasting pan, it’s a good idea to use that since the heat will then circulate more evenly. If you don’t have one, you can use a few uncooked full-sized carrots or celery ribs under the turkey. You won’t be eating them, they’ll just be there to prop the bird up a bit. They will add extra flavor to your gravy though!
If you have an oven-safe probe thermometer, you can use that. Insert it into the breast or the thickest part of the thigh, not touching bone. I don’t use one of these so I’m not really an expert on it. I just use an instant-read thermometer that I poke around with when I think the turkey is nearly ready.