Because it’s made from cured pork shoulder instead of pork belly, cottage bacon tastes different from regular bacon. This creates a leaner bacon with an incredible flavor that is a cross somewhere between ham and bacon. The best part is that it’s fully cooked when it’s done smoking, so you can eat it cold from the fridge or fried in a pan.
I’ve made things other than bacon before, like venison bacon, which is more like sliced sausage than real bacon. However, cottage bacon is much closer to regular bacon, as it is a whole cured meat. It has a noticeably salty flavor, and smoke drenched into each bite.
Cottage bacon also goes by the name, buckboard bacon. You may have also heard of back bacon, which is made with pork loin and is not the same thing. In the United States, back bacon is more commonly known as Canadian bacon.
Shoulder bacon sometimes called cottage bacon or Boston butt bacon comes from the front leg of the hog rather than the belly. This leaner, meatier bacon alternative has a delicious smoky pork flavor that adds savoriness to any dish when cooked right. Follow this guide to master frying, baking, grilling, and more to bring out the best in shoulder bacon.
What is Shoulder Bacon?
Shoulder bacon is cured and smoked pork shoulder. It has a higher meat-to-fat ratio than regular bacon. The meat tends to be leaner but still has plenty of rich, smoked pork essence.
Other names for shoulder bacon include cottage bacon, buckboard bacon, and Boston butt bacon. It’s sold sliced, diced, or in roasts. Opt for good marbling to ensure juiciness. Heritage breed and pasture-raised pork offer premium quality.
Benefits of Cooking with Shoulder Bacon
There are many advantages to using shoulder bacon:
-
Flavor – Deep smoky, savory pork taste even though it’s leaner.
-
Texture – Provides a meaty chew different from belly bacon
-
Versatile – Slices, chunks or roasts allow varied uses.
-
Economical ‒ Uses the whole hog efficiently with less waste.
-
Lean ‒ Has a higher ratio of meat to fat.
-
Cholesterol ‒ Slightly less than regular bacon due to less fat.
This premium bacon alternative brings delicious smokiness without as much grease.
Choosing the Right Shoulder Bacon
Look for these qualities when selecting shoulder bacon:
-
Good marbling for flavor and moisture
-
Pink to deep red color without brown spots
-
Moist appearance without dry edges
-
Minimal enhancement or additives
-
Reputable source like heritage breed or organic
-
Suitable thickness for intended cooking method
Proper selection helps ensure great results.
Preparing Shoulder Bacon for Cooking
Prepping your shoulder bacon correctly is important:
-
Rinse briefly and pat dry to remove excess salt.
-
Neatly trim any unpleasant edges.
-
Cut into desired sizes if cooking chunks.
-
Line pans with foil or parchment paper for easy cleanup.
-
Ensure pans and oil are fully preheated before cooking.
Proper prep sets you up for evenly cooked, great tasting shoulder bacon.
Frying Shoulder Bacon
Pan frying yields crispy, flavorful results:
-
Heat a skillet over medium heat and add just enough oil to coat.
-
Cook slices 2-3 minutes per side until lightly crisped at edges.
-
Transfer to a paper towel-lined plate to absorb grease.
Frying brings out the rich taste and texture of shoulder bacon.
Baking Shoulder Bacon
For convenient, hands-off cooking:
-
Preheat oven to 400°F. Line a baking sheet with foil or parchment paper.
-
Arrange slices in a single layer without overlap.
-
Bake 15-25 minutes, flipping halfway, until desired crispness.
Baking renders fat slowly, leaving bacon evenly cooked.
Grilling Shoulder Bacon
The grill adds irresistible smoky char:
-
Prepare a hot grill or grill pan over direct medium heat.
-
Cook slices 4-5 minutes per side until nicely grill-marked.
-
Move to indirect heat if flare-ups occur.
Grilling imparts fantastic flavor but watch closely to avoid drying.
Broiling Shoulder Bacon
For fast, crispy, hands-free cooking:
-
Place oven rack 4-6 inches under the broiler on high.
-
Line a broiler pan with foil and top with bacon in a single layer.
-
Broil 3-5 minutes until browned, flipping once halfway through.
-
Watch carefully to prevent burning.
Microwaving Shoulder Bacon
For convenience, microwave between paper towels in 30 second bursts until desired crispness is reached. Drain fat between batches. Let stand 1 minute before eating.
Tips for Cooking Shoulder Bacon
-
Use medium or medium-low heat to prevent toughening.
-
Cook times vary based on thickness. Thinner cuts cook faster.
-
Flip frequently while pan frying.
-
Avoid overlapping pieces for even cooking.
-
Fry just until deep golden brown.
-
Pour off excess grease as it renders out.
-
Let bacon rest briefly after cooking.
Proper technique results in tender, flavorful shoulder bacon.
How to Tell When It’s Done
Look for these signs your shoulder bacon is fully cooked:
-
Deep brown color on both sides
-
Crispy, curled edges if pan fried
-
Most of the fat rendered out
-
Bacon aroma
-
Little to no pink color remaining
-
Temperature above 145°F
Serving Suggestions
Incorporate shoulder bacon into:
-
Breakfast dishes like eggs, pancakes, and hashbrowns
-
Hearty salad greens, pasta salads, or potato salads
-
Sandwiches and burgers
-
Soups, stews, beans, risotto, and pasta for smoky depth
-
Brussels sprouts, cabbage, and other roasted veggies
-
Nachos, baked potatoes, dips, and snacks
Shoulder bacon complements both savory and sweet flavors.
Storing and Freezing Shoulder Bacon
-
Refrigerate for up to 1 week sealed in an airtight container. Separate slices with parchment paper.
-
Freeze for 2-3 months wrapped tightly.
-
Reheat gently in a skillet, oven, or microwave before crisping back up.
-
Use within 1-2 days after reheating for best quality.
With its lean meatiness and scrumptious smoky essence, shoulder bacon can elevate all kinds of dishes in delicious new directions. Master quick stovetop frying, hands-off oven baking, flavorful grilling, and more. Cook it carefully to crispy, browned perfection. Then incorporate shoulder bacon into both savory and sweet preparations for incredible richness and porky depth. This flavorful bacon alternative will soon become a kitchen staple.
What do I need?
- Pork Shoulder Roast: Some names for this meat are Boston butt, pork butt roast, picnic roast, and picnic shoulder. You should try to find a roast that doesn’t have any bones in it, but it’s normal for the bone to still be there.
- Prague Powder – Also known as curing salt, Cure #1, or Instacure #1. Specifically, it is 6. 75% sodium nitrite in sodium chloride.
- Salt
- Brown sugar
- Black pepper
- Sweet paprika – Sweet paprika is spicier than traditional paprika. You can use regular paprika with a little cayenne pepper if you can’t find it in your store.
How to prepare the pork shoulder
You will need to break down your pork shoulder a bit to prepare it for curing. Many of the shoulder roasts you buy in the store have already had the fat cap removed. However, as you see in my photo, this isnt always the case. You will need to trim up the thick layer of fat prior to curing the meat.
The next thing you need to do is remove any bone. Most pork shoulder roasts come with bones, but if you can find one without bones, that will make your job easier. Take your time trimming out the bone so you dont mangle the surrounding meat.
Finally, I recommend slicing the roast to be only one-two inches thick, give or take. You want a flatter roast so you can slice it like bacon. See the picture below as an example.
When curing any meat, you will need to use a curing salt such as Prague powder. This salt has sodium nitrite in it as a preservative. This keeps the meat safe to eat and gives cured meats their pink color. However, it is important not to use too much curing salt due to potential adverse health risks.
I use the Equilibrium curing calculations to ensure I am using an appropriate amount of cure. For my recipe, you want to use 1.1 grams of Prague powder per pound of meat. Scale up the cure and seasonings for larger roasts.
Mix together the Prague powder with your salt, pepper, sugar, and paprika. Once it is well-combined use it to fully coat your pork. Dont worry if it looks like you have excess seasoning. As the pork cures, it will give off liquid, and soon, all of the seasonings will stick to the meat.
The pork shoulder and any extra seasoning should be put in a gallon-sized zip lock bag and put in the fridge for 7 to 9 days. Flip the bag over every day to ensure it cures evenly.
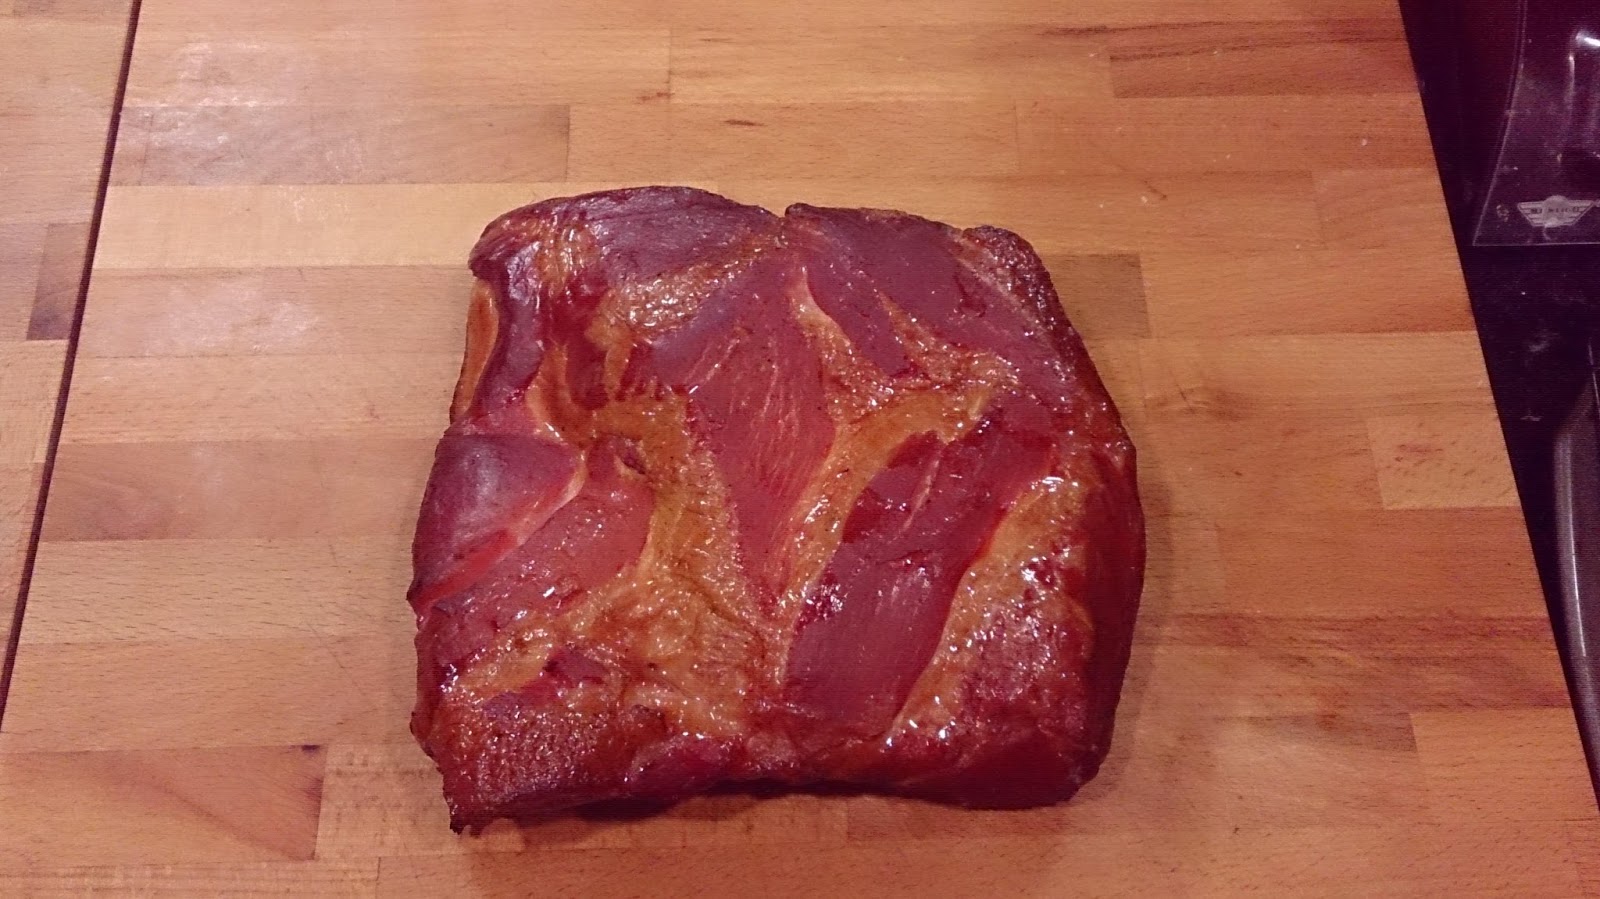
After a week you are ready to make your own homemade cottage bacon. For the seasonings to come off the meat, take your cured pork butt out of the fridge and run water over it all over. Then pat dry with paper towels. Now the flavor will be working its way into the meat, and as you can see in the picture, the meat will be a lot darker.
Now it is ready for smoking. Fire up your smoker to 200 degrees and add your favorite flavor of wood chips. Place the pork roasts in the smoker and smoke for approximately 2 hours, or until the internal temperature reaches 150 degrees. It is important to use a digital thermometer to check this.
At this point, your bacon is fully cooked. Let it cool, then slice it thinly and enjoy. You can slice it will a standard chef knife, but using a deli slicer really makes this easier.