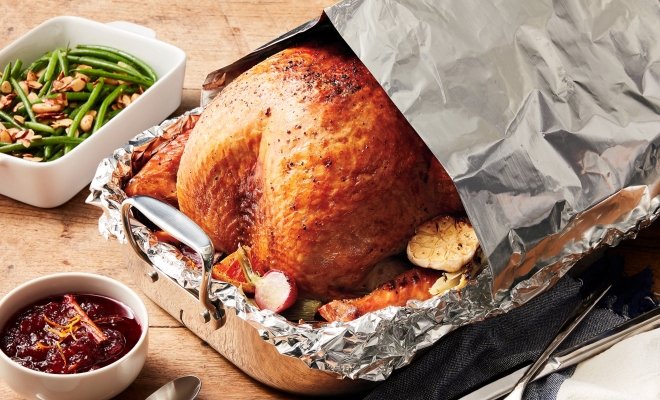
A miraculous way to roast a turkey that uses butter-covered aluminum foil to protect the breast from the high heat while basting it. The foil is removed at the end so that the skin can crisp up. This article also talks about brining and whether or not you should do it. It also has a lot of tips for roasting a turkey perfectly.
You probably know that my parents owned and operated restaurants when I was growing up. What you might not know is that they also did a lot of catering. We estimate that they’ve catered over a thousand turkey dinners, with each dinner requiring numerous turkeys. Their dinners have always gotten great reviews, and now I’m going to show you how my mom roasts a turkey perfectly. We will first talk about what size turkey you need, and then we will talk about how to cook it (basting and crisping the skin with butter!) so that the meat is perfectly cooked and juicy. Even the breast meat is juicy.
As Thanksgiving approaches, home cooks everywhere are gearing up to prepare the centerpiece of the holiday meal – the turkey. But roasting a turkey can be tricky business. With its large size and irregular shape getting perfectly cooked moist and tender turkey is no easy feat.
One of the biggest challenges when roasting a turkey is preventing the breast meat from drying out, while fully cooking the dark meat in the legs and thighs. The breast cooks faster than the legs and thighs due to its location and leaner makeup. So halfway through roasting, you may find the breast meat overcooked and dry, while the legs are still underdone.
This is where tenting the turkey with foil comes in handy. Tenting essentially creates a barrier between the hot oven air and the delicate white breast meat. It allows the turkey to gently roast, without rapidly drying out.
Here’s everything you need to know about tenting your Thanksgiving turkey with foil, including when, why and how to do it
What Does Tenting a Turkey with Foil Do?
Tenting a turkey with aluminum foil slows down cooking, preserves moisture and prevents the breast meat from overcooking and drying out
As the turkey roasts, any exposed areas will brown and crispen from the hot, dry oven air. Areas that are shielded by the foil tent will steam and roast more gently in the trapped moisture and heat.
Foil tents are especially useful for protecting lean breast meat, which dries out easily when roasted uncovered. The legs and thighs have more fat and connective tissue, making them more forgiving during roasting.
When Should You Tent a Turkey with Foil?
For optimal results, tent your turkey with foil about halfway through the estimated roasting time. This gives the breast meat ample time to cook through without drying out.
For example, if your 15 lb turkey needs to roast for about 3 hours total, tent it with foil after 1 1/2 hours.
You’ll know it’s time to tent the turkey when:
- The breast meat springs back when pressed and registers 150°F internally.
- The skin is lightly browned but not too crispy or darkened.
- The legs and thighs are not fully cooked through yet.
Tenting around the halfway point lets the breast finish cooking gently while the legs play catch up in the second half of roasting.
How Should You Tent a Turkey with Foil?
Tenting a turkey is simple:
-
About halfway through estimated roasting time, remove turkey from oven.
-
Cover breast loosely with a sheet of heavy duty aluminum foil.
-
Tuck foil ends under turkey or form into a loose tent shape. The foil should drape gently over the breast without pressing down on it.
-
Return turkey to oven to finish cooking until fully done, about 1 1/2 hours more.
-
For crispy skin, remove foil during last 30-45 mins of roasting.
Make sure the foil tent is loose and doesn’t restrict airflow too much. You still want plenty of hot air circulating to finish cooking the legs and thighs.
For easy foil removal, consider using non-stick foil or spraying regular foil with non-stick spray first.
Should You Tent Just the Breast or the Whole Turkey?
You can tent just the breast meat or the entire turkey with foil. Tenting just the breast is common since the breast dries out faster than the dark meat.
However, tenting the entire turkey helps even out cooking by creating a more enclosed roasting environment. This allows the legs to catch up to the more rapidly cooking breast.
So for best results, loosely tent the entire turkey with foil at the halfway point.
Turkey Roasting Tips for Added Moisture
Along with tenting, here are some additional tips for keeping your Thanksgiving turkey extra moist:
-
Brush with butter or oil: Coating the skin with melted butter or oil helps prevent moisture loss. Reapply halfway through roasting after tenting.
-
Use an oven-safe V-rack: Elevating the turkey on a V-rack increases airflow for more even cooking. Place a rimmed baking sheet on the lower rack to catch drippings.
-
Baste with pan drippings: Baste the turkey with the hot pan drippings every 30 mins. This moisturizes the skin and makes it crispy.
-
Let rest before carving: Letting the turkey rest for 30 mins after roasting allows juices to redistribute and reabsorb into the meat.
-
Cook to proper temperature: Cook until the breast is 160°F and thighs are 175°F for optimal moisture.
Alternatives to Tenting with Foil
If you’re out of foil, you can mimic a tent with other heat-safe cookware:
- An overturned roasting pan placed over the breast
- A large metal mixing bowl inverted on top
- Several layers of cheesecloth draped over the breast
You can also place the turkey breast-side down on a V-rack for the first half of roasting time. Then flip it over to evenly brown and self-baste during the second half.
Get Perfectly Cooked, Juicy Turkey Every Time
Following these foil-tenting techniques helps ensure moist, tender turkey year after year. While your turkey roasts, breathe easy knowing the foil tent has your back against dried-out breast meat.
Focus instead on prepping delicious sides and appetizers so you can relax and fully enjoy time with loved ones this Thanksgiving.

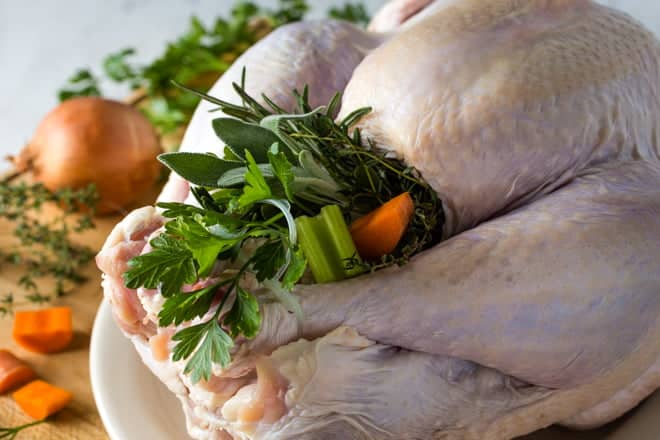
STEP #2 – Stuff The Cavity With Aromatics
Don’t stuff the turkey with stuffing or dressing. I know that to some people this may seem sacrilegious. I understand. But really, don’t stuff the turkey. That makes it take longer to cook, which means the turkey is drier, and it has also been linked to more infections. Instead, you’ve got to try my mom’s stuffing recipe. She bakes it in muffin tins, which makes the portions look so cute. The recipe is classic, and the bread is soft on the inside and slightly crispy on top.
Instead of filling the turkey with stuffing or dressing, you can put some aromatics in there. I really don’t think it’s necessary, especially if you used the dry brine or the very flavorful wet brine I talked about earlier. But if you really want to, you can. Fresh herbs, carrots, onion, celery, orange wedges, lemon wedges, and garlic cloves all work well. You don’t need very much though. It should be really loosely tucked into there. I think for this picture, I had too much. You also don’t really want it sticking out like that. I did that to make the picture look pretty, I think. But, it’s better to have it all tucked in.

Step #3: Season And Butter The Turkey
Next you’ll be seasoning liberally with salt and pepper, all over. But, there’s no seasoning in the below picture because this turkey was brined. If you have brined your turkey, don’t add anything to it here.
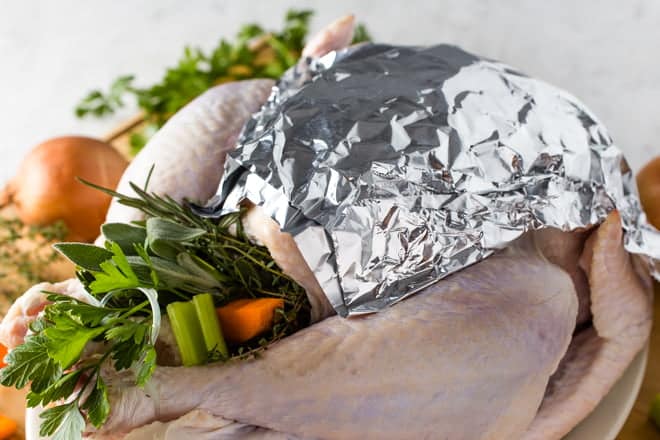
Brined or not, what you’re going to do is to take a big piece of aluminum foil. You’ll want a piece bigger than in the below picture. Let me explain. I forgot how my mom did it when I was taking these pictures. I thought she only put foil over the breast meat. She has since told me that I was wrong. So, get a piece of foil big enough to cover the whole bird. If you need to, you can use two pieces that overlap. Then smear one side of the foil with a lot of softened butter or margarine. You want a good cup (that’s two sticks) of butter spread on there.
Note, I think it’s best to use unsalted butter, especially if you’ve brined the turkey. Or just keep in mind that there’s salt in your butter when you’re seasoning the turkey. You can make the butter taste better before putting it on the foil if you want to take this butter thing to the next level. This is my recipe for Compound Butter for Turkey. Putting it on the foil before roasting is one way to use it, and adding little bits of it to sliced turkey that is already cooked is another way to use it.

Then, take that foil and put it butter side down onto the turkey. Press the foil against the turkey skin so that it’s making contact all over. The breast meat won’t dry out because of this foil, and the tasty butter will stay on the turkey for a lot of the cooking time. It will also drip into the roasting pan, leaving you with tasty baste juices and great drippings for your gravy.
Tent vs. Wrap: Turkey Tips with Reynolds Wrap® Heavy Duty Aluminum Foil
FAQ
Should you tent turkey with foil?
Is it better to cook a turkey covered or uncovered?
Should I cover turkey with foil when resting?
Should I cover my butterball turkey with foil?
How do you cook a Turkey in a foil tent?
MAKE a foil tent by placing a sheet of foil over turkey, leaving 1 inch between top of turkey and foil tent for heat circulation. Crimp foil onto long sides of pan. ROAST turkey until meat thermometer inserted in thickness part of the thigh not touching the bone reads a temperature of 180°F. For approximate roasting times see chart.
Should you tent a Turkey with foil before roasting?
Use a meat thermometer to ensure the turkey breast reaches the recommended internal temperature before removing the foil for the last part of the cooking process. In summary, tenting your turkey with foil is an essential step during roasting to achieve a perfectly cooked bird.
How do you make a Turkey tent?
Fold a large piece of foil in half lengthwise. Place the turkey breast-side up in the center of the foil. Bring the long sides of the foil up over the turkey and crimp to seal. Fold the ends of the foil up to create a tent. 6.
Can you use aluminum foil to tent a Turkey?
While aluminum foil is commonly used for tenting a turkey, you can also use a lid from a roasting pan or a silicone turkey roasting tent specifically designed for this purpose. 10. What if my foil tent sticks to the turkey skin? If the foil tent sticks to the turkey skin when removing it, gently peel it off to avoid tearing the skin.
Do you need a foil for roasting a Turkey?
But if you are roasting the turkey, be it whole turkey, breast, or leg on a regular roasting pan, foil is a good option. Basically the foil works in the same way a lid works—by trapping steam so the turkey stays moist throughout the roasting process. Simply tent the foil so that it loosely covers the whole turkey.
Is foil tenting suitable for roasting Turkey breasts?
Certainly! The foil tenting technique is suitable for roasting turkey breasts as well. Use a meat thermometer to ensure the turkey breast reaches the recommended internal temperature before removing the foil for the last part of the cooking process.
