Last Thanksgiving, I decided that I wanted a heritage turkey. Reading about the selective breeding1 and the bland tasting meat of commercial turkeys compared to wild and heritage turkeys. So, I asked The Fiancé. Prices may vary, but they are such that it is wise to ask your significant other for permission prior to purchase. She said, “yes” because she rocks.
When Thanksgiving morning arrived and my turkey had not, I worried. I called the farmer to ask when I should expect it. She told me, with concern in her voice, that the turkey had already been delivered – FOUR DAYS AGO. Like a condemned man, I went to my apartment building’s front office to ask if they had forgotten any packages for me. I knew my fears were confirmed as I opened the office door – I COULD SMELL IT.
The office smelled like spoiled meat. When the office worker found the package she proclaimed, “I got this a few days ago, I must have forgotten to give you a notice.” In what I think was a steady voice, I said, “That’s my Thanksgiving turkey.” Without missing a beat she replied, “We were wondering what that smell was.” To cap off the comedy2, the management office’s remedy was that they would buy me a new turkey – FOUR DAYS AFTER THANKSGIVING! I told them where they could stuff their turkey.
As a result, I found myself shopping for turkey on Thanksgiving day, without time to thaw a full turkey and cook it before dinner with my future mother-in-law. Clearly, the only thing to do was to make THE BEST TURKEY EVER.
As I studied the turkey thighs I had selected as my whole turkey substitute, I pondered the sense in roasting a turkey. Due to its enormous size, it’s hard not to dry out some of the meat. And it hit me, the braise. The century old technique for softening tough meats to delectable tender goodness. And was it the best turkey ever? Well, the attached recipe is what I did last year and, by request, this is the recipe that we will be doing this year for Thanksgiving.
Those who have followed these posts will not be surprised that I am going to talk about browning…again. I am not going to go into the science of browning again, only emphasize how important it is. If you want to know more about the science of browning, you can learn all about it in this previous post. Are you ready for the emphasizing? I’m going to use italics just to be extra emphatic. Brace yourself.
I don’t really care about the other things, but I am not okay with you serving bland food, so we are going to do some browning. To do this we are going to start by removing the skin from the turkey thighs. In a braise, the skin is not going to contribute and it will block the meat from getting browned in the pan.
“But Ben,” you say, “I love the crispy skin.” Well hold your horse there, Buffalo Bill. We can still make crisp skin. We’re simply going to lay out the skin on a sheet pan, sprinkle it with a bit of salt, and cook it in a 400F oven until browned and crisp (about 30 minutes). There we go, we just made turkey cracklins. Serve that over your finished braise for that crisp brown skin flourish. Now, back to the turkey.
With the skin off, we are going to heat our braiser3 over medium-high heat on the stovetop. Yes, we are using the pan we will eventually braise in. That way, any little bits of food that stick to the pan or browning that forms in the pan will make it into our braising liquids.We sear the turkey thighs on each side until well browned then get them out of the pan. Next we’ll do our vegetables. A quick saute over high heat to develop some browning on the outside. We are not going to eat these vegetables, they are simply providing flavor to our braising liquid. Now that we have a pan chock full of delicious brown flavors, on to the main event: the braise.
The braising technique is a simple one and absolutely ideal for creating tender meat. In its original French iteration, braising was to cook something in a closed pot (a braiser4) surrounded on all sides by hot coals. Now the term means to cook in a closed pot with a small amount of liquid. While braising can be done on the stovetop or in the oven, I prefer to do mine in the oven because the less direct heat reduces the risk of evaporating all off the liquids. For our turkey, we are simply going to add our liquids (cider, stock, and wine) into the pan with our sautéing vegetables, along with the aromatics (herbs and garlic). The turkey thighs are going to nestle right on top, the lid goes on, the whole shebang goes into the oven and physics does the rest.
So the obvious question is, “What is happening in the pot that makes the meat so tender?”
As the pot hits 212F, our liquids are going to start converting into vapor, which will fill our pot. This helps our cooking process because steam is more efficient at transferring energy than air. This means that we are actually cooking our meat faster, even though it is at a lower temperature (212F as opposed to 325F). Don’t believe me? Try this experiment at home: Cut 8 new potatoes of the same size in half. Place 8 halves on a sheet pan in a 325 degree oven and the other 8 in a steamer basket over boiling water with a lid on. Test each for doneness with a skewer at after 5, 8, 10, and 15 minutes. Which finished cooking first?
Here is the surprising part…this actually makes our meat less juicy. Now before you go all Transylvanian torch and pitchfork toting villager on me for drying out your meat, it doesn’t matter if the meat in your braise isn’t juicy. Juiciness is a measure of the water content of the meat. Once the meat is done braising, we stir it through the liquids in the pan, rehydrating it and rejuicifying it. So loosing the juices isn’t really a concern. What we want to focus on is the tenderness, which is a measure of how easily the meat comes apart. Despite what Otis Redding might tell you, holding her and squeezing her is not the best way to get tenderness. The best way, scientifically speaking, is low, prolonged heat. Low, slow heat is the best environment for collagen, the connective tissue that holds meat together, to convert into gelatin. The gelatin will solidify when chilled, which is why leftovers of braises can have a jello-y substance surrounding them, but while hot it will remain liquid. If you have ever been subjected to meat that I think can only be described as crumbly, what you have had is a long cook in a dry oven. The same conversion of collagen to gelatin will occur, only over a longer period of time. However, without the liquids there to rehydrate the meat, you are left with fall apart meat that is extremely dry, much like saw dust.
With our turkey awash in gelatin and swirled through the juices in the pan, we have that perfect meaty combo of tender and juicy and we are ready to serve up some turkey that even the mother-in-law will be impressed by. Happy cooking and a Happy Thanksgiving.
CHEF’S NOTES 1. The turkeys we buy for Thanksgiving cannot naturally procreate anymore – they have to be artificially inseminated. 2. I use comedy here not in the modern ” ha ha, that’s so funny” sense, but I the ancient Greek “how ironic that everyone died horrible, yet fitting deaths” sense. 3. A wide 3-4 inch deep pan with tight-fitting lid. 4. Not to be confused with a brassiere, though I wouldn’t put it past the French to find a way to cook in one of those as well.
Braising is hands down the best way to cook turkey and achieve incredibly moist, fall-off-the-bone meat Unlike roasting, braising keeps the turkey super tender and infuses it with rich, concentrated flavor. If you’ve only ever had dry roasted turkey, trying braised turkey will be a game changer.
Below I’ll explain exactly how to braise a turkey at home Follow these tips and tricks for perfection every time,
Why Braise Turkey?
There are a few key advantages to braising turkey rather than roasting
-
It keeps the meat incredibly moist and tender. Roasting often leads to dried out turkey, especially the breast meat. Braising ensures even the dark meat is succulent and fork tender.
-
You get way more flavor. Braising allows the turkey to absorb all the aromatics from the vegetables, herbs and braising liquid. It’s deeply seasoned in a way roasting can’t match.
-
The skin gets crispy. A common concern about braised turkey is the skin won’t crisp up. But it does! Broiling at the end makes the skin nicely browned and crispy.
-
It’s less finicky. Roasting a whole turkey requires carefully monitoring both white and dark meat. Braising just the leg and thigh portions makes it easier to nail the doneness.
-
You can use the braising liquid for gravy. The flavorful braising liquid provides an easy, deeply savory base for gravy.
How to Choose Turkey for Braising
For braising, select bone-in turkey leg or thigh portions. Thigh meat tends to be a bit juicier, but drumsticks work great too.
You can braise a whole turkey, but braising just parts is much easier for home cooking. Look for turkey legs and thighs at your grocery store meat counter or butcher.
For 4 servings, get around 2 pounds of turkey pieces, or 2 leg quarters cut into thigh and drumstick sections. Make sure the skin is intact for maximum flavor and crispiness.
Aromatics for Braising
Packing the braising liquid with aromatic veggies and herbs is key for amazing flavor. Good options include:
-
Onions – Diced yellow, white or red onions provide sweetness and depth.
-
Mushrooms – Meaty mushrooms like cremini or shiitakes add great umami flavor. Slice them thickly.
-
Carrots – Diced carrots lend natural sweetness and color.
-
Celery – Chopped celery gives an earthy component.
-
Garlic – Mashed garlic cloves provide warmth and fragrance.
-
Herbs – Woody herbs like rosemary, thyme and sage pair wonderfully.
-
Black Pepper – Generously season with cracked black pepper.
For the most flavor, sauté the vegetables first before adding the turkey to brown. Then submerge everything in the braising liquid.
The Braising Liquid
The braising liquid is what makes this dish so succulent and also turns into an incredible gravy. Go with chicken or turkey stock to keep it savory. Adding some wine, like dry white or red, gives nice acidity. Or use just water and wine if you lack stock.
Make sure the turkey pieces are about two-thirds covered in liquid. Bring to a gentle simmer on the stovetop before transferring to a 300°F oven. Maintain a gentle simmer, adding more liquid as needed.
Braising Time
The braising time varies based on size and thickness of the pieces, but plan on:
- Turkey thighs: 60-90 minutes
- Turkey drumsticks: 90-120 minutes
The meat should be fall-apart tender when done. Use an instant read thermometer to confirm it reaches 185°F for perfect thighs and 175°F for drumsticks.
If the turkey seems done early, tent it with foil to keep warm for the full time. This ensures ultra tender, pull-apart meat. The skin will still crisp up nicely under the broiler.
Crisping the Skin
Here’s the brilliant step that makes your braised turkey skin crispy as a roasted bird: broiling!
Once the turkey is fork tender, remove it from the oven and crank the heat to high broil. Return the turkey pieces skin side up and broil 3-5 minutes until the skin bubbles and crisps. Watch closely to avoid burning.
The high heat beautifully crisps the skin without overcooking the already tender meat. Best of both worlds!
Making Turkey Gravy
One of the big perks of braised turkey is it provides an easy base for rich gravy.
After removing the turkey, pour the braising liquid into a saucepan (defat first if desired). Simmer and thicken with cornstarch or flour. For extra richness, brown the drippings first before making the gravy. Season with pepper and fresh herbs.
The flavor can’t be beat compared to plain pan drippings gravy. Deliciously savory and satisfying.
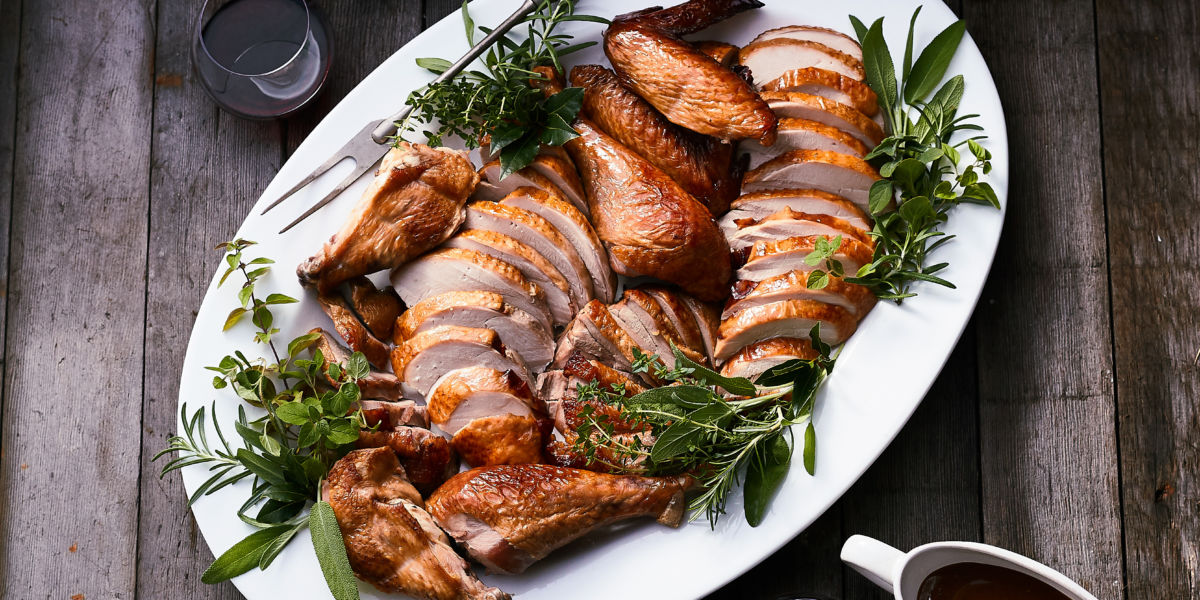
How to Serve Braised Turkey
-
Shred the ultra tender meat right off the bones with two forks.
-
Pour gravy over the top or serve it on the side for dipping.
-
Garnish with chopped fresh parsley or herbs.
-
Serve over mashed potatoes, polenta or egg noodles to soak up the delicious braising sauce.
-
Pair it with simple roasted veggies like Brussels sprouts or broccoli.
-
Toss braised greens in some of the gravy for extra flavor.
With this easy technique, you’ll never go back to dry roasted turkey again. Braising turkey is hands down the most foolproof, flavorful and tender way to enjoy it.
A Public House for Science
In which Items of Interest and Curiosities of Nature are discussed employing the latest techniques in Logic and The Scientific Method for the furtherance of Human Erudition and the promotion of Critical Thought.
How to Cook a Turkey
FAQ
How to braise the turkey?
- Sear the Turkey: Start by browning the turkey breast in a heavy-bottomed pot for a golden crust.
- Build the Braise: Add your apple cider, broth, fresh herbs, and aromatics to the pot.
- Low & Slow: Cover and cook gently in the oven, letting the flavors meld and the turkey become perfectly tender.
What is the best way to cook a turkey without drying it out?
By roasting turkey upside down, the breast meat is protected from the oven’s searing heat by the rest of the bird.
How to braise in the oven?
Add stock or water halfway up the meat you’re braising and bring to a boil, then immediately lower to a simmer. Once it’s simmering, you can add in aromatics. Cover and keep it at a low simmer on the stovetop or in the oven at 350 degrees F. Cooking low and slow breaks down the tough meat so it’s tender and delicious.
How much liquid do you need to braise meat?
Add enough stock, wine, beer, and/or water to partially submerge the meat – about 1/3 to 1/2 of the meat should be under liquid.Jan 21, 2020