You can make tasty meals like tacos, chicken chili, pulled pork, and shredded beef enchiladas with shredded chicken and other cooked meats. When you look at shredded meat recipes, remember that you can use your stand mixer to achieve them. Yes, that versatile mixer is useful for far more than mixing, whisking and baking challenges. Your included beater is the ideal tool for quickly shredding meat into a mouthwatering bowlful. Let’s look at how it’s done, as well as some tips and shredded meat recipe ideas.
Hey there, kitchen warriors! If you’re tired of shredding chicken by hand and getting them sore fingers, I’ve got a game-changer for ya. Ever wondered which KitchenAid attachment for shredding chicken is the real MVP? Well, lemme spill the beans right off the bat: it’s the flat beater, with the flex edge beater as a darn close second. These bad boys can turn your cooked chicken into perfect, fluffy shreds in less than a minute. No more forks, no more mess, just pure shred-tastic magic!
Here at our lil’ kitchen corner we’re all about making your meal prep easier and using a KitchenAid stand mixer to shred chicken is one of them hacks I wish I knew years ago. In this mega guide, I’m gonna walk ya through why these attachments rule, how to use ‘em, and a whole lotta tips to get that shredded chicken just right for tacos, soups, or whatever your heart desires. So, grab a coffee, and let’s dive into this time-saving trick!
Why Shredding Chicken with a KitchenAid is a Total Win
Before we talk about the attachments, let’s talk about why you’d want to shred chicken with a KitchenAid in the first place. I mean, I’m not going to use forks to pull apart hot chicken for 20 minutes when I have a machine that can do it in 30 seconds. Here’s why we’re obsessed with this method .
- Speedy as Heck: Seriously, you can shred a whole pound of chicken in under a minute. That’s faster than I can scroll through my Insta feed.
- Less Mess: No more chicken bits flying everywhere or burning your hands on hot meat. The mixer keeps it contained.
- Perfect Texture: You get them nice, even shreds that look pro-level, whether you’re making enchiladas or a quick salad.
- Hands-Free Vibes: Pop the chicken in, turn on the mixer, and boom—you’re free to chop veggies or sip some wine.
I remember struggling with two forks and a hot pile of chicken, only to end up with uneven pieces and a bad mood. When I found this KitchenAid trick, it was like a light bulb went off. Now, let’s focus on the star of the show: the right attachment.
The Best KitchenAid Attachment for Shredding Chicken: Flat Beater
Alright, let’s cut to the chase. There’s a good chance you already have the flat beater for your KitchenAid stand mixer—it comes with most models. And guess what? It’s the best tool ever for shredding chicken. Here’s why I’m Team Flat Beater all the way:
- Versatility King: This attachment ain’t just for batters and doughs. Its wide, flat surface smashes and pulls apart chicken like a dream.
- Even Shredding: The way it moves in a circular pattern breaks down the meat into uniform bits without turning it into mush.
- KitchenAid Approved: Word on the street (or in my kitchen) is that this is the go-to for shredding proteins. It just works, fam.
Now, don’t get me wrong—there’s a close runner-up, the flex edge beater, which I’ll gab about next. But the flat beater is your ol’ reliable. I’ve used it on everything from chicken breasts to rotisserie birds, and it ain’t let me down yet.
What About the Flex Edge Beater?
If you’ve got the flex edge beater or you’re thinking of snagging one, you’re in for a treat. This bad boy is like the flat beater’s fancy cousin. It’s got a flexible edge that scrapes the sides of the bowl as it goes, which means less chicken sticking and more even shredding. Here’s the lowdown:
- No Stick Zone: That flexible edge keeps the chicken from gunking up on the bowl sides, so you don’t gotta stop and scrape as much.
- Awesome for Big Batches: If you’re shredding a ton of chicken, this one makes sure every piece gets hit.
- Still a Shred Champ: It works just as good as the flat beater for texture, maybe even a tad better if your chicken’s on the moist side.
To be honest, I didn’t have the flex edge for a long time, and the flat beater worked fine for me. I was like, “Dang, this is next-level!” when I tried the flex edge. If you’re not sure which to use, use whatever you have on hand. Both are solid picks for shredding chicken.
Attachments to Skip for Shredding Chicken
Now, let’s talk about what not to use. I’ve seen folks try other KitchenAid attachments and end up with a hot mess (literally). Here’s the ones to steer clear of when you’re shredding chicken:
- Wire Whip: This one’s too aggressive, y’all. It’s meant for whipping cream or egg whites, not meat. You’ll end up with a weird, mushy paste instead of nice shreds. Ain’t nobody got time for that.
- Dough Hook: Nah, this chunky tool is for kneading bread, not shredding. It’ll just mash your chicken into uneven globs. Hard pass.
- Meat Grinder: Don’t even think about it. This attachment is for raw meat grinding, not cooked chicken. You’ll get a gross, pasty mess. Keep it for burger prep instead.
I made the mistake of trying the wire whip once, thinking it might work in a pinch. Big nope! My chicken turned into something that looked like baby food. Stick with the flat beater or flex edge, and you’ll be golden.
How to Shred Chicken with Your KitchenAid: Step-by-Step
Alrighty, now that you know which KitchenAid attachment for shredding chicken is the best, let’s walk through how to do it. It’s super easy, but there’s a few tricks to make sure you nail it every time. Grab your mixer, and let’s get to work!
What You’ll Need
- Cooked chicken (boneless and skinless works best, but any cut will do)
- KitchenAid stand mixer
- Flat beater or flex edge beater attachment
- Maybe a spatula (if you’re using the flat beater and need to scrape)
Steps to Shred Like a Pro
- Cook Your Chicken First: Make sure your chicken is fully cooked—whether you baked, poached, grilled, or snagged a rotisserie bird from the store. I usually bake mine with a lil’ salt and pepper for flavor.
- Let It Cool a Bit: Hot chicken shreds easier, but don’t burn yourself. Let it sit for a couple minutes after cooking. If it’s cold from the fridge, warm it up in the microwave for a quick sec.
- Chop It Into Chunks: If your chicken pieces are huge, like a whole breast, cut ‘em into smaller 2-3 inch bits. This makes shredding smoother and don’t stress your mixer out.
- Set Up Your Mixer: Pop on that flat beater or flex edge beater. Make sure your mixer’s locked and ready to roll.
- Add Chicken to the Bowl: Toss in your chicken, but don’t overfill. Work in batches if you’ve got a lot. Crowding the bowl messes up the shredding.
- Start on Low Speed: Set your mixer to a low setting, like speed 2 or 4. High speeds can turn your chicken into goo, so start slow. You can bump it up a notch if needed, but don’t go past speed 6 or you’ll have chicken confetti all over your kitchen.
- Shred for 30-60 Seconds: Let it run for about half a minute to a full minute, depending on how fine you want them shreds. Keep an eye on it—stop when it looks just right.
- Check and Scrape if Needed: If some chicken sticks to the sides (especially with the flat beater), stop the mixer and scrape it down with a spatula. Give it another quick whirl if needed.
- Use or Store: Boom, you’re done! Use that shredded chicken right away in your fave recipe, or store it in the fridge for later.
I’ve shredded pounds of chicken this way for big family dinners, and it’s always a breeze. Takes me less time than it does to argue with my kid over what’s for dinner!
Tips for the Best Shredded Chicken with KitchenAid
To make sure your shredding game is on point, here’s some extra nuggets of wisdom I’ve picked up over the years. These lil’ tips can save you from dry chicken or a stuck-up mixer bowl.
- Warm Chicken is Your Friend: Like I said earlier, warm chicken shreds way better than cold. If it’s straight from the fridge, zap it for 20-30 seconds in the microwave to loosen it up.
- Don’t Overcook Beforehand: If your chicken’s overcooked, it’ll be dry as heck after shredding. Cook it just till it’s done, and if it feels dry, toss in a splash of broth to moisten it up.
- Work in Small Batches: Don’t jam-pack the bowl. Shredding a little at a time gets you even results. I learned this the hard way when I tried to shred three breasts at once—total disaster.
- Season Before or After: You can add spices like garlic powder or paprika before shredding for extra flavor, but hold off on sauces till after. Saucy chicken splatters everywhere during mixing, trust me.
- Watch That Speed: Keep it low, around 2-4. I’ve gone too fast before and ended up with chicken puree. Not cute.
- Clean Up Quick: Once you’re done, rinse off that beater right away. Chicken bits dry fast and stick like glue if you wait.
One time, I forgot to cut my chicken into smaller pieces, and my mixer was struggling like a tired old horse. Lesson learned—chop first, shred second!
Why Does My Shredded Chicken Look Weird? Troubleshooting
Sometimes, even with the right KitchenAid attachment for shredding chicken, things go a bit wonky. Don’t sweat it—here’s how to fix common oopsies.
- Chicken’s Too Dry: If it’s crumbly or tough, you mighta cooked it too long. Next time, check it sooner, or add a spoonful of chicken broth after shredding to bring back some juiciness.
- Chicken’s Mushy: Sounds like you over-shredded. Keep the speed low and time short—30 seconds is often plenty. Check it early to avoid going too far.
- Sticking to the Bowl: If bits are clinging to the sides, stop and scrape with a spatula. Or, if you’ve got the flex edge beater, let that baby do the work for ya.
- Uneven Shreds: Probably overcrowded the bowl. Do smaller batches, and make sure pieces are roughly the same size before you start.
I’ve had my fair share of shredding fails, like the time I turned my chicken into a paste ‘cause I got distracted by my dog barking. Stay focused, and you’ll be fine!
What to Make with Shredded Chicken: Recipe Inspo
Now that you’ve got a pile of perfectly shredded chicken thanks to your KitchenAid, what’s next? Oh, the possibilities are endless, my friend. Here’s a few ideas to get your taste buds tingling:
- Taco Night: Mix that chicken with some taco seasoning and lime juice, then stuff it into tortillas with salsa and avocado. Easiest dinner ever.
- Chicken Salad: Toss it with mayo, celery, and a pinch of salt for a quick lunch sammich. I like adding grapes for a sweet kick.
- Enchilada Magic: Roll your shredded chicken in tortillas, smother with enchilada sauce and cheese, then bake till bubbly. My fam goes nuts for this.
- Soup or Chili: Throw it into a pot with broth, beans, and veggies for a hearty meal. Perfect for them chilly nights.
- Quesadillas: Layer it with cheese between tortillas and grill. Dip in sour cream or guac for extra yum.
I could go on forever, but you get the idea. Shredded chicken is like the Swiss Army knife of ingredients—it fits into dang near anything!
Quick Comparison Table: Flat Beater vs. Flex Edge Beater
Just to make things crystal clear, here’s a lil’ table comparing the two best attachments for shredding chicken with your KitchenAid.
| Feature | Flat Beater | Flex Edge Beater |
|---|---|---|
| Availability | Comes with most mixers | Might need to buy separate |
| Shredding Power | Excellent, even texture | Excellent, slightly more consistent |
| Bowl Scraping | Needs manual scraping sometimes | Scrapes sides automatically |
| Best For | Everyday use, small to medium batches | Larger batches, less cleanup |
| Price | Usually included | Might cost extra |
Both are awesome, but if you’re picking one to invest in, I’d say grab the flex edge if you hate scraping bowls like I do!
Can You Shred Other Meats with a KitchenAid?
Heck yeah, you can! The same attachments—flat beater or flex edge—work wonders on other cooked meats too. I’ve shredded pork for pulled pork sammiches, beef for barbecue sliders, and even turkey after Thanksgiving. The trick is the same: cook it, cool it a tad, cut into chunks, and shred on low speed. Just make sure there’s no bones in there, ‘cause that’ll wreck your mixer faster than you can say “oops.”
One Thanksgiving, I shredded a whole turkey breast this way, and it was a total crowd-pleaser. Saved me hours of hand-pulling, and the texture was spot-on for leftovers.
Storing Your Shredded Chicken Like a Boss
If you’ve made more chicken than you can eat in one go (guilty as charged), storing it right is key. Here’s how we do it at my house:
- Fridge It: Pop your shredded chicken into an airtight container and store in the fridge for 3-4 days. I use glass containers ‘cause they don’t soak up smells.
- Freeze It: For longer storage, toss it into freezer bags or containers. Flatten the bags so it thaws quicker later. It’ll keep for a couple months this way.
- Reheat Smart: When you’re ready to use it, thaw in the fridge overnight if frozen, then warm it up with a lil’ broth or water to keep it moist.
I’ve got a stash of shredded chicken in my freezer right now, ready for them lazy days when cooking feels like a chore. It’s a lifesaver!
Why KitchenAid is My Ride-or-Die Kitchen Buddy
I gotta give a shoutout to KitchenAid for making kitchen life so much easier. These stand mixers ain’t just for baking cookies or whipping cream—they’re beasts at tasks like shredding chicken. Whether you’ve got a basic model or a fancy one, with the right attachment, you’re set to tackle a ton of recipes without breaking a sweat.
I remember saving up for my first KitchenAid, thinking it was just gonna be a pretty countertop decoration. Boy, was I wrong! It’s been my go-to for everything from bread dough to shredded meats, and I ain’t looking back.
Wrapping Up: Shred Smart with KitchenAid
So, to answer that burning question—which KitchenAid attachment for shredding chicken?—it’s hands-down the flat beater, with the flex edge beater as a stellar alternative if you’ve got it. These tools turn a tedious chore into a quick, painless task, leaving you with perfect shredded chicken for all your culinary adventures.
We’ve covered the how-to, the tips, the troubleshooting, and even some yummy ideas to use your chicken in. Whether you’re a busy parent, a meal prep fanatic, or just someone who hates shredding by hand (hi, me!), this KitchenAid hack is gonna change your game. So, dust off that mixer, slap on the right attachment, and get shredding. You’ll thank me later when you’re chowing down on the easiest tacos ever!
Got any shredding stories or recipes of your own? Drop ‘em below—I’m always down to swap kitchen tricks with y’all. Let’s keep the good eats rollin’!
Shred pork or beef in your stand mixer too
Perhaps all this talk of shredding has got you craving a pork shoulder. Or perhaps you’re making ravioli and need a pile of juicy shreds of beef. This simple way to shred chicken in a mixer can equally be used to shred other cooked meats too. Just put the warm meat that has been skinned and bones taken out in the mixer bowl and turn it on low speed to shred it into the right texture. No manual work and no forks needed. It’s a cinch.
How to shred chicken in a stand mixer… like magic
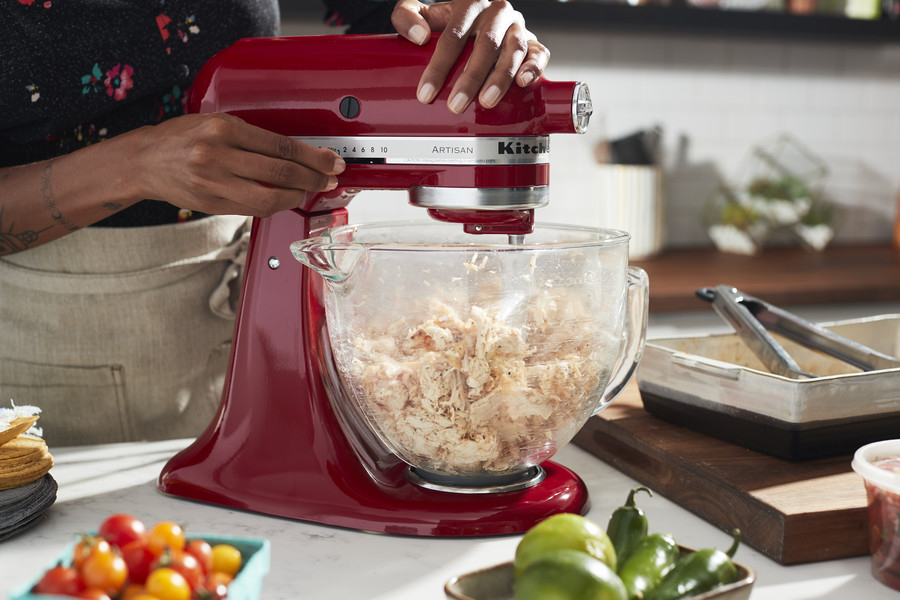
Beautifully shredded chicken is just 3 steps away with your KitchenAid stand mixer. Choose your preferred method to cook the meat, whether it’s pan poaching, baking or grilling — you can read more about the methods of cooking meat for shredding further down the page. You’ll want cooked, boneless and skinless chicken. For best results, shred the chicken while it’s still warm, so that it’s soft (warm in the stove or microwave if necessary).
Follow these simple steps to make delicious, cooked chicken ready for your chosen meal:
Ingredients: Cooked, boneless and skinless chicken Seasonings and spices (optional)
Tools: KitchenAid mixer (with flat beater or pastry beater accessory)
Time: About 3 minutes
Yield: Approximately 450 g of chicken will give you 4 servings per main course meal.
Step 1. Get your mixer ready. Attach the flat beater or pastry beater (also known as a paddle) to the shaft of your KitchenAid mixer.
Step 2. Add chicken – Place your warm, boneless and skinless chicken into the mixing bowl. Separate into several batches if you are doing it in bulk.
Step 3. Mix at low speed – Set your stand mixer on a low power setting and mix for 30 seconds to 1 minute – depending on the quantity.
That’s it! Now it’s time to enjoy your shredded chicken or add it to your favourite recipe. If you’ve made more shredded chicken than you and your guests can possibly eat during one sitting, you can cover and store the shredded chicken in the fridge to enjoy later.
$20 Chicken Shredder vs $500 Kitchenaid Mixer for shredding chicken | Honest Review!
FAQ
What attachment to use on KitchenAid to shred chicken?
Your included beater is the ideal tool for quickly shredding meat into a mouthwatering bowlful.
Which KitchenAid attachment is for shredding?
The KitchenAid® Fresh Prep Slicer/Shredder attaches to the power hub of your KitchenAid® Stand Mixer* and uses the power of the mixer to help you process ….