An important part of the incubation process is making chicken eggs sweet. It lets you keep an eye on how the embryo grows and spot any problems that might happen. If you want to know when the best time is to candle eggs, read this whole guide. It has everything you need to know about it, including when you should do it.
What is Egg Candling?
Candling is the process of shining a bright light through an egg shell to see inside it. It illuminates the embryo blood vessels and air sac so you can assess development.
In the past, candlelight was used, which is where the name comes from. These days, an LED flashlight or a light made just for candling works much better. The light shines through the shell and casts shadows that show what’s inside.
Candling allows you to identify
- Fertile vs. infertile eggs
- Normal vs. abnormal embryo growth
- Quitter embryos that stopped developing
- Cracked eggs to remove from incubation
Without candling, you won’t know what’s happening until hatch day.
When Should You Candle Chicken Eggs?
Most experts recommend candling chicken eggs twice during the 21-day incubation period:
First Candling: Days 7-10
Between days 7 and 10 of incubation, the first candling session should happen. In this way, you can see early signs that the embryo is growing normally.
Look for:
- Small dark spot (embryo)
- Spider-like red veins around the embryo
- Small air sac at the broad end of the egg
You may even see some movement! But not all embryos will be visible at this stage based on positioning.
If you don’t see any veins or embryo, the egg is likely infertile. Remove these so they don’t rot and explode.
Second Candling: Days 14-17
The second candling gives you another progress check around day 14-17. A healthy embryo should now fill most of the egg.
Look for:
- Larger darkened area (embryo fully formed)
- Less light shining through
- Continued movement
If the egg still looks clear with no change from the first candling, the embryo likely died and the egg should be removed.
Avoid Early and Late Candling
It’s best not to candle too early or late in incubation:
- Days 1-6: Embryo is too small to see well
- Day 18 onwards: Chick is positioning itself to hatch
The first and last few days carry the highest risk of disrupting development when handled.
Step-by-Step Egg Candling Process
Candling chicken eggs is easy to do at home following these steps:
Choose Your Light Source
- A narrow beam LED flashlight works perfectly.
- Or use a purpose-built candling light if you prefer. Just avoid bulbs that emit heat.
Work in a Dark Room
- Candling is easiest in a dark room so the light shines through the egg clearly.
Hold the Narrow End Against the Light
- Place the pointed end of the egg gently on the light source.
Rotate and Observe
- Slowly rotate the egg while watching for signs of development on all sides.
- Mark eggs with a pencil so you can track changes between sessions.
Limit Candling Time
- Spend no more than 5 minutes examining eggs to avoid temperature changes.
- Never candle right after taking eggs out of the incubator – let them rest first.
Follow these candling steps carefully to avoid harming the embryos. Patience and practice will make you an expert in no time!
What to Look for When Candling Chicken Eggs
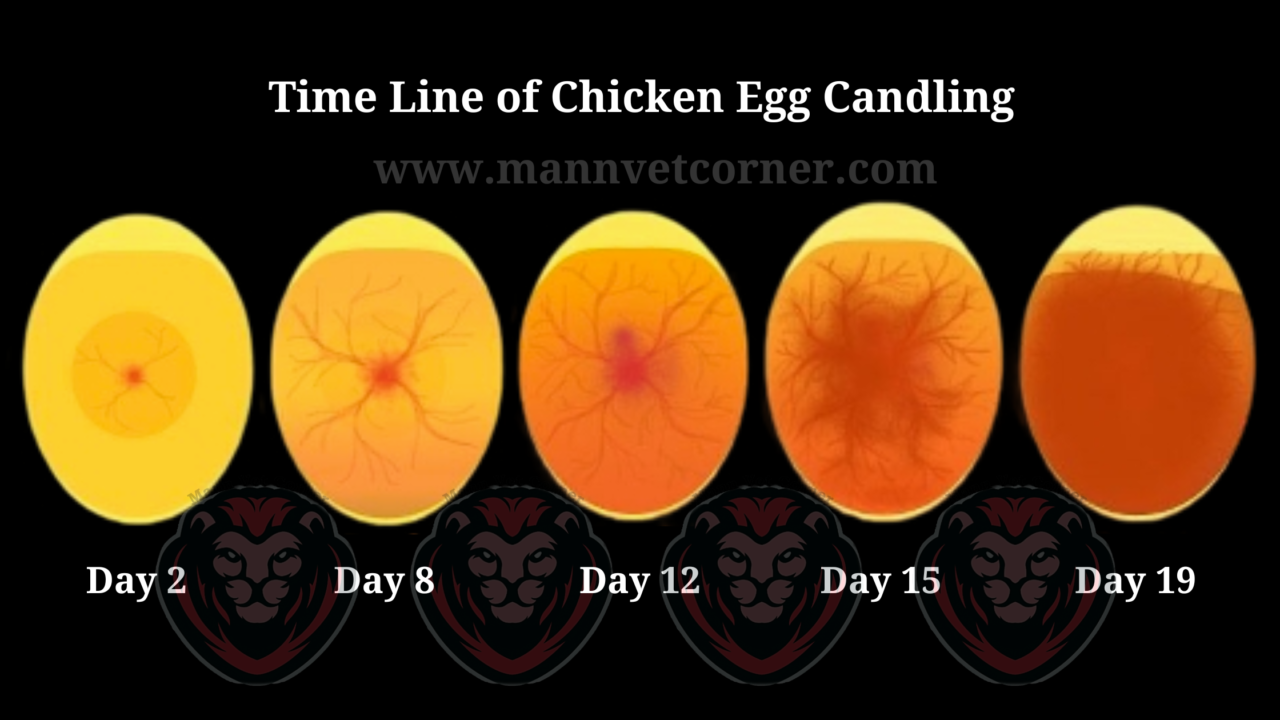
Here’s a handy visual guide to what you should see at different candling stages:
Day 7 Fertile Egg: Small dark spot (embryo) with spider-like veins and air sac visible.
Day 7 Infertile Egg: No veins or embryo, just the shadow of the yolk.
Day 14 Fertile Egg: Larger darkened area filling the egg and less light passing through.
Day 14 Infertile/Quitter Egg: Still clear with no change from Day 7 candling.
Once you’ve candled a few times, it gets much easier to quickly identify fertile developing eggs versus problem eggs.
Tips for Successful Egg Candling
Follow these tips for the best candling results:
- Handle eggs gently and limit time out of the incubator.
- Only candle after eggs have rested at room temperature for 15-30 minutes.
- Mark each egg with a pencil to track changes between sessions.
- Work quickly in a warm, draft-free, dark room.
- Practice candling store-bought eggs first to sharpen your skills.
- Don’t assist hatching if you see signs of life while candling.
Take it slow and you’ll be an expert in no time. Candling is a crucial step for a successful hatch!
Frequently Asked Candling Questions
Here are answers to some common questions about egg candling:
How often should you candle eggs?
Twice is ideal – first between days 7-10 and again on days 14-17. Avoid candling too early or late.
Can you tell if an egg is fertile before incubating?
No, there’s no reliable way to tell if an egg is fertile before incubation starts. Candling lets you know once embryonic growth begins.
What happens if you don’t candle the eggs? You won’t be able to tell which eggs are clear and infertile so you can get rid of them or keep an eye on their growth. Undetected problems could negatively impact hatch rates.
Can candling harm embryo development?
Not if done correctly for brief periods at the right times. Limit handling, maintain temperature, and follow the candling best practices outlined above.
The Takeaway on Candling Chicken Eggs
Candling is a must for anyone incubating chicken eggs! While it takes some practice, it’s an easy skill to master.
For the best results, candle eggs twice: between days 7-10 and again on days 14-17. Look for the embryo, blood vessels, and air sac to assess normal growth.
Candling will boost your hatching success and is fascinating to see the chicks developing inside their shells. Just be sure to follow the guidelines in this article to keep your embryos safe.
Beginners candling eggs FAQ’s
Egg candling is when we shine a bright light into an egg to see inside it. During incubation, candling an egg lets you see the embryo growing inside the shell and gets rid of eggs that won’t hatch.
Commercially, this enables egg packers to remove eggs with hairline cracks, blood-spots, or other undesirable contents.
The term ‘egg candling’ comes from the past before electric light bulbs when people used candles for light. Poultry breeders would place a candle inside a wooden box and cut a hole big enough to allow light to shine through the egg but small enough to stop the egg from falling into the box.
Candling does not damage the embryos inside the egg, providing you maintain the temperature of the egg.
Don’t keep eggs out of the incubator longer than they need to be, and if you use an egg candler with a bulb, don’t heat the egg too much. Modern LED versions do not give off heat and are a better option.
Egg candlers can be mains powered or battery operated. The first one looks like a torch and has a rubber seal around the end. The second one is a tabletop unit with a spot for the egg.
To be honest, a small ultra-bright torch is all you need, you can use your hand between the egg and torch to make a good seal.
Most candlers today use light-emitting diodes (LED’s) rather than electric bulbs. The advantage of LED is that it produces a bright white light without much heat.
I have tested several egg candlers, and in summary, I would not waste money on some of the cheap imported versions. The seal between the light source and the egg is not as good and doesn’t last. The LED is not usually very bright.
There are two egg candling devices I recommend and use regularly:
- This ultra bright, LED Torch. Normal LED flashlights with batteries get dim over time. This one, on the other hand, can be charged and topped off every so often to keep it super bright.
- This ultra bright Titan Egg Candling device. This one is nice because you don’t have to hold it. You can put an egg on top of it while it’s sitting on a surface.
Some large eggs can have more than one yolk. Double yolk eggs (or “double yolkers” as they are sometimes called) are the most common.
Double yolk eggs rarely hatch since the space and resources inside the egg are limited. If they do hatch, one or both can be deformed or much smaller.
When a chick hatches, it needs to rotate inside the shell to break free from its shell, which becomes almost impossible when there are two chicks inside an egg. There are some success stories, and they almost always need assistance in hatching.
As well as checking egg viability, candling eggs can free up space in your incubator. If you use a separate hatcher for the last few days of incubation (I find this is easier to clean), you can keep your incubator topped up with more eggs!
How can you tell an egg is fertile?
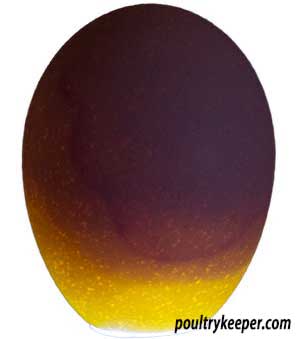
After a week of incubation, if an egg is fertile, you will see the embryo starting to develop as a dark spot with spider-like veins stretching out around it. Sometimes it isn’t possible to observe the embryo if it’s in the centre of the egg or if the eggshell is thick or a darker colour.
If an egg is infertile, you will only see the yolk’s shadow inside the egg without the embryo or veins. We sometimes call this a “clear” egg.
There are four distinct periods of incubation when embryos can die, and I provide common reasons for these losses in my incubation troubleshooting guide.
For the 7 and 14 days candling eggs photos I show in this guide (to remove non-viable eggs), and a successful hatch, we only really need to consider two high-risk periods for embryo death: At the beginning of incubation and just before the chicks hatch. Remember to expect some losses, on average; commercial hatcheries have 85% of their fertile eggs hatching.
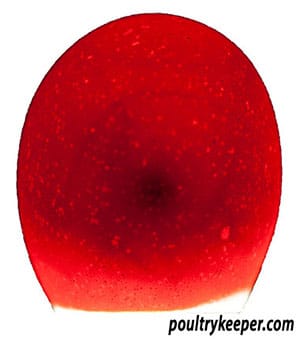
We expect to see either fertile eggs or clear eggs, as shown in our first candling after seven days, but occasionally the embryo starts to develop in a fertile egg and then dies. We call this “early embryonic death” or sometimes just “early death”.
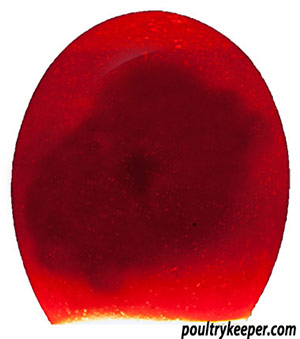
A thin ring around the inside of the egg indicates an early death. The embryo died at the start of incubation, usually within a couple of hours. These eggs are easy to identify and remove, and I have included a photo below.
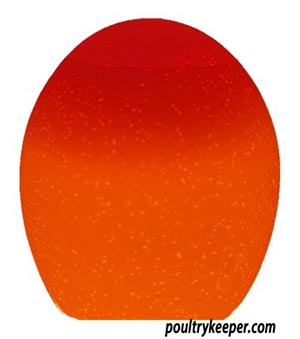
The second common type of early embryonic death occurs when the embryo starts to develop and dies within the first week. We call these slightly later embryo deaths “quitters“. Eventually, the rest of the contents of the egg will become cloudy as the egg deteriorates. You can see this in the second photo below. The contents may swish around when rotating the shell.
There are more candling photos in the gallery at the end of this article.