As a backyard chicken keeper, knowing when to candle eggs is an important part of monitoring your hatch. Candling allows you to peek inside the egg and check on chick development without cracking the shell. But when is the best time to candle chicken eggs? In this article we’ll cover everything you need to know about egg candling so you can confidently candle your eggs.
What is Egg Candling?
Candling is a simple technique used to determine if an egg is fertile and the embryo is developing properly It involves shining a bright light through the egg shell to see the contents inside The name comes from the old practice of using a candle for the light source, but a flashlight works just as well.
Candling allows you to identify clear infertile eggs early on see the growth of the chick embryo, detect problems or ceased development, and overall monitor the progress. This helps ensure healthy chicks and hatch rates. It’s a must for any backyard chicken keeper incubating eggs.
When Should You Candle Chicken Eggs?
Most experts recommend candling chicken eggs twice during the 21-day incubation period:
First Candling: Days 7-10
The first candling should occur between days 7-10 of incubation. This first peek inside the egg allows you to identify clear, infertile eggs.
In a fertile egg at this stage, you should see:
- A small dark spot (the embryo)
- Red spider-like veins radiating out
- A clear air sac at the broad end
If you don’t see these signs of development, the egg is likely infertile. Remove these so they don’t rot and damage other eggs.
By now, you might even be able to see the embryo moving! This is a big step forward!
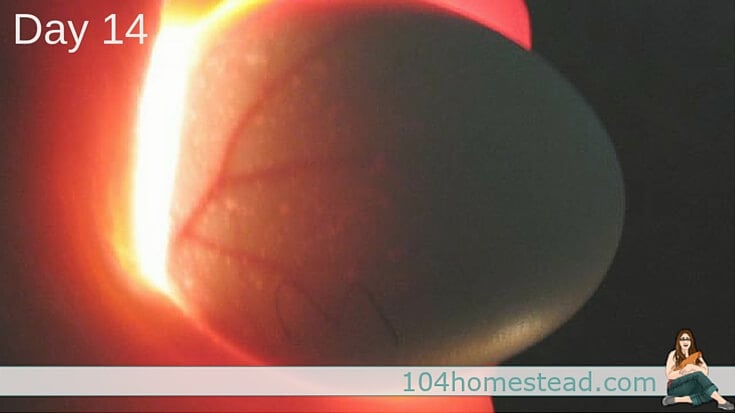
Second Candling: Days 14-18
The second candling session should happen between days 14-18. Now over halfway through incubation, a healthy embryo should take up most of the egg.
Look for:
- A large dark shadow filling most of the egg
- Decreased light penetration
- Obvious chick movement
If it still appears mostly clear or unchanged from the first candling, the embryo likely stopped developing and the egg should be removed.
Step-by-Step Egg Candling Process
Candling chicken eggs is simple and fast with just a few supplies. Here is a step-by-step overview:
Supplies Needed
- Eggs to be candled
- Bright flashlight
- Dark room
- Paper and pen (optional)
Process
- Wash hands before and after handling eggs
- Set up in a dark room and have eggs at room temperature
- Gently press narrow end of egg against the flashlight light
- Slowly rotate egg while looking for signs of development
- Mark results on paper if desired
- Work quickly and return eggs to incubator immediately
The darkness makes it possible for the light to shine through the shell. Slow down and turn the egg all the way around to get the best view of what’s inside.
Marking down results can help you track changes between the first and second candling. But work quickly to maintain proper temperature and humidity levels in the incubator.
What to Look for When Candling
Here’s what to look for when you shine the light through those eggs:
Infertile eggs: Will look completely clear inside with no veins or dark spots. The light passes through clearly.
When you first look at fertile eggs, you should see a small dark spot that is the embryo. It should have red veins that look like spider webs going out from it. A healthy air sac will also be visible.
Developing embryos: As incubation progresses, the dark mass inside will get larger as the chick develops, and light penetration will decrease. You’ll see definite movement and a very dark interior by days 14-18.
No change from the first candling: If there is no growth or movement, it could mean that the embryo has stopped developing and the egg needs to be taken out.
Other Candling Tips
- Numbering eggs can help track changes between candling sessions
- Work in a draft-free room to maintain incubator conditions
- Limit candling sessions to just a few minutes
- Remove any eggs that appear abnormal or unchanged
When Should You NOT Candle Eggs?
While candling provides valuable insights into what’s happening inside the egg, there are a few times when it should be avoided:
- After day 18 of incubation – The air cell shrinks and movement can be harmed
- 3 days before hatching – Chicks are too large and in position to pip
- Temperatures below 70°F – Candling should only be done with eggs at room temp
Candling too late can disrupt the hatching process since the chick is fully developed and in position. Avoid candling in cool temperatures which can shock the embryo.
Other than these sensitive times, candling aligned with the schedule above will allow you to monitor development without harming the chick.
Candling Tips for Successful Hatching
Here are some key tips to make candling easy and effective:
- Use a quality egg incubator with an automatic turner
- Allow eggs to rest at room temp for 1-2 hours before candling
- Work in a warm, draft-free room to maintain temp
- Sanitize hands before and after handling eggs
- Gently return eggs immediately after candling
- Mark eggs with pencil – avoid ink near embryos
- Remove any eggs that appear abnormal or cease growing
Following best practices for hygiene, temperature regulation, and tracking results will give you the best possible hatch.
Candling is a must-have tool for monitoring chick development and identifying issues. By candling twice, around days 7-10 and 14-18 of incubation, you can remove infertile and non-viable eggs and ensure higher hatch rates.
Candling may seem tricky at first, but gets easier with practice. Just remember to work quickly, maintain proper conditions, and avoid candling late in incubation or near the hatch date. With the right schedule and technique, you’ll gain invaluable insight into the magical process happening inside those fragile eggs.
The final days to hatching
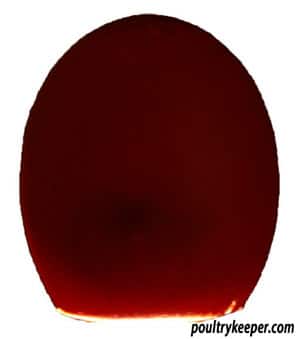
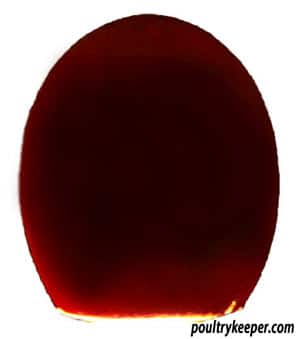
In the end, the chick will take up almost all of the space inside the egg, and the air sac will get even bigger (see pictures below). When it finally hatches, it will break through the inner membrane into the air sac to take its first breaths of air. It will crack/push through the shell with its egg tooth (attached to the end of the beak). The eggshell hole allows further oxygen into the air sac so the chick can continue to breathe.
Over the final 24 hours, the chick absorbs the remainder of the yolk sack, and this will give it enough energy to turn inside the shell and slowly break from the shell as it goes. It will then use its feet to push itself out.
I think the only reason to candlare eggs in the last few days is to check the size of the air sacs, as I already said. You won’t see much else. The chick almost fills the shell.
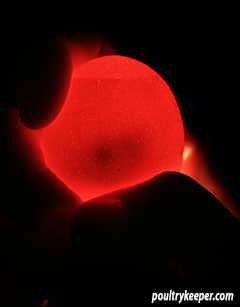
If you are on a budget, you could build an egg candler. Place a desk lamp (using a bright low energy light bulb) inside a cardboard box. Cut a small, round hole in the top of the box, just big enough for the pointed end of your egg. Alternatively, modern LED torches that do not give off much heat are also an excellent light source for candling eggs. I used a flashlight and my hand to seal the egg for the picture, and I could still see the embryo!
One way to confirm the humidity of your incubator is correct is to monitor the air-sac size. The s below show you the relative air sac sizes at different incubation stages for chicken and duck eggs.
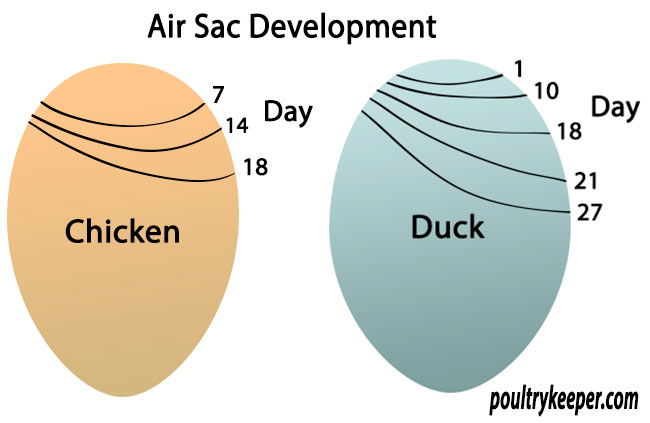
- Compare these to your eggs during candling.
- Use a soft pencil to mark your eggs so you can keep track of your progress.
- The humidity in the incubator is too high if the air bag is too small. It’s too dry in your incubator if the air bag is too big.
Video: candling eggs at day 14
You can candle again after 14 days but not after you’ve stopped turning your eggs during the last few days before they hatch. We finish rotating chicken eggs at 18 days and duck eggs at 25 days. After this time, the chick is positioning itself, ready to emerge.
Some books suggest candling eggs at 18 days; however, I don’t usually look at them again after 14 days. You can’t see much other than the increasing air sac size, and the egg is full up with a chick!
The exception to this is if I have hatching problems that I suspect are caused by incorrect incubation humidity, then I will mark the size of the air sac onto the eggshell using a soft pencil and compare it with a known good egg. More information is coming up below on air sac development, where I have included a handy chart.
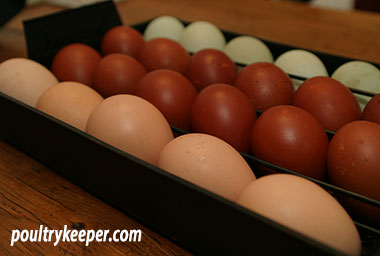
Dark shelled eggs (Such as Marans or Welsummer Eggs) are much harder to see through, so you will need the brightest light source you can get.
One idea is to practice candling light eggs first or incubate with lighter coloured eggs, and then you have a comparison.
You will need to candle in a dark room to stand a chance. If you still can’t tell, you will have to wait longer until the embryo has developed further.
When to Candle Chicken Eggs | What is a Red Ring?
FAQ
How soon can you candle an egg?
Is 75% humidity too high for hatching eggs?
Ideal Humidity Ranges for Different Eggs Chicken eggs: 35-55% during incubation, 65-75% during hatching. Duck eggs: 50-60% during incubation, 65-80% during hatching. Reptile eggs: Varies depending on the species, but generally between 60-70% is common.
Can I candle eggs on day 3?
Yes, you can candle eggs on day 3 of incubation to check for fertility. You should see some signs of growth, like a dark spot that’s the embryo and maybe some red veins.
How do you know if an egg is fertile by candling?
You can do this by holding a bright light or candle against the egg in a dark room. A fertilised egg will show some development, such as veins, a dark spot (the embryo), and a shadowy mass. ( I tend to use my Iphone light in a very dark room. This seems to do the trick!).