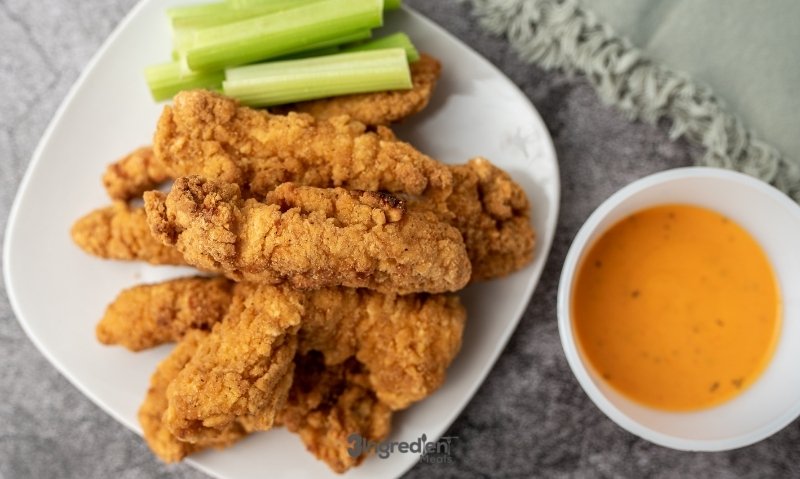
I am not kidding when I say these are the most flavorful baked chicken tenders I have ever eaten. They are juicy, perfectly seasoned, and only require a few minutes of prep time. No breading needed!.
Most people overcook their chicken tenders by a mile. Your chicken tenderloins are probably too done if they’ve been in the oven for more than 15 minutes. That means dry chicken like sawdust in your mouth.
With this simple chicken recipe, I’ll show you how to use simple ingredients to make the best oven-baked chicken tenders ever.
Serve them with your favorite dipping sauce and a side of mashed cauliflower or a fresh salad for a healthy dinner.
1 pound of chicken tenderloins (8–10). If you don’t like the tough tendon in chicken tenderloins, you can use chicken breasts cut into strips instead.
Im going to show you a great way to remove that tendon in 10 seconds flat down below.
2 tablespoons oil – I use avocado oil but you can use olive oil or vegetable oil.
2 tablespoons Tamari – this is a gluten free alternative to soy sauce which has a more balanced flavor and is less salty.
Hey there, food fam! If you’re wondering, “What is the cook time for chicken fingerz?” you’ve landed in the right spot We all crave that crispy, juicy bite of golden chicken strips, whether it’s a quick snack or a full-on meal for the crew I’ve burned a few batches in my day (oops!), but I’ve got the deets now, and I’m here to share the goods. Straight up, cook times depend on how you’re making ’em—frying, baking, or air frying—and if they’re fresh or straight outta the freezer. Frying takes about 3-5 minutes per side, baking needs 20-25 minutes, and air frying clocks in at 8-15 minutes. But hold up, there’s more to it than just setting a timer. Stick with me, and I’ll walk ya through every method, toss in some tips, and make sure your chicken fingerz are damn good every time.
Let’s get into this tasty subject and step up your cooking game. Trust me, if you want to avoid dry, sad strips of chicken fingerz, you need to get the cook time right. We’ll cover all the bases so you can make a batch that’s crispy on the outside, tender on the inside, and safe to eat.
Why Cook Time Matters for Chicken Fingerz
Let’s talk about why timing is so important before we get into the details. If you don’t cook your chicken fingers long enough, you could get nasty food bugs. We don’t want that. If you cook them too long, you get a bunch of rubbery nonsense. The best temperature is 165°F, which is about 74°C if you’re into numbers. That number lets you know they’re done and still juicy. I didn’t use a thermometer the first time because I thought I could tell by feel. I learned my lesson the hard way. So, grab a meat thermometer if you can—it’s a game-changer.
Not only is cook time important for safety, but it’s also for texture. If you don’t give it enough time, the breading will get soggy. Too much, and it’s like bitin’ into cardboard. Let’s break down how long you need for each method of cooking.
Cooking Methods and Times for Chicken Fingerz
Chicken fingerz can be cooked in a few dope ways, and each method’s got its own vibe and timing. Whether you’re a deep-fry fanatic or a health nut with an air fryer, I gotchu. Here’s the lowdown on each, with times for both fresh and frozen strips. I’ve thrown in a handy table too, ‘cause who doesn’t love a quick cheat sheet?
1. Frying Chicken Fingerz – The Classic Crunch
Frying is my go-to when I’m feelin’ indulgent. It’s fast, and that crispy crust? Unbeatable. You’ll need hot oil at about 350°F (175°C)—don’t skimp on heat, or you’ll end up with greasy, sad fingerz. I’ve made that mistake, and it ain’t pretty.
- Fresh Chicken Fingerz: Fry for 3-5 minutes per side. Flip ‘em halfway to get that golden goodness all over.
- Frozen Chicken Fingerz: Give ‘em a bit longer, about 5-7 minutes per side. They gotta thaw and cook through.
Make sure you don’t crowd the pan. I’ve tossed in too many at once before, and they just steamed instead of crisped up. Give ‘em space to sizzle! Check the internal temp hits 165°F before you dig in. Pro tip: use a high-smoke-point oil like canola or peanut. I tried olive oil once—big nope, it burned and tasted weird.
2. Baking Chicken Fingerz – Healthier Vibes
Baking is great if you want to cut down on oil. If you do it right, it takes longer but still gives you a good crunch. Turn the oven up to 400°F (200°C). For extra crisp, I sometimes turn it up to 425°F. If you have a wire rack, put it on a baking sheet. This lets the hot air move around.
- Fresh Chicken Fingerz: Bake for 20-25 minutes, flippin’ halfway so both sides get love.
- Frozen Chicken Fingerz: Add a few mins, so 25-30 minutes total. Flip these too for even cookin’.
I’ve baked without a rack before, and the bottoms got soggy. Don’t be like past me—elevate those strips! Again, check that internal temp. Nothin’ worse than cuttin’ into a pink center after waitin’ all that time.
3. Air Frying Chicken Fingerz – Best of Both Worlds
Air fryers are legit a kitchen cheat code. Less oil than frying, faster than baking, and still crispy as heck. Set it to 380-400°F (193-200°C), and don’t forget to shake or flip halfway.
- Fresh Chicken Fingerz: Air fry for 8-10 minutes. Quick and easy!
- Frozen Chicken Fingerz: Takes about 10-12 minutes, still flippin’ midway.
I was skeptical when I first got my air fryer, thinkin’ it couldn’t match deep-fryin’. Boy, was I wrong. Just don’t overload the basket, or they won’t crisp up right. Temp check at 165°F, and you’re golden.
Here’s a quick table to pin on your fridge or somethin’:
| Cooking Method | Fresh Cook Time | Frozen Cook Time | Temperature |
|---|---|---|---|
| Frying | 3-5 mins per side | 5-7 mins per side | 350°F (175°C) |
| Baking | 20-25 minutes | 25-30 minutes | 400-425°F (200-220°C) |
| Air Frying | 8-10 minutes | 10-12 minutes | 380-400°F (193-200°C) |
Factors That Mess with Cook Time
Now, I know you’re thinkin’, “Why the range in times? Can’t it just be one number?” Nah, fam, a few things can change how long your chicken fingerz need to cook. Let’s break it down so you ain’t caught off guard.
- Size and Thickness: Big, thick strips take longer. If you cut your chicken into chunky bois, add a couple minutes. Thin ones cook faster, so keep an eye out. I usually aim for strips no thicker than an inch to keep things even.
- Startin’ Temp: If your chicken’s straight from the fridge, it’ll take longer than if it’s been sittin’ out a bit. Frozen, obviously, needs extra time to thaw and cook. I’ve rushed this before and ended up with cold centers—yuck.
- Equipment Quirks: Not all ovens or fryers heat the same. My old oven ran hot, so stuff cooked quicker. Get to know your gear, and adjust if needed.
Bottom line, these factors mean you gotta be flexible. Don’t just set it and forget it. Watch ‘em, test ‘em, and make sure they hit that 165°F mark inside.
How to Know When Chicken Fingerz Are Done
I can’t stress this enough—don’t guess! I’ve done the “eh, looks cooked” thing, and it’s a gamble. Here’s how to be sure:
- Meat Thermometer: Stick it in the thickest part. If it reads 165°F, you’re good. I got a cheap one, and it’s saved my bacon (or chicken, ha!) more times than I can count.
- Visual Clues: They should be golden brown outside. Cut one open—meat should be white, no pink, and juices clear. If it’s pinkish, back in it goes.
- Texture Check: Press on it lightly. If it feels firm but still got some give, it’s likely done. Too soft means raw; too hard means overcooked.
I’ve overdone it before, thinkin’ more time equals safer. Nah, it just equals dry. Trust the temp, not the clock alone.
Tips to Nail Perfect Chicken Fingerz Every Time
Alright, now that we got cook times down, let’s talk makin’ these fingerz next-level. I’ve picked up some tricks over the years, and I’m spillin’ the beans.
- Breading Game Strong: Do the three-step dance—flour, egg wash, then breadcrumbs or panko. Panko’s my fave for extra crunch. Mix in some spices to the breading if you’re feelin’ wild.
- Rest Before Cookin’: Let the breaded strips chill for 10-15 minutes before cookin’. Helps the coating stick better. I skipped this once, and half the breading fell off in the oil. Messy!
- Don’t Crowd: Whether fryin’ or air fryin’, give ‘em room. Crowdin’ leads to soggy sadness. Cook in batches if you gotta.
- Preheat Everythin’: Hot oil, hot oven, hot air fryer. Startin’ cold messes with the crisp. I’ve been impatient and paid the price.
- Marinate for Flavor: Soak ‘em in buttermilk with spices for a few hours before breadin’. Makes ‘em tender and tasty. I do this when I got time, and it’s a total win.
- Rest After Cookin’: Let ‘em sit a few minutes after cookin’. Keeps the juices in so they ain’t dry. I’ve chowed down too quick and missed out on max flavor.
One weird tip I swear by? Add a pinch of baking powder to the breading mix. Sounds odd, but it makes it puff up crispier. Try it, thank me later.
Common Mistakes I’ve Made (So You Don’t Have To)
I ain’t perfect, and I’ve botched plenty of chicken fingerz batches. Here’s what not to do, straight from my screw-ups.
- Skippin’ the Thermometer: Thought I could tell by lookin’. Nope. Half raw, half overdone. Get that temp tool, fam.
- Overcrowdin’ the Pan: Tried to cook for a crowd all at once. Ended up with steamed, not fried, fingerz. Batch cookin’ is your friend.
- Not Flippin’: Forgot to turn ‘em in the oven once. One side crispy, other side mush. Flip halfway, always.
- Wrong Oil Temp: Fried with oil not hot enough. Greasy disaster. Test it with a small piece first—if it don’t sizzle, wait.
Learn from my oopsies, and your gonna have a smoother ride in the kitchen.
Servin’ Up Your Chicken Fingerz
Once they’re cooked, it’s time to plate ‘em up. Chicken fingerz are dope on their own, but pairin’ ‘em right takes it to another level. I love messin’ with different combos, so here’s some ideas.
- Dippin’ Sauces: You can’t go wrong with classics like honey mustard, ranch, or BBQ. I’m also a sucker for buffalo sauce when I want a kick. One weird one I tried? Mix mayo with a lil’ sriracha. Spicy heaven.
- Sidekicks: French fries are the OG pairin’, but I also dig coleslaw for somethin’ fresh. Sweet potato fries or a simple salad work if I’m feelin’ healthy-ish. Onion rings are a sneaky fave when I’m splurgin’.
I’ve thrown chicken fingerz on a salad before too, cut up into bites. Sounds fancy, but it’s just lazy cooking with extra greens. Whatever floats your boat, make it a meal that hits all the spots.
Storin’ and Reheatin’ Leftovers
Got extras? Don’t let ‘em go to waste. I’ve figured out how to keep ‘em tasty for later.
- Storin’: Cool ‘em down to room temp, then pop into an airtight container. Fridge for up to 4 days, or freeze for a couple months. I’ve left ‘em out too long before, and they got weird. Don’t do that.
- Reheatin’: Skip the microwave—it makes ‘em soggy. Use an oven at 375°F for 10-15 minutes, or air fryer at 360°F for 5-7 minutes. Flip halfway to revive that crunch. I’ve microwaved in a pinch, and it’s just not the same.
Fresh is best, but leftovers done right can still slap. I’ve had some day-old fingerz taste almost as good with a quick reheat.
Why Chicken Fingerz Are a Kitchen Must
Let’s be real—chicken fingerz are a crowd-pleaser. Kids love ‘em, adults sneak ‘em, and they’re easy to whip up. I’ve made ‘em for game nights, quick lunches, even as a sneaky late-night snack. Knowin’ the cook time means you can pull ‘em off without stressin’. Whether you fry for that sinful crunch or bake for a lighter bite, you got options.
I remember the first time I cooked a big batch for friends. Nailed the timing, got the crisp just right, and they were gone in minutes. Felt like a kitchen boss. You can get that vibe too—just follow the times and tips I’ve laid out.
Experimentin’ with Flavors and Styles
Don’t stop at plain ol’ fingerz. I’ve played around with flavors, and it’s fun as heck. Toss some garlic powder, paprika, or cayenne into the breading for a lil’ zing. I’ve even tried mixin’ parmesan into the crumbs—fancy and delish. Marinate in weird stuff like pickle juice if you’re feelin’ adventurous. I did that once on a dare, and it was oddly awesome.
Switch up cookin’ methods too. I’ve done half fry, half bake before when I couldn’t decide. Keeps things interestin’. Point is, once you got the base cook times down, the kitchen’s your playground.
Wrappin’ It Up
So, what’s the cook time for chicken fingerz? Quick recap: fry for 3-5 minutes per side (5-7 if frozen) at 350°F, bake for 20-25 minutes (25-30 if frozen) at 400-425°F, or air fry for 8-10 minutes (10-12 if frozen) at 380-400°F. Always aim for 165°F inside to keep it safe and tasty. We’ve covered the methods, the why’s, the how’s, and even how to save leftovers. I’ve thrown in my personal flubs and wins to help you dodge the pitfalls.
Chicken fingerz ain’t just food—they’re a vibe. Whether you’re cookin’ for yourself or a whole squad, gettin’ the timing right makes all the difference. So, grab some chicken, heat up that oil or oven, and make a batch tonight. Trust me, your taste buds will thank ya. Drop a comment if you got a wild recipe twist or a funny kitchen fail—I’m all ears for a good story. Let’s keep the food love goin’!
How to remove the tendon from chicken tenders
They won’t work as well if they still have that tough tendon going through the middle of them. Let me show you the best way to remove it in about 10 seconds.
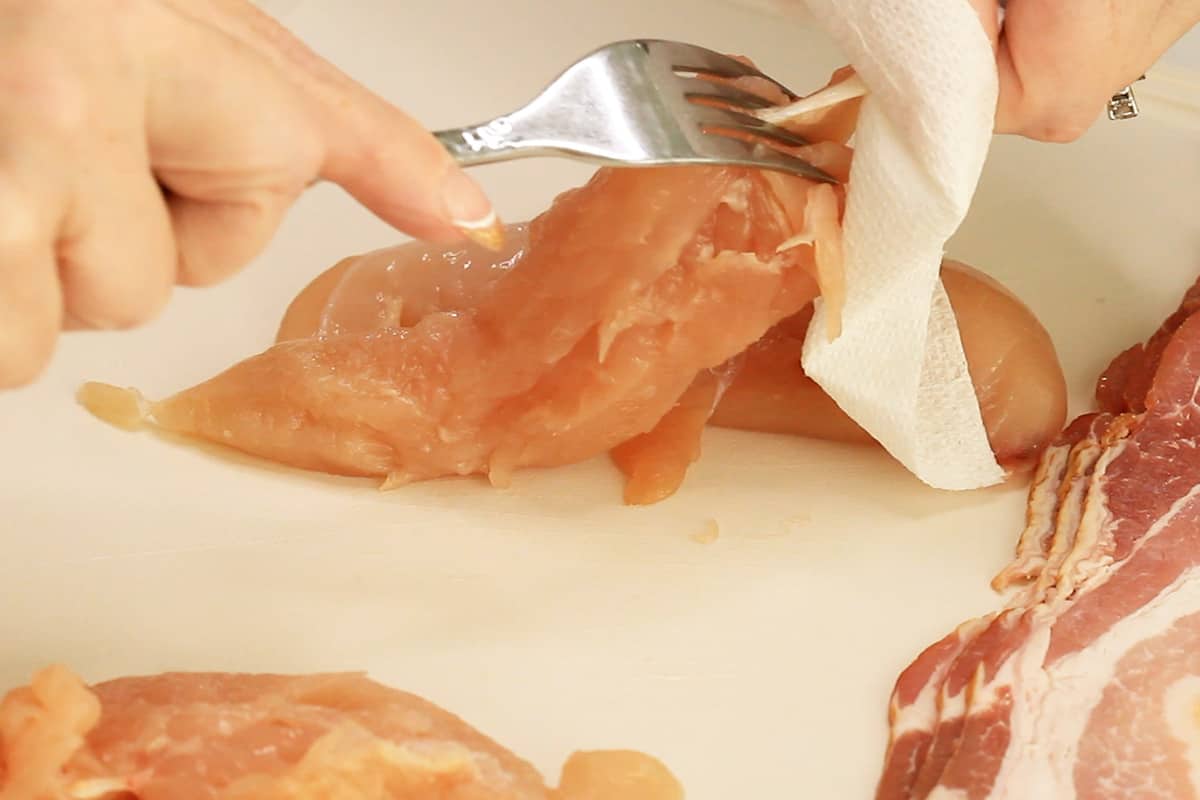
Grip the tendon in one hand with a small piece of paper towel. In The other hand, put the tendon between the tines of a fork.
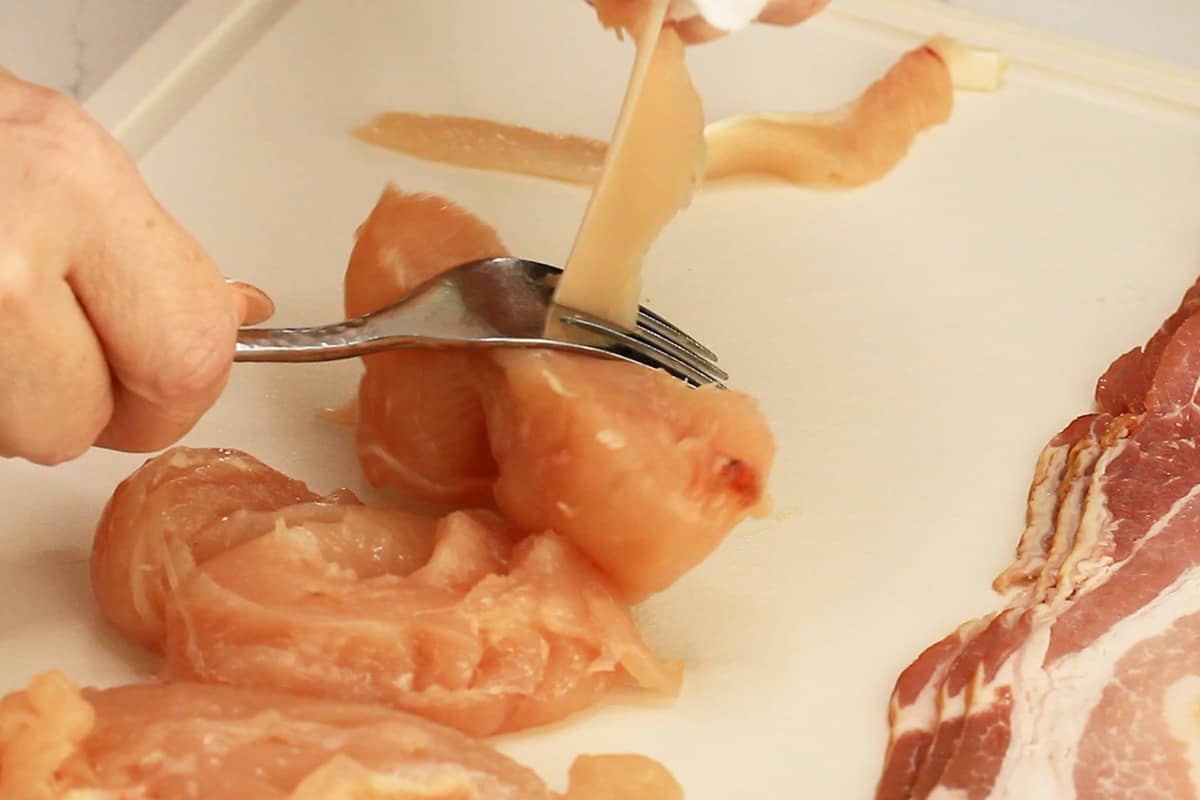
In one forceful motion, pull the tendon up using the paper towel, and push the chicken tender down with the fork. The tendon will pull right out.
This will cut your tender almost all the way through the middle, but I’d rather have that than a tough tendon in my chicken any day.

How to make healthy baked chicken tenders
These homemade chicken tenders do not require a breadcrumb mixture so they are perfect for someone following a gluten-free diet. That means less prep time!.

- Set the oven to 350 degrees F and marinate the tenders. To do this, put the chicken strips in a medium bowl and add the oil, tamari, and seasonings. For the best results, let the tenders soak up the marinade in the bowl while the oven heats up.

- Stack the chicken pieces one on top of the other on a baking sheet. If you want to make cleanup easier, you could line the sheet pan with parchment paper.
- Put the dish in an oven that has already been heated for 15 minutes, or until an instant read thermometer reads 165F inside.
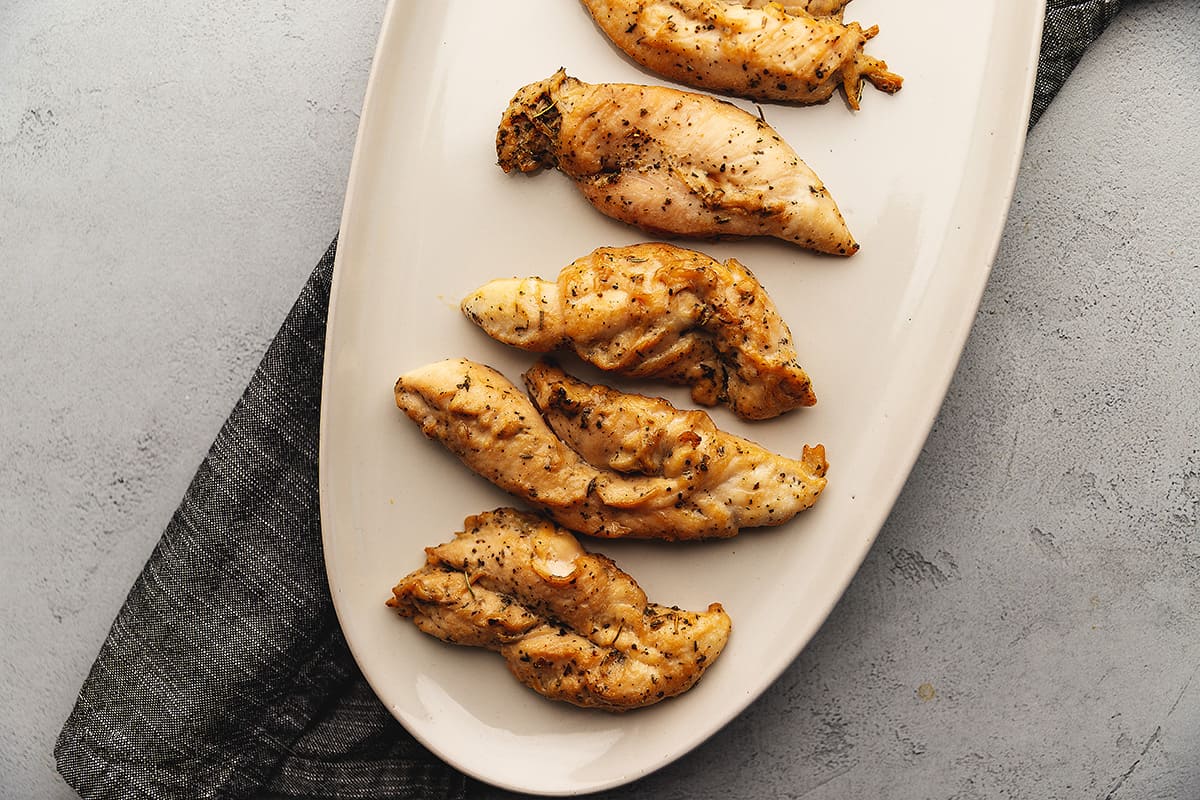
As you can see, this chicken tenders recipe produces golden brown, juicy chicken without a crunchy coating that will be soggy 5 minutes later.
What is the Safe Temperature to Cook Chicken to?
FAQ
How long should chicken fingerz and signature fillets be drained after you finish cooking them in Zaxby’s?
After cooking chicken fingers and signature fillets, it is important to drain them to remove any excess oil or grease. The duration for draining these items should be around 1 to 2 minutes. Place the cooked chicken fingerz and signature fillets on a paper towel-lined plate or a wire rack to allow the oil to drip off.
How long does it take to cook chicken tenders in the oven at 375 degrees?
Bake chicken tenders in a 375° F oven for about 14-15 minutes, flipping halfway through. The chicken should be crispy and golden brown on the outside, the juices should run clear, and the meat should reach an internal temperature of 165° F.
What temperature should chicken fingers be cooked at?
Use a meat thermometer to ensure the chicken is cooked through. It must read 165 degrees Fahrenheit to be considered safely cooked.
How long do you cook chicken fingers in the oven?
The optimal cooking time for chicken fingers in the oven at 425°F (220°C) is typically 18-20 minutes. However, the exact timing may change depending on how thick the chicken is, how well each oven works, and how crispy you want it. When it comes to selecting chicken fingers for baking, you have a few options.
How long do frozen chicken fingers take to cook?
Typically, frozen chicken fingers will require an oven temperature of around 400°F (200°C). The cooking time can vary depending on the thickness and size of the chicken fingers, as well as the characteristics of your oven. As a general guideline, frozen chicken fingers will take about 18-20 minutes to cook.
What temperature should chicken fingers be cooked to?
The cooking time can change based on how thick and big the chicken fingers are and how hot the oven is. It is essential to cook chicken fingers to an internal temperature of 165°F (74°C) to ensure they are safe to eat. If your chicken fingers are thinner or smaller, they will require less time to cook.
Do you preheat the oven before cooking chicken fingers?
Yes, it is recommended to preheat the oven before cooking chicken fingers. This ensures that the oven is at the desired temperature and helps in evenly cooking the chicken fingers. How Can I Tell If The Chicken Fingers Are Fully Cooked? The best way to tell if chicken fingers are fully cooked is by using a meat thermometer.
Can frozen chicken fingers be baked?
Frozen chicken fingers can be baked directly in the oven. Just make sure to adjust the cooking time accordingly. Add a few extra minutes to allow them to cook thoroughly. 2. What if my chicken fingers are not crispy enough? If you desire extra crispy chicken fingers, you can broil them for the last 2-3 minutes of cooking.
How do you cook chicken fingers with breadcrumb?
Gently press the breadcrumb mixture onto the chicken fingers to ensure an even coating. Place the coated chicken fingers on a baking sheet lined with parchment paper or a greased baking rack. Make sure to leave some space between the chicken fingers to allow for even cooking and proper browning.