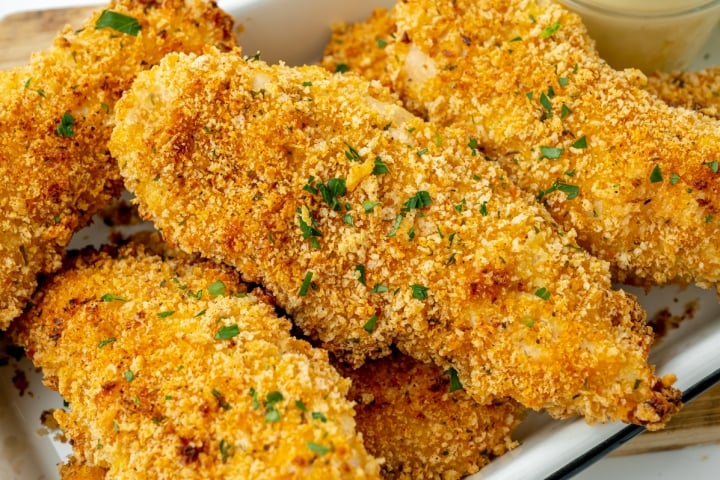
This easy Oven-Fried Chicken turns out perfectly crispy and juicy every time! The special seasoning blend tastes just like KFC, but it’s made with wholesome ingredients in your own kitchen. No deep fryer needed!.
If you’re craving traditional fried chicken but don’t feel like going out, this Oven-Fried Chicken will hit the spot!.
Instead of deep frying, this recipe coats chicken strips in eggs and a panko bread crumb mixture for a crispy coating. They’re baked on a sheet pan with butter to get that signature crunch.
Our whole family loves this dinner recipe, especially the kids! Serve it with Spicy Mayo, Sweet and Sour Sauce, or Homemade BBQ Sauce, and it will disappear quickly!
Have you ever been disappointed by soggy frozen chicken tenders? We’ve all been there – you’re hungry, in a hurry, and those frozen chicken strips looked so crispy on the package. But somehow, they always come out of your oven soft and disappointing. Well, I’m here to change that forever! As someone who’s gone through countless bags of Tyson Crispy Chicken Strips trying to perfect this art, I’ve finally cracked the code on making truly crispy frozen chicken tenders.
Why Your Frozen Chicken Tenders Aren’t Getting Crispy
Before we dive into the solution, let’s understand the problem. Most people just follow the basic instructions on the package and end up with mediocre results. The main issues are:
- Not preheating your oven properly
- Overcrowding the baking sheet
- Using the wrong baking surface
- Not flipping the tenders during cooking
- Not knowing the secret finishing techniques
Let me share with you my foolproof method that’ll transform those Tyson Crispy Chicken Strips (or any brand) into restaurant-quality crispy goodness!
The Perfect Method for Crispy Oven-Baked Chicken Tenders
What You’ll Need:
- Frozen chicken tenders (Tyson Crispy Chicken Strips work great!)
- Baking sheet
- Parchment paper or aluminum foil
- Cooking spray
- Wire rack (optional but recommended)
- Tongs for flipping
Step 1: Preheat Your Oven (The Right Way)
Most packages say to heat the oven to 375°F, but here’s my first tip: make it hotter. Preheat your oven to 425°F instead. The crispiness is better at this higher temperature, and the chicken inside doesn’t get dry.
Before you put the tenders in the oven, make sure it is completely hot. It takes around 15 to 20 minutes, not just when the oven beeps to let you know it’s done.
Step 2: Prep Your Baking Surface
Line your baking sheet with parchment paper or aluminum foil and spray lightly with cooking spray This prevents sticking and helps with cleanup,
For EXTRA crispiness (and this is a game-changer), place a wire rack on top of your baking sheet Elevating the chicken tenders allows hot air to circulate all around them, creating that perfect crispy exterior
Step 3: Arrange the Tenders Properly
Here’s where most people go wrong – they crowd the pan! Space your Tyson Crispy Chicken Strips about 1 inch apart. If they’re touching, they’ll steam each other instead of getting crispy.
I usually can fit about 8-10 strips on a standard baking sheet without crowding. If you’re cooking for a family, use multiple baking sheets rather than crowding one.
Step 4: The Initial Bake
Place your baking sheet on the middle rack of your preheated oven. Bake for 10 minutes.
Step 5: The Critical Flip
After 10 minutes, take the baking sheet out and flip each tender using tongs. This ensures even cooking and crispiness on both sides.
Return to the oven for another 8-10 minutes. Keep an eye on them during the last few minutes – we want golden and crispy, not burnt!
Step 6: The Secret Final Touch
After cooking your chicken tenders, turn off the oven, crack the door open, and let them sit in there for three to five minutes to cool down. This is a secret trick that no one tells you.
This lets the exterior crisp up further without continuing to cook the inside. It’s like the resting period for a steak, but for crispiness!
Advanced Tips for Even Crispier Results
If you’re really serious about your crispy chicken tenders (and I know I am), try these advanced techniques:
1. The Spray Method
Before putting the tenders in the oven, lightly spray them with cooking spray. This helps the breading crisp up even more effectively.
2. The Double Bake Technique
For EXTRA crispy results, bake as directed above, then let the tenders cool for 5 minutes. Turn the oven up to 450°F, then put them back in for just 2-3 minutes to create an extra-crispy exterior.
3. The Convection Advantage
If your oven has a convection setting, use it! The circulating air is perfect for creating crispy chicken tenders. Reduce the temperature by 25°F if using convection.
Serving Suggestions for Your Perfectly Crispy Tenders
Now that you’ve mastered the art of making frozen chicken tenders crispy in the oven, let’s talk about how to serve them:
- Dipping sauces: Honey mustard, BBQ, ranch, or buffalo sauce take these tenders to the next level
- As a main: Serve with roasted veggies and mashed potatoes for a complete meal
- In a wrap: Slice up your crispy tenders and wrap them with lettuce, tomato, and sauce
- On a salad: Crispy chicken tenders make any salad more exciting and filling
Nutrition Considerations
While Tyson doesn’t provide the full nutrition information on their website for their Crispy Chicken Strips, it’s worth noting that baking these in the oven is still healthier than deep-frying. You’re using minimal added oil with the cooking spray method.
If you’re watching your calorie intake, you can still enjoy these occasionally as part of a balanced diet. Just pair them with plenty of vegetables for a more nutritious meal.
Common Mistakes to Avoid
Even with all these tips, there are some common mistakes people still make:
- Using a dark baking sheet without adjusting: Dark baking sheets absorb more heat and can burn the bottom of your tenders. If using one, reduce oven temperature by 25°F.
- Opening the oven too frequently: Every time you open the oven, you lose heat, which disrupts the crisping process.
- Not allowing frozen tenders to thaw slightly: Letting them sit out for just 5 minutes before baking can help them cook more evenly.
- Using old frozen chicken tenders: Check the date! Freezer burn affects texture and taste.
FAQs About Making Crispy Frozen Chicken Tenders
Q: Can I use an air fryer instead of an oven?
A: Absolutely! Air fryers are actually PERFECT for crispy chicken tenders. Cook at 400°F for about 10-12 minutes, shaking the basket halfway through.
Q: How do I know when they’re done?
A: The outside should be golden brown and crispy. If you have a meat thermometer, the internal temperature should reach 165°F for food safety.
Q: My tenders came out dry inside. What went wrong?
A: You might have cooked them too long or at too high a temperature. Remember, chicken tenders are already cooked—you’re just reheating and crisping them up.
Q: Can I add my own seasonings to frozen breaded tenders?
A: Yes! Try sprinkling garlic powder, paprika, or Italian seasoning on them before baking for extra flavor.
Final Thoughts
Mastering how to make frozen chicken tenders crispy in the oven isn’t rocket science, but it does require attention to detail. The difference between soggy disappointment and crispy perfection often comes down to just a few simple tweaks to your cooking method.
I hope these tips help you achieve the crispy, delicious chicken tenders you’ve been dreaming of! Tyson Crispy Chicken Strips are a great starting point, but these techniques work for any brand of frozen breaded chicken.
Next time your family asks for chicken tenders, you’ll be ready to impress them with your perfectly crispy results. And remember – don’t tell everyone your secrets… sometimes it’s good to keep a little kitchen magic to yourself!
What’s your favorite dipping sauce for crispy chicken tenders? I’m partial to honey mustard myself, but I’m always looking to try new combinations!
Remember, life’s too short for soggy chicken tenders. Get out there and get crispy!
Quick things to remember:
- Cooking time: The cooking time may need to be changed depending on the size and thickness of your chicken pieces. Always make sure the chicken is done before eating it.
- Add oil: If the pan is dry when you flip the chicken, add a little oil to make sure the chicken on the bottom gets crispy.
What people are saying:
“WoW – Absoltely FanTAStic!!! A random search on Google led me to your site and after seeing the huge numbers of high ratings, decided to give it a shot. SO GLAD I did – crispy yet juicy and spot on flavor. With a real feel of -22 in ND, this was Exactly what I needed. Highlight of my weekend ” Gabriella.
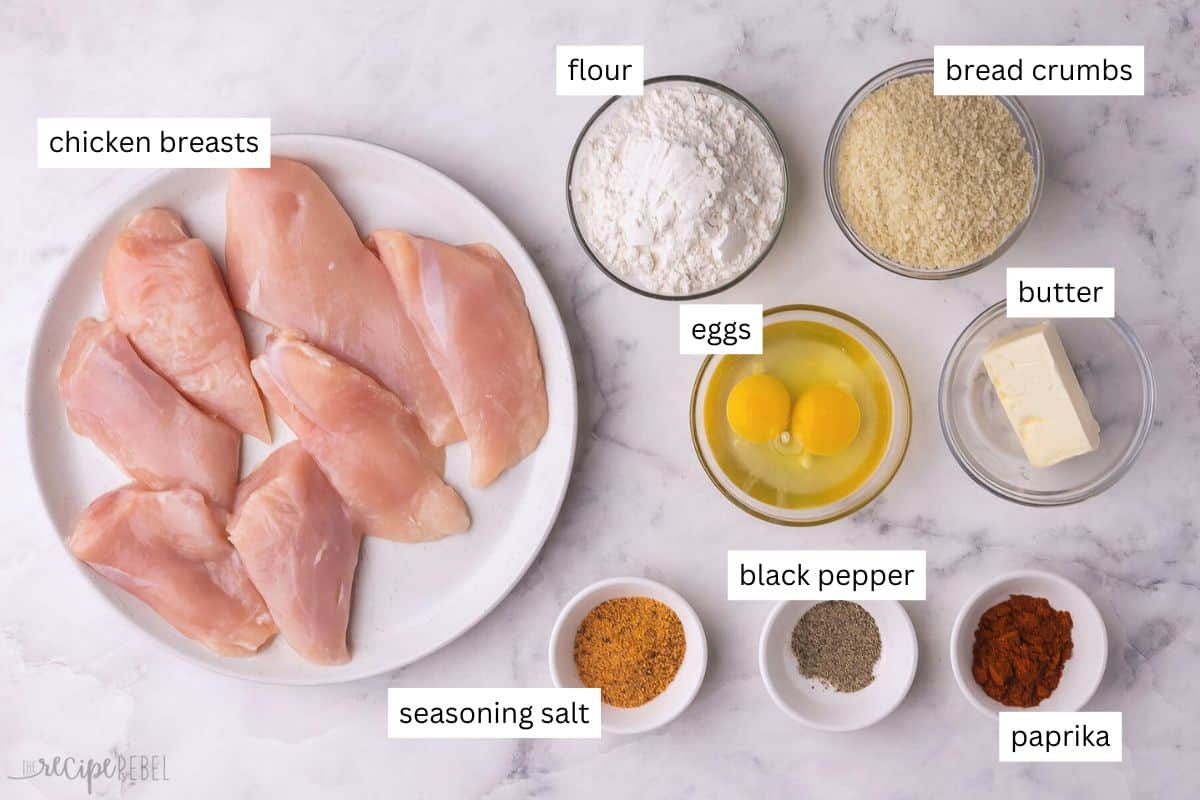
- Cut the chicken breast into strips. This recipe makes about three to four chicken breasts, or about one and a half pounds. The way I cut them, one chicken breast makes about three strips. You could also use tenders, thighs, or legs!.
- Eggs: To make the coating stick better, coat your chicken with beaten eggs.
- Butter: Salted or unsalted butter is fine.
- Flour: All-purpose flour helps the chicken get a crispy outside. If you need to, you can use gluten-free flour instead.
- Panko: Panko breadcrumbs give the chicken a crunchy, crispy coating. For a gluten-free option, you can use pork rind panko!.
- If you want to season something, use seasoned salt. I like Lawry’s brand, but you can use any brand you like.
- Paprika: It doesn’t make things spicy, but it gives them more flavor, a little sweetness, and a lot of color. If you want it hotter, you could add a little cayenne pepper!