Are you tired of dry, flavorless chicken? I certainly was until I discovered the magic of cooking a whole chicken in my Ninja Foodi Grill. This game-changing appliance combines the benefits of grilling, air frying, and roasting to create the perfect bird – crispy on the outside, juicy on the inside.
I will tell you everything you need to know about using your Ninja Foodi Grill to cook a tasty whole chicken in this detailed guide. From how to choose the right bird to how to season it and how long to cook it, you’ll be making delicious meals in no time!
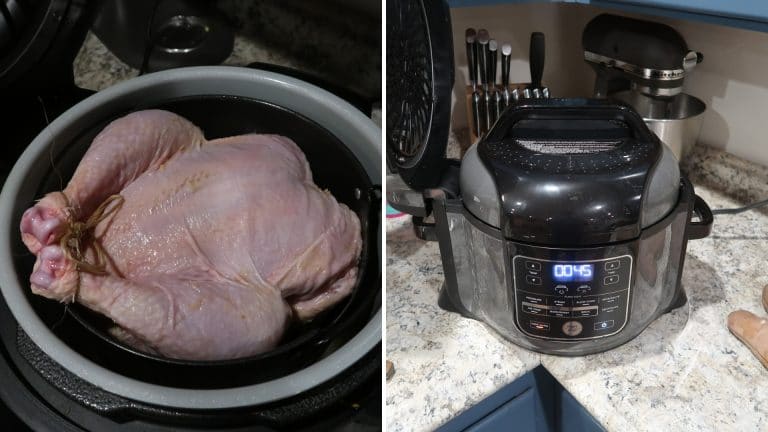
Why Choose the Ninja Foodi Grill for Cooking Whole Chicken?
The Ninja Foodi Grill is very flexible and has many cooking options, which makes it perfect for cooking a whole chicken.
- Precise temperature control (105°F to 500°F)
- Integrated temperature probe for monitoring doneness
- Combination of grilling, air frying, and roasting capabilities
- Even cooking and crispy skin results
- Non-stick grill grate for easy cleanup
I’ve found that using the Ninja Foodi Grill saves time and creates consistently better results compared to traditional roasting methods. Plus, the multi-functionality means less cleanup and kitchen mess!
Selecting the Perfect Chicken
Before we fire up the grill, let’s talk about choosing the right chicken:
- Size matters: Look for chickens between 3-5 pounds for optimal cooking in the Ninja Foodi Grill
- Quality counts: Fresh, organic chickens generally offer better flavor
- Source wisely: Free-range or pasture-raised chickens often taste better
- Check freshness: Always verify the expiration date
- Local is best: When possible, buy from local butchers or farmers markets
I personally prefer organic chickens around 4 pounds – they seem to cook most evenly in my Foodi Grill while providing enough meat to feed my family of four with some leftovers,
Essential Preparation Steps
Cleaning the Chicken
Proper preparation is crucial for food safety and flavor:
- Remove the chicken from packaging and discard any giblets from the cavity
- Rinse the chicken thoroughly under cold water, inside and out
- Pat the chicken completely dry with paper towels (this is key for crispy skin!)
- Let the chicken come to room temperature for about 30 minutes before cooking
Seasoning Your Bird
The right seasoning makes all the difference. Here’s my go-to approach:
Basic Seasoning Mix:
- Generous amount of salt (don’t be shy!)
- Fresh cracked black pepper
- Garlic powder
Application Technique:
- Season both inside the cavity and outside skin
- Rub the seasonings evenly across all surfaces
- For extra flavor, add olive oil or melted butter to help seasonings adhere
- Optional: stuff cavity with herbs (rosemary, thyme) or lemon slices
Pro tip: For extra juicy results, I sometimes brush my chicken with BBQ sauce during the final cooking stages (about 15 minutes before finishing).
Setting Up Your Ninja Foodi Grill
Now that your chicken is prepped, let’s get the grill ready:
- Ensure all parts are properly assembled (grill grate, cooking pot)
- Connect to power source and switch on
- Select the ‘Grill’ function
- Set temperature to 375°F (optimal for whole chicken)
- Press the preheat button and wait for the indicator (usually about 10 minutes)
- While preheating, lightly oil the grill grate to prevent sticking
Step-by-Step Cooking Process
Follow these steps for perfect results every time:
1. Preheating
- Set grill to 375°F
- Allow approximately 10 minutes for preheating
- Grill is ready when indicator light turns off
2. Positioning the Chicken
- Place the chicken breast-side up on the crisper plate
- Make sure wings and legs are tied with cooking twine for even cooking
- Insert temperature probe into thickest part of breast or thigh (avoid touching bone)
3. Cooking Time and Temperature
- For a 4-5 pound chicken, expect 60-70 minutes total cooking time
- Target internal temperature: 165°F (food safety standard)
- If browning too quickly, slightly reduce temperature
4. Basting (Optional)
- After about 20 minutes, you can begin basting with BBQ sauce
- Apply sauce every 5 minutes during final cooking stages for a delicious glaze
- Use a basting brush for even application
5. Checking Doneness
- Use the integrated probe or a separate meat thermometer
- Verify temperature in thickest part of thigh (165°F)
- Juices should run clear, not pink
- If not done, return to grill and check again in 5-10 minutes
Troubleshooting Common Issues
Even experienced cooks encounter challenges. Here’s how to address them:
| Problem | Solution |
|---|---|
| Skin not crispy enough | Pat chicken extra dry before cooking; increase temperature for last 5 minutes |
| Chicken cooking unevenly | Ensure chicken is properly tied; rotate during cooking if needed |
| Internal temperature won’t reach 165°F | Continue cooking in 5-minute increments; cover with foil if browning too much |
| Too much smoke | Reduce temperature; ensure drip tray is clean |
| Chicken sticking to grate | Apply more oil to grate before cooking |
Flavor Variations to Try
Don’t be afraid to experiment with different flavor profiles:
Herb & Garlic
- 2 tablespoons fresh herbs (rosemary, thyme, sage)
- 4 minced garlic cloves
- 2 tablespoons olive oil
- 1 teaspoon salt
- ½ teaspoon black pepper
Citrus Zest
- Zest and juice of 1 lemon or orange
- 1 tablespoon honey
- 2 teaspoons salt
- ½ teaspoon black pepper
- ¼ teaspoon cayenne (optional)
BBQ Style
- ¼ cup BBQ sauce (plus more for basting)
- 1 tablespoon brown sugar
- 1 teaspoon smoked paprika
- 1 teaspoon garlic powder
- 1 teaspoon onion powder
I’ve tried all three, and the BBQ style is definitely my family’s favorite. The Ninja Foodi Grill caramelizes the sauce beautifully!
My Personal Tips for Perfect Results
After cooking dozens of chickens in my Ninja Foodi Grill, I’ve learned a few tricks:
- Truss the chicken: Tying the legs and wings with cooking twine helps ensure even cooking
- Rest before carving: Let the chicken rest for 10-15 minutes after cooking to retain juices
- Save the drippings: The flavorful drippings make excellent gravy
- Clean while warm: Clean your grill while still warm (but not hot) for easier maintenance
- Batch prep: Season multiple chickens at once and freeze extras for future quick meals
Serving Suggestions
A beautifully roasted chicken deserves complementary sides. I like to serve mine with:
- Roasted vegetables (can be prepared alongside in a separate air fryer basket)
- Fresh green salad with light vinaigrette
- Crusty bread for soaking up juices
- Simple herb rice or mashed potatoes
Storage and Leftovers
Don’t waste any of that delicious chicken! Here’s how to handle leftovers:
- Refrigeration: Store carved leftovers in airtight container for up to 3 days
- Freezing: Freeze portions in freezer bags for up to 3 months
- Repurposing: Use leftover meat for sandwiches, salads, soups, or casseroles
Health Benefits
Cooking chicken in the Ninja Foodi Grill offers several health advantages:
- Less oil needed compared to traditional frying
- Fat drips away during cooking
- Retains more nutrients than some other cooking methods
- Provides excellent protein (approximately 45g per serving)
- Lower in calories than fried alternatives (about 420 calories per serving)
Final Thoughts
Mastering how to cook a whole chicken in your Ninja Foodi Grill opens up a world of delicious, impressive meals with minimal effort. The combination of crispy skin, juicy meat, and incredible flavor makes this technique worth adding to your regular cooking rotation.
I’ve been cooking whole chickens this way for over a year now, and my family still gets excited when they smell that amazing aroma filling our kitchen. Give it a try – I’m confident you’ll be just as impressed with the results!
FAQ
Q: Can I use frozen chicken in the Ninja Foodi Grill?
A: It’s best to fully thaw your chicken before cooking for even results and food safety.
Q: How many people will a 4-pound chicken feed?
A: A 4-pound chicken typically serves 4-6 people, depending on appetite and sides.
Q: Do I need to flip the chicken during cooking?
A: No, the Ninja Foodi Grill cooks evenly without flipping, which helps retain juices.
What if I don’t have a temperature probe? A: You can use a different instant-read thermometer to see if the food is done.
A: Yes, you can cook vegetables at the same time. Add the vegetables around the chicken in the last 20 to 30 minutes of cooking.
Remember, practice makes perfect! Each time you cook a whole chicken in your Ninja Foodi Grill, you’ll discover new techniques to make it even better. Happy cooking!
Best for this recipe…
- Serves 2-4
- Preparation Time 5 minutes
- Bake Time 35 minutes
- Compatability Medium
- Protein 45g
- Fibre 0g
- Sugar 8g
- Calories 420kcal
- 1 (1.2kg) whole chicken
- 1 tablespoon olive oil
- Flaked sea salt, as desired
- Fresh cracked black pepper, as desired
- 75g BBQ sauce