One of the things I have less and less time for right now is cooking. This is my second trimester of pregnancy, and my family is growing. I am too tired to think about making dinner at the end of a long day.
But though my husband helps a ton (thank goodness for a man who can cook, am I right?), sometimes I still feel the urge to get into the kitchen to cook a nice meal for us.
He deserves something tasty, and while I may not be cooking as fancy as I did a few months ago, I think it’s the least I can do for all the pet-foot rubs.
I mean, I’ve gone through all the different ways to cook pretty much anything in the pressure cooker at this point. Yet, I am still amazed every single time at just how consistent and quick it is.
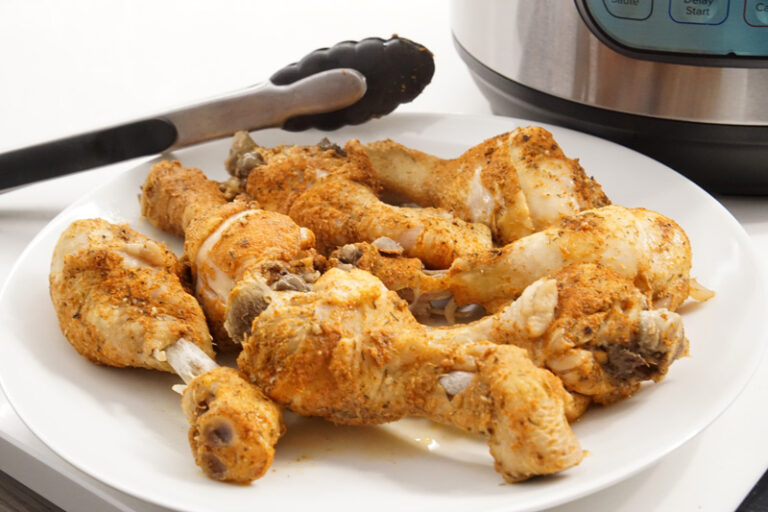
Today, we are talking about how to cook chicken drumsticks in the electric pressure cooker. We all know this appliance is downright magical, and this how-to guide offers yet another reason why.
Talk about a super simple way to get dinner on the table in less than 30 minutes! The meat comes out juicy and tender, with just the right amount of flavor from a simple homemade seasoning blend.
It’s great that I only have to use one pot to cook the chicken. It also makes cleanup easy. Then I can focus on some simple side dishes at the same time.
This entree is extremely versatile, so you can pair it with all sorts of side dishes.
Since I’m all about options that help to keep me off my feet, you can bet my Instant Pot is being put to work these days. Many simple sides can be made in this handy appliance too!
Are you tired of dry, overcooked chicken drumsticks? Or maybe you’re in a rush and need a quick dinner solution that doesn’t sacrifice flavor? I’ve been there too! After experimenting with my pressure cooker for years I’ve discovered that chicken drumsticks are practically made for pressure cooking – they come out juicy, tender and packed with flavor in a fraction of the time compared to traditional methods.
But the question everyone asks is: how long to cook chicken drumsticks in a pressure cooker? The short answer is 10-15 minutes for fresh drumsticks and 15-20 minutes for frozen ones. But there’s so much more to know if you want truly delicious results!
In this guide I’ll share everything I’ve learned about pressure cooking chicken drumsticks to perfection – from exact timing guidelines to flavor-boosting techniques that’ll make your family think you spent hours in the kitchen (when you actually only spent minutes!).
The Magic Cooking Times for Chicken Drumsticks
Let’s get straight to what you came for – the perfect cooking times for chicken drumsticks in your pressure cooker:
For Fresh Drumsticks:
- Small drumsticks: 8-10 minutes
- Medium drumsticks: 10-12 minutes
- Large drumsticks: 12-15 minutes
For Frozen Drumsticks:
- All sizes: 15-20 minutes
Remember, these times are for cooking at high pressure after the cooker has reached full pressure. The total time from start to finish will be longer when you factor in the time it takes for the pressure cooker to build pressure and the release time afterward.
Factors That Affect Cooking Time
I’ve noticed that several factors can influence how long your drumsticks need to cook:
- Size matters: Larger drumsticks naturally need more time to cook through
- Fresh vs. frozen: Frozen drumsticks need about 5 extra minutes
- Your pressure cooker model: Different models might have slight variations
- Altitude: If you live at high altitude, you might need to add a minute or two
- Quantity: Cooking a large batch might require slightly more time
Step-by-Step Guide to Perfect Pressure Cooker Drumsticks
Now that we know the basic timing. Now let’s go over the whole process of making delicious chicken drumsticks in a pressure cooker.
What You’ll Need:
- 2-3 pounds chicken drumsticks (about 7-8 drumsticks)
- 1 cup chicken broth or water
- Your favorite seasonings (I recommend a mix of paprika, garlic powder, onion powder, salt, pepper, and maybe some oregano)
- 1 teaspoon olive oil (if you want to sear them first)
- Optional: your favorite sauce or marinade
Preparation Steps:
-
Dry and season: Use paper towels to dry the drumsticks. This makes the seasonings stick better and helps the meat brown. Season generously with your spice mixture.
-
Optional but recommended – Sear for flavor: Set your pressure cooker to the sauté function and add a teaspoon of oil. Once hot, brown the drumsticks for 2-3 minutes per side. This extra step adds tremendous flavor! You might need to work in batches to avoid overcrowding.
-
Add water or chicken broth: Pour in 1 cup. This is very important for making the steam that makes the cooker’s pressure rise. Or, if you want to get fancy, you can add extra flavor with apple cider or white wine.
-
Arrange the drumsticks: Place the drumsticks in the pot, trying to distribute them evenly. It’s okay to stack them if necessary, but try not to pack them too tightly.
-
Lock the lid: Make sure the pressure valve is in the “sealing” position.
-
Pick the cooking time. Choose the right cooking time from our list above based on the size of your drumsticks and whether they are fresh or frozen.
-
Choose your release method: After cooking completes, you have two options:
- Natural release (recommended): Let the pressure naturally decrease for 5-10 minutes before releasing any remaining pressure. This results in more tender meat.
- Quick release: If you’re in a hurry, you can carefully turn the valve to release pressure immediately, but the meat might not be quite as tender.
-
Check for doneness: Always verify the internal temperature has reached 165°F (75°C) using a meat thermometer. The juices should run clear with no pink visible.
Flavor Boosters: Taking Your Drumsticks to the Next Level
While basic seasoned drumsticks are delicious, here are some of my favorite ways to amp up the flavor:
Marinades (Apply Before Cooking)
Marinating the drumsticks for at least 30 minutes (or overnight for best results) can dramatically improve flavor. Some winning combinations:
- Honey Garlic: Mix honey, soy sauce, minced garlic, and ground ginger
- Spicy BBQ: Combine BBQ sauce with chili powder, salt and pepper
- Teriyaki: Use store-bought teriyaki sauce or make your own with soy sauce, brown sugar, ginger, and garlic
After Cooking – Crisping the Skin
One downside of pressure cooking is that the skin doesn’t get crispy. Here’s how to fix that:
- After pressure cooking, transfer the drumsticks to a baking sheet
- Brush with a little oil or butter
- Broil for 2-3 minutes until the skin crisps up
- Alternatively, use an air fryer for 3-5 minutes at 400°F
This extra step takes just minutes but makes a huge difference in texture and appearance!
Common Questions About Pressure Cooking Chicken Drumsticks
Can I stack drumsticks in my pressure cooker?
Yes! Unlike some other cooking methods, pressure cookers cook with steam that circulates throughout the pot. Just make sure they’re not packed too tightly so steam can reach all surfaces.
Can I cook frozen drumsticks without thawing?
Absolutely! That’s one of the best things about pressure cookers. Just add about 5 minutes to your cooking time and make sure they’re separated (not frozen in a clump). Run them under cool water if needed to separate.
What if my drumsticks are still pink near the bone after cooking?
This can occasionally happen even when the chicken is fully cooked. The most reliable test is temperature – if they’ve reached 165°F (75°C), they’re safe to eat regardless of any pinkish hue near the bone.
How do I store leftover cooked drumsticks?
Cool them completely, then store in airtight containers in the refrigerator for 3-4 days. They also freeze well for up to 3-4 months.
What sides go well with pressure cooked drumsticks?
So many options! My favorites include:
- Mashed potatoes
- Rice or wild rice
- Green beans
- Roasted vegetables
- Coleslaw
- Macaroni and cheese
- Sweet potatoes
Three Foolproof Drumstick Recipes to Try
Here are three of my favorite pressure cooker drumstick recipes that always get rave reviews:
1. Honey Garlic Chicken Drumsticks
- 2 lbs chicken drumsticks
- 1/2 cup honey
- 1/4 cup soy sauce
- 3 cloves garlic, minced
- 1 tsp ground ginger
- Cook for 12 minutes at high pressure, natural release for 5 minutes
- Optional: Reduce the sauce using the sauté function after cooking
2. Buffalo Chicken Drumsticks
- 2 lbs chicken drumsticks
- 1 cup water or chicken broth (for cooking)
- 1/2 cup buffalo sauce
- Season with salt and pepper
- Cook for 12 minutes at high pressure, natural release for 5 minutes
- After cooking, toss in more buffalo sauce and broil for 2-3 minutes for crispiness
3. Simple Herb and Garlic Drumsticks
- 2 lbs chicken drumsticks
- 1 cup chicken broth
- 1 tsp paprika
- 1 tsp garlic powder
- 1/2 tsp onion powder
- 1/4 tsp dried oregano
- 1/2 tsp salt
- 1/4 tsp pepper
- Cook for 12 minutes at high pressure, natural release for 5 minutes
Why I Love Pressure Cooking Drumsticks
We’ve been using our pressure cooker for drumsticks at least once a week in our house, and I’m still amazed by how good they turn out every time. The benefits are just too good to ignore:
- Time-saving: Ready in under 30 minutes total (including prep and pressure build-up)
- Juicy results: The pressure cooking environment locks in moisture
- Flavor absorption: Seasonings and marinades penetrate deeply
- Hands-off cooking: Set it and forget it while you prepare sides or take a break
- Budget-friendly: Drumsticks are often one of the most affordable cuts of chicken
- Family-friendly: Kids and adults alike love them
Final Tips for Pressure Cooker Drumstick Success
After many batches of pressure cooked drumsticks (some more successful than others!), here are my top tips:
-
Don’t skip the seasoning: Even a simple salt and pepper will do, but drumsticks really benefit from generous seasoning.
-
Try the sauté function: That initial sear makes a huge difference in flavor development.
-
Don’t worry about adding too much liquid: Unlike slow cookers, pressure cookers need very little liquid – just 1 cup is usually plenty.
-
Get a meat thermometer: It’s the only reliable way to ensure your chicken is safely cooked without overdoing it.
-
Natural release matters: I’ve found that at least 5 minutes of natural pressure release results in more tender meat.
Whether you’re a busy parent, a cooking novice, or just someone who appreciates efficiency in the kitchen, pressure cooker chicken drumsticks deserve a spot in your meal rotation. They’re economical, delicious, and nearly foolproof when you follow these guidelines.
Can I Use Frozen Drumsticks?
That’s the beauty of the electric pressure cooker – you can cook straight from the freezer if you need to.
Start by separating the drumsticks so they are no longer sticking together. Run them under cool water if you have to. A sharp knife can slip easily when handling frozen ingredients.
You only need to change up the cooking method slightly.
Rub the drumsticks with the seasoning, but skip the searing step for frozen poultry. Then cook for 15 minutes on High pressure. Let the pressure naturally release for 5 minutes before releasing the rest manually.
Can I Use a Different Type of Seasoning?
There’s so much flexibility available to customize these legs with whatever you would like.
I like to check out my spice rack and dive into my collection of spice mixes to change up the ingredients whenever the mood strikes.
All you have to do is use 3 1/2 teaspoons total of your favorite dry spice mix in lieu of the seasonings listed below.