From keeping livestock contained to marking property boundaries, wire fences like woven wire fences and barbed wire fences have been a stalwart presence for centuries. But over time and because of things like weather and animals getting in the way, wire fences can become loose or sagging, which makes them less effective. In this step-by-step guide, well walk you through the process of achieving a taut and secure fence line using straightforward techniques. Whether youre a seasoned DIY enthusiast or a first-time fence stretcher, our comprehensive instructions and tips will equip you with the knowledge to accomplish this task efficiently and effectively.
Stretching a wire fence requires several materials to ensure a secure and sturdy installation. There are different kinds of materials you may need depending on the type of wire fence you’re installing, how long it is, and the ground it’s on. Heres a general list of materials you might need:
Chicken wire is a handy material that can be used for a variety of purposes It’s often used to build enclosures for chickens and other poultry, but it also has many other uses like fencing gardens, making crafts, and more. Stretching chicken wire properly is crucial to get the desired result for your particular project This comprehensive guide will walk you through the entire process step-by-step.
What is Chicken Wire?
Chicken wire, which is also known as poultry netting, is a metal wire mesh that comes in different sizes. It usually has hexagonal holes and can be made of galvanized steel, stainless steel, or PVC. How thick the wire is (its gauge) and how big the holes are can be changed. Common mesh hole sizes are 1/2″, 1″, and 2″. The wire is bendable, so it can be shaped and cut to size.
Why Stretch Chicken Wire?
Stretching chicken wire tight serves several important purposes:
-
Gets rid of any kinks or other flaws in the wire mesh that come from rolling it up This helps the wire lay flat and even.
-
Provides tension so the chicken wire holds its shape. Otherwise, it may sag over time.
-
Allows you to create a smooth, professional looking end result.
-
Lets you fully extend the wire to the desired length.
-
Helps the chicken wire withstand impact without collapsing or deformation.
Before You Start Stretching
Follow these preliminary steps
-
Inspect the chicken wire for any defects or damage. Ensure you have enough undamaged wire for your project.
-
Clear debris from the area you’ll be working in. Remove any obstacles.
-
Measure the space you need to cover with the chicken wire and cut a piece slightly longer than required. It’s better to have extra than not enough.
-
Make sure you have all the necessary tools on hand before starting such as wire cutters, pliers, stapler, gloves, etc.
-
Plan where you will anchor the chicken wire at each end. Natural poles work well, or you can use posts secured into the ground.
How to Stretch Chicken Wire
Now you’re ready to start stretching. Follow these steps:
-
Lay the chicken wire flat on the ground in the location you’ll be installing it.
-
On one end, wrap the edge of the chicken wire around your anchor point and staple or nail it into place.
-
While firmly gripping the other end with gloved hands or pliers, steadily pull the wire towards the opposite anchor point to apply tension.
-
Periodically check that the wire is maintaining even tension across its width, not just the edges. Adjust as needed.
-
Once fully stretched, wrap the other end around the second anchor point and securely staple or nail in place.
-
Use wire cutters to trim off any excess chicken wire.
-
Re-check tension and reinforce with additional staples anywhere the wire feels loose.
-
You can bend, twist, or otherwise change the shape of the chicken wire to fit your project.
Helpful Tips
-
Stretch chicken wire slowly and gradually to avoid overstressing it. Don’t yank too forcefully.
-
Wear thick gloves to protect your hands from the cut edges of the wire.
-
Use a helper to hold one end of the wire while you stretch from the opposite end.
-
On long spans, stretch from the center working outward to the ends.
-
Stretching works best at moderate temperatures. Avoid extreme cold or heat.
-
For large areas, stretch in sections rather than all at once.
-
Check for proper tension frequently and adjust as you go.
-
Consider using a wire stretcher tool for added leverage and ease of use.
Securing Stretched Chicken Wire
Once stretched to the desired tension, the chicken wire must be firmly secured in place. Here are some options:
-
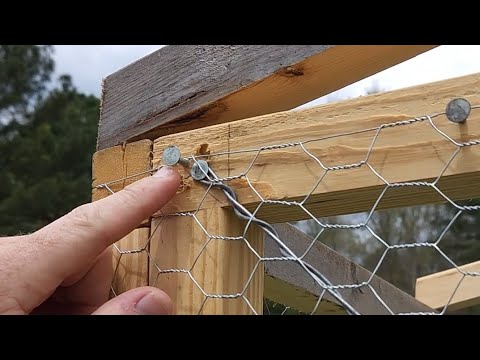
Staples – Hammer staples approximately every 6-8 inches along framing boards, poles, or posts.
-
Zip ties – Loop zip ties through the wire mesh and around anchor points to hold it tightly.
-
Twist ties – Twist soft wire ties tightly around the chicken wire where it meets poles, fencing, etc.
-
U-nails – Hammer U-nails along framing boards or plywood backing to secure the chicken wire.
-
Hog rings – Use hog ring pliers to clamp hog rings along the edge of the chicken wire every few inches.
-
Wire – Wrap and twist baling wire around the chicken wire and anchor points to hold it in tension.
Common Uses for Stretched Chicken Wire
Chicken wire is a versatile product that can be stretched and secured in many useful applications:
-
Coops, runs, and enclosures for chickens, rabbits, goats, and other livestock.
-
Protective barriers for gardens and flower beds to keep animals out.
-
Wrapped around fence or deck railings for safety.
-
Cylinder cages for small animals like guinea pigs.
-
Craft projects such as plant trellises, hanging planters, lampshade covers, and more.
-
Sports backstops at home to practice batting or shooting pucks.
-
Temporary fencing for dogs, building sites, events, etc.
-
Decorative elements for windows, room dividers, ceiling accents and other ornamental uses.
Learning how to properly stretch and secure chicken wire takes some technique, but is easy to master. Following the steps outlined here will help you get clean, straight, and professional looking results for whatever purpose you need chicken wire. With the right tools and preparation, you can stretch chicken wire smoothly and efficiently. Just take care not to overtension the wire, and reinforce it well for maximum durability.
Step 8: Splicing Fence Sections
When dealing with longer fence lines, seamless integration is key. Splicing fence sections allows for a continuous and unbroken barrier. You can either splice the wires by hand or use a machine, such as fence clips or hog rings, for ease of use. Overlapping the fence material from previous sections ensures a secure connection. This step guarantees that your fences strength isnt compromised by joints or weak points, creating a cohesive and dependable boundary. Properly spliced fence sections contribute to the fences overall stability and effectiveness, providing a durable solution for your enclosure needs.
Step 14: Cleaning Up and Completion
As you finish your wire fence stretching project, the last thing you need to do is clean up the work area and make sure everything is properly stored and secured. Carefully release the tension on the come-along tool and detach it from the fence. Take down any temporary braces that were used during the stretching process. Cut off any extra fence material that is hanging off the posts or corners with wire cutters or other appropriate tools. With the area cleaned and the fence stretched successfully, take a moment to appreciate your accomplishment.
How to properly install and stretch chicken wire
FAQ
Can you tension chicken wire?
Dig a trench along your fence line for the netting, making it approximately 30cm deep. To achieve a robust and highly secure fence, employ tensioning wire in multiple rows. Instructions for tensioning a fence can be found here.
How to make chicken wire not sag?
To get most of the curl out, unroll it “upside down” so that the wire on the end bites into the ground. Put a couple of cement blocks or something heavy on that end. Roll out the rest of the fence, putting weights on it wherever it wants to curl back up. Leave it for a couple of days.
How do you secure a chicken wire fence?
Use diagonal tension when running new fence (especially chicken wire). It’ll stretch nice and neat. Tension on the sides is just as important as it is on the ends. Very true. It really comes down to finesse when securing. A good way to do it without any help is to stretch the top first and get it secure all the way to a corner or end.
Can chicken wire be stretched?
When you buy chicken wire in rolls, it can be hard to stretch. Other fencing materials have more support. You need to stretch it out to build a fence, and dealing with it can be tricky.
How do you stretch a chicken wire fence?
Stretch the fence as you unroll it and tie it to the next stake. Continue, stretching the fence so it stays tight and flat, and making sure to attach it to the stakes as you go. Agree with bstpierre. If you are stretching the chicken wire tight as you attach it to the fence posts, the fence will appear flat.
How do you unroll chicken wire?
To unroll chicken wire without damaging it, you can roll it out on the ground and then walk around on it to take out the kinks and stretch it out. This method is also fun for kids. You might want to keep unrolling the chicken wire to finish the job, but be careful not to damage it.
How do you Bury chicken wire?
If your chickens are digging around the fence line, the best solution I can give you is to bury the chicken wire about 12 inches below the ground. Even though it takes some work, all you have to do is dig a hole under the current fence and add more chicken wire, burying the second piece.
How do you attach a chicken wire to a board?
Angle the nails inward toward each other, so they grip the foam better. Wrap the chicken wire around the foam. Pull the sides so they touch the edges of the board. Put one end of the wire through the hole on one end of the chicken wire. Twist it so it is secure. Poke the wire through the corresponding hole on the other side of the chicken wire.