Plucking a chicken is an essential skill for anyone raising chickens for meat While you can buy pre-plucked chickens from the grocery store, learning how to do it yourself allows you to control the freshness and quality of your meat Plus, it can save you money in the long run.
I’ll show you how to pluck a chicken from beginning to end in this detailed guide. Whether you’ve done it before or just want to brush up on your skills, you’ll learn the important steps, tools, and tips for doing it right.
Why Pluck Your Own Chickens?
Here are some of the biggest benefits of plucking your own chickens versus buying pre-plucked:
-
Cost savings Plucking your own birds is much cheaper than buying chicken at the store The cost of feed and processing is minimal compared to retail prices
-
Fresher meat: Once you learn how to pluck chickens well, you can process them soon after killing them to get the freshest meat. Store-bought chicken is often days old.
-
Better taste: Chicken allowed to live and grow naturally, with a varied diet, simply tastes better than commercial poultry.
-
More humane: When you raise your own birds, you can make sure they are happy and healthy from hatching to harvest. Commercial operations prioritize efficiency over animal comfort.
-
Skills development: Over time, you’ll get better at plucking. This is a useful skill for people who are homesteading or getting ready to live off the grid.
6 Steps to Pluck a Chicken
Follow these six basic steps for clean plucking:
1. Gather Your Supplies
You’ll need:
- Pot for scalding water
- 5-gallon bucket for dunking
- Knife or shears for any remaining feathers
- Old towel
- Cutting board
- Optional: defeathering machine if processing many chickens
2. Heat Water to 145-180°F
Heat a pot with 2-5 gallons of water. The temperature should be between 145-180°F before dunking the chicken. This helps loosen the feathers for easier removal. Use a thermometer to monitor the temperature.
3. Dunk the Chicken
With a rope or your hands, fully submerge the chicken in the hot water for about 30 seconds. Dunking too long cooks the skin. Dunking too briefly won’t loosen feathers enough.
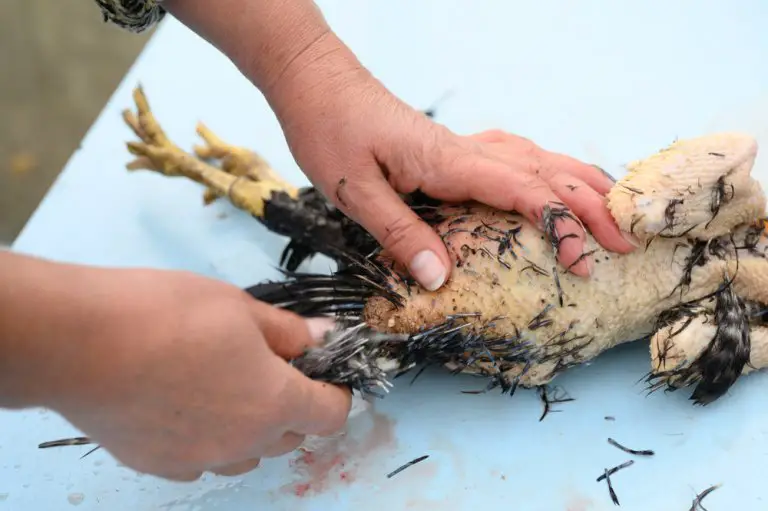
4. Pluck Feathers
Remove the chicken from the water and start plucking immediately while still warm. Pull the largest feathers first in the direction they grow. Use a repetitive flicking motion with your wrists. Discard feathers or compost.
5. Focus on Pinfeathers
Small pinfeathers will likely remain. Rub a towel over the skin to remove them. Tweezers help with stubborn pins around joints and crevices. Avoid tearing the skin.
6. Rinse and Chill
Give the plucked bird a final rinse under cool water to remove debris. Chill it thoroughly in ice water before butchering. Refrigerate meat right away.
Tips for Easier Plucking
Follow these tips and techniques for fast, efficient feather removal:
-
Pluck immediately after scalding when the skin is hottest. The longer you wait, the harder plucking becomes.
-
Hang the bird upside down. It keeps the work surface clear and allows easy access.
-
Start plucking at the base of the tail and work up towards the breasts and wings. Save the head area for last.
-
Pull steadily in the direction of feather growth. Jerking or twisting can tear the skin.
-
Keep the carcass warm. If the chicken starts to cool, re-dunk it in hot water for 30 seconds.
-
Use a few feathers to help rub off pinfeathers. The barbs help grab the tiny pins.
-
Consider waxing feathers on older birds a week before slaughter. This loosens feathers for easier plucking.
Using an Automatic Chicken Plucker
For those raising chickens extensively, a mechanical plucker is a worthwhile investment. These cylindrical drums have rubber fingers that efficiently remove feathers when a chicken carcass is placed inside.
Benefits of automatic pluckers include:
- Much faster than hand plucking
- More consistent results
- Less work for the processor
- Can handle 20+ birds in an hour
Downsides can include the initial cost, maintenance, and learning to use the equipment properly. But for serious poultry farmers, the time savings are significant.
Next Steps After Plucking
Once plucking is complete, the chicken is ready for these next steps:
- Chilling in ice water to 40°F internally
- Removing head and feet
- Evisceration and removal of organs
- Cutting into parts (breasts, thighs, wings, etc.)
Proper refrigeration of all meat is critical for food safety. Cook poultry within 2 days or freeze for later use.
While plucking chickens takes practice, it ultimately allows you to put high-quality, farm-fresh poultry on your dinner table. Following the steps outlined here will help you become efficient at the task over time.
Raising your own chickens and learning to process them is incredibly rewarding. The meat tastes superior to store-bought options. You’ll also gain skills and self-sufficiency for living off the grid.
Products For Gardeners
Learn to Butcher Chickens without equipment EASY Hand plucking 10 week old Freedom Rangers
FAQ
What is a plucked chicken?
the process of manually plucking chicken feathers before cooking.
What does plucking the chicken mean in slang?
to pluck a chicken. Slang. to rob, plunder, or fleece.
What does it mean to pluck a chicken?
verb. If you pluck a chicken or other dead bird, you pull its feathers out to prepare it for cooking.
Why did Diogenes plucked a chicken?
According to a story, the Greek philosopher Plato once said that people are “featherless bipeds.” Diogenes made fun of this idea by bringing a chicken whose feathers he plucked into the lecture hall and calling it a man. This meme continues such sentiments.