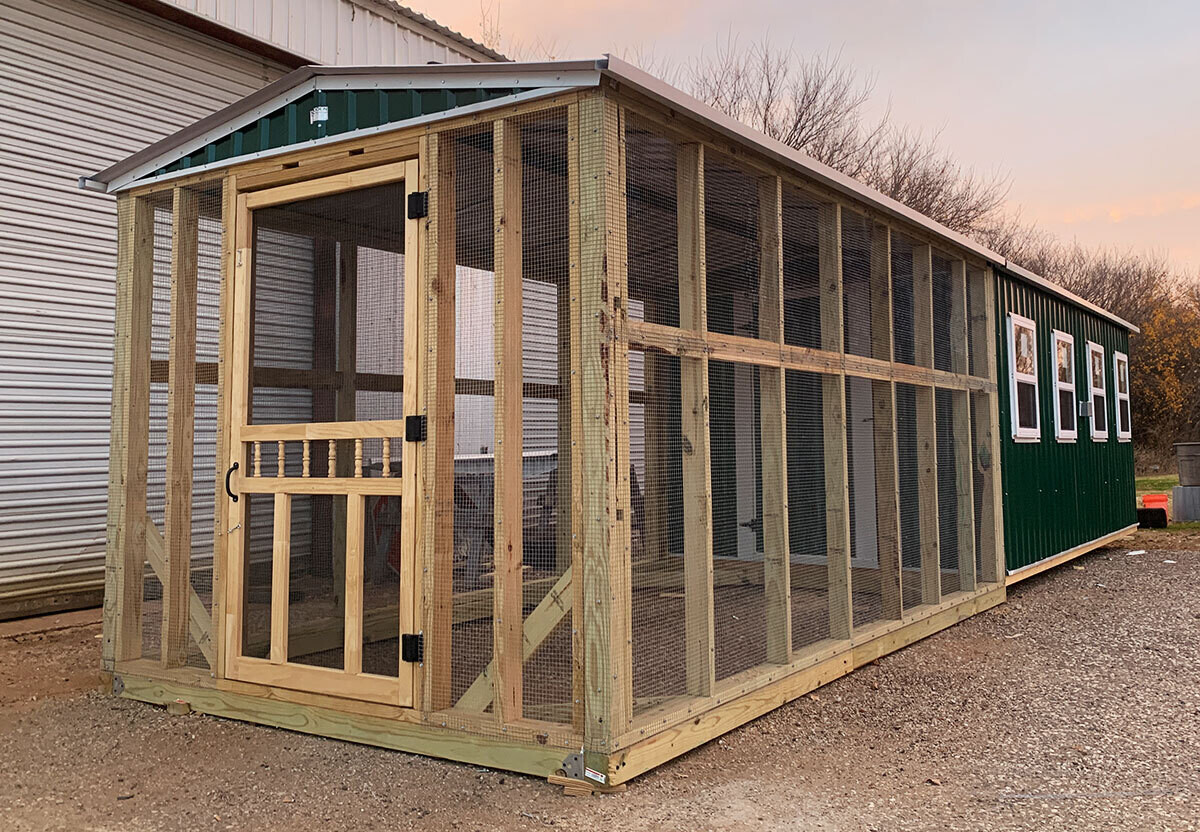
How to Build an A-Frame Chicken Coop a. k. a The Movable “Chicken Sled” – Get FREE Plans for this easy to build coop below!.
I have made many chicken coops over the years, and we are all in agreement that this is the best one by far.
Having chickens can be an incredibly rewarding experience. Fresh eggs, fun pets, natural pest control – what’s not to love? However, keeping chickens safe from predators while also allowing them time to roam can be a challenge. This is where an A-frame chicken run comes in handy!
What is an A-Frame Chicken Run?
An A-frame chicken run is essentially a portable chicken coop that allows your flock access to fresh pasture while keeping them safe and secure.
The A-frame shape provides plenty of interior space for roosting nesting boxes and feeders. The bottom portion is typically enclosed in wire mesh or hardware cloth, creating a “run” space where chickens can scratch, dust bathe, forage, and get fresh air and sunshine.
A-frame chicken runs are often built on skids or wheels so they can be easily moved to give birds access to new grass bugs and dirt. Their portability makes cleaning a breeze – simply drag them to a new spot to leave the mess behind!
Benefits of an A-Frame Chicken Run
There are many advantages to housing chickens in an A-frame style run
-
Safety – The enclosed design provides security from predators like hawks, dogs, foxes, and raccoons. Birds are safe from above and all sides.
-
With a mobile coop, you can give your chickens new grass and dirt every day. This prevents diseases that spread in stagnant coops and runs.
-
Chickens have access to pasture, where they can scratch, eat, dust bathe, and lay out in the sun. This is crucial to their health and happiness.
-
Easy cleaning – By moving the run daily, you leave the chicken poop behind to fertilize the ground. No need to shovel out bedding material.
-
Safety from the weather: The A-frame roof keeps the chickens out of the sun, wind, rain, and snow. Birds stay comfortable in hot and cold weather.
-
Aesthetics – These coops have a cute design that looks nice in backyards. Their small size can fit urban and suburban areas.
Things to Consider with A-Frame Chicken Runs
While A-frame runs have many perks, they do require some special considerations:
-
Predator protection – Be sure to use strong wire mesh on any exposed areas. Bury hardware cloth at least 12 inches to deter digging predators.
-
Ventilation: The closed A-frame shape can cause ammonia to build up. Ensure adequate airflow, fans, windows and vents.
-
Size – Plan square footage based on number and size of chickens. Overcrowding causes stress and unhappiness.
-
Weather extremes – Extra insulation and protection may be needed in very hot or cold climates. Pay attention to your chickens’ comfort.
-
Moving injuries – Take care when dragging the run to not catch chickens’ feet or wings. Go slow and check for hitch hikers.
-
Roosting bars – Many DIY plans lack roost bars inside. These are essential for chicken comfort and cleanliness. Be sure to add them.
-
Nesting boxes – Provide at least one enclosed space with bedding where hens can lay eggs in privacy.
Building an A-Frame Chicken Run
Ready to build one for your flock? Here are some step-by-step tips:
Choose a Design
-
Search online for free building plans that match your needs and skill level. Customize as desired.
-
Or purchase detailed blueprints with material lists, diagrams, photos and instructions. For example, Green Willow Homestead.
-
Decide size based on number of chickens, allowing at least 2-4 square feet per bird inside.
Select Materials
-
Framed walls of 2×2 or 2×4 lumber. Opt for lightweight cedar which resists rot.
-
Corrugated metal, plywood or vinyl for the A-frame roof.
-
1/2 to 1 inch hardware cloth or wire mesh for the run floor and walls. Staple securely.
-
Roosting bars made of 2×2 or 2×4 lumber spaced 8-12 inches apart.
-
At least one nesting box per 5-6 hens. Essential for egg laying.
Add Features
-
Wheels, skids or a hitch for moving the run around the yard.
-
Exterior nest boxes for easy egg collection.
-
Ventilation windows protected with wire mesh.
-
Roof overhangs to keep the run dry in rain.
-
Insulation if using the run in extreme cold or heat.
Finish and Use
-
Paint or stain the wood framing to protect it from elements.
-
Introduce chickens slowly to their new home so they adjust.
-
Move the run frequently for cleanliness and new foraging turf.
-
Do thorough cleanouts 2-4 times per year with fresh bedding.
-
In winter, add extra warmth like a heating lamp or deep litter bedding.
Helpful Tips and Tricks
Here are some additional pointers to get the most out of your A-frame chicken run:
-
Add a chain or eye hook on one end to tow with a tractor or ATV for easy moving.
-
Install an automatic pop door so chickens can come and go freely from the coop.
-
Hang feed and water inside the run for easy access. Use gravity or nipple systems.
-
Provide a shady spot under the A-frame roof so chickens can escape the sun.
-
Supplement feed with scratch grains scattered in the run to encourage foraging.
-
Grow bird-safe plants inside like wheat grass, clover or spinach for enrichment.
-
Place bricks or pavers under feeders and waters to prevent mud pits.
-
Use a deep litter method in cold months to generate warmth from composting.
A-frame chicken runs are great for keeping small backyard flocks safe, healthy, and happy while giving them room to roam. With smart planning and design, they can be an excellent housing solution for your chickens. Be sure to consider your climate, number of birds, predator threats, and convenience when selecting free building plans for your DIY A-frame run. Your feathered friends will thank you!
Finishing the A-Frame Chicken Coop
To finish the A-Frame Chicken Coop, I covered the roof edges with some vinyl trim pieces found in the roofing section of my hardware store.
Then I covered the roof with Corrugated Asphalt Roofing Panels that I cut to length. There are 2 panels on each side, and they overlap by about 4 inches in the center.
The panels are attached with coordinating nails made for them. The top is covered with matching ridge caps of the same material. These roofing materials are the same ones I have used for my big coop as well as my rabbit tractors. It’s handy and easy to use.
The only thing that remained to do in these photos, was to simply paint the raw wood. Otherwise the coop was done. The nesting boxes we have are simple milk crates tucked inside the big door. They are easy to access, easy to clean, and inexpensive.

To move the coop, simply hook a chain or strap to the “U” bolts at the front, and pull. The coop will slide across the ground on the skids.
This A-frame structure could be used for all sorts of things, depending upon how you finish it out. If you make a structure from these plans, be sure to let me know. I would love to see photos!.
To Build the Base of the A-Frame Chicken Coop
Cut a 45 degree corner off of each end of the 10 foot 2x8s. These are your skids.
Attach the pressure treated 64″ 2x8s to the skid, creating a large box. Place one at one end, close to the cut angle.
Place the other at 7’8″ – this (front) end will have more “skid” overhang. This is necessary.
Attach the pressure treated 64″ 1×8 at an angle on the forward end. This is a “skid plate” that will lay vegetation over as you slide the coop. Simply align it with the edge of the skid.
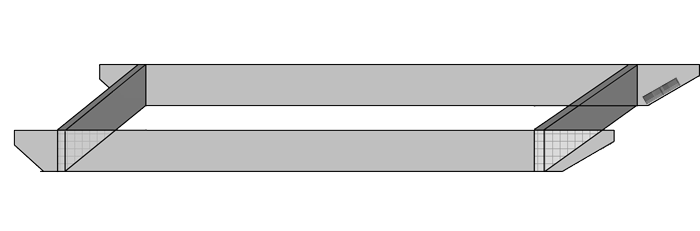

Attach the U-bolts above the “skid plate” with the U on the inside. You will need to drill the holes for these.

Next we’re going to frame the supports for the floor.
Place the 64-inch 2x4s evenly between the frame’s ends (shown in blue in the diagram below). ) They will be lined up with the top edge of the frame, so that the bottom of the board is above the ground.
After they are joined together, you will measure and cut 8 pieces of 2×4 to connect them. These will be about 21 3/4 inches long, but I don’t cut them ahead of time because the wood has natural flaws and variations.
I measure each space and cut a board to fit them. (Noted as green in the diagram below.) The boards should be staggered so that you can easily attach them with screws in the ends.


Now that the frame of the base is completed, you will cover the floor with the 1 inch hardware cloth. Attach the metal mesh across the width of the frame using the poultry net staples. These are “U” shaped nails.
I find them easiest to attach by holding them with my multi-tool while I hammer them in.
You want the raw (cut) edges of the hardware cloth to completely cover, or slightly wrap over the top of the frame. This will prevent your chickens from cutting their feet on sharp metal.

Overlap the mesh slightly on the joists.

The bottom portion is now completed.
Place the A-frame on top of the base and attach with screws. At this point the frame of your coop is complete, and you can finish it any way you like. Below I have diagrams showing how I completed mine.

This end of the coop is the end with the perches. I purchased a pre-made louvered vent from the hardware store and framed it in with pieces of 2×4. This vent allows airflow, but doesn’t let rain come in where the chickens are sleeping.
Then I framed a chicken door below that vent. These were done with scraps of 2×4 left from the project.
Once the frames were competed, I cut pieces of 3/4″ plywood to close the openings and finish off the ends.
I then built a door from the plywood, (about 16×18 inches) framed it with 1×3″ pieces and attached it with hinges. I made a door latch (swivel wood) and built a little ramp.
This end was finished.

TIP: When you finish out the ends of your structure, any board that is placed vertically to meet the roof/sides – must be cut at the very sharp 60 degrees off square angle.
Any board that connects horizontally to the roof/sides will be cut at the milder 30 degrees off square angle.

On the other end, I cut a horizontal 2×4 to sit flush with the end, dividing the end in half. The top portion, I covered with 1/2 inch hardware cloth, attaching it with the poultry net staples. I covered the bottom edge of the hardware cloth with a piece of 2×3 that was a scrap from another project.

The bottom half is a large door.
The door is big enough that I can climb inside the coop if necessary – you never know! This is also the end where the nesting boxes will be and how I will collect eggs. The hinges are at the bottom.
The door is 4 feet wide, and trimmed with 1x3s. Trim looks nice on these doors but it isn’t a decoration. It reinforces the doors and helps prevent the door from warping in the weather.
I attached a “leg” for support that is also hinged. It will support the door if I need to lay it open for any reason, and keep the hinges from getting stressed.
The latch is a wood swivel, just like on the other door. It is simply a piece of 2×4 that swivels on a screw. Turn it to latch or lock the door. It’s a frugal way of making a latch, basically for free from scraps.
HOW TO Build an EASY DIY A-Frame Chicken Coop | Part #1 (Pallet Project)
FAQ
What is an A-frame chicken coop?
An A-frame chicken coop is a coop or coop/run combination in an ‘A’ shape. It is a type of chicken coop. If you’re interested in building an A-frame coop for your chickens, then you’re likely looking for a coop with one or more of the following functions: Sound about right? Here’s how you can DIY an A-frame chicken coop.
Can I build my own a-frame chicken coop?
If you’re ready to start building your own A-frame chicken coop, click on any of the links in this article to get the plans. Enjoy giving your chickens a safe and lovely place to live! Like it? Pin it! Sharing is caring! It’s quick and easy to build an A-frame coop, even if you’re not a pro.
Do a-frame chicken coops have to be chicken tractors?
Not all DIY A-frame coops have to be chicken tractors. You can quickly and cheaply build a walk-in A-frame coop as well. Check out these step-by-step photos and plans for a simple, straightforward DIY coop. Many A-frame chicken coops are stationary and of high quality.
How long does it take to build an a-frame chicken coop?
An A-frame chicken coop can be built in just a few hours so your flock can have a safe and secure place to live. Cheap to build. Almost any type of leftover or recycled building materials can be used to build an A-frame chicken coop. Plywood, roofing materials, metal, screen wire, PVC pipes, etc. , can be used for this easy DIY project.
Are a-frame chicken coops cheap?
As you can see, many plans for A-frame coops are cheap, and the coops themselves are cost-effective and easy to build. If you are ready to build your own A-frame chicken coop now, click on any of the links in this article to get your A-frame chicken coop plans. Enjoy giving your chickens a safe and beautiful place to live! Like It? Pin It!.
What is the best a frame chicken coop?
Quaint A-Frame Chicken Coop If you want a stylish coop for your chickens, this quaint A-frame design by The Owner Builder Network is the way to go. This coop is perfect for those without a lot of space in the backyard or people who only plan on raising a few chickens. You’ll find all the materials needed listed on their website, so check it out. 9.