Dry aging beef has become an increasingly popular technique for home cooks and meat lovers looking to achieve tender, flavorful steaks The process involves storing large cuts of beef in a temperature and humidity-controlled environment for weeks or even months, allowing natural enzymatic and microbial actions to break down connective tissues and concentrate flavors
Traditionally, dry aging is done in specialized commercial chambers. But is it possible to mimic this process at home using a simple electric dehydrator? While a dehydrator can’t precisely control humidity like a professional setup, with some care and technique, you can use it to dry age beef with decent results.
How Does Dry Aging Work?
Dry aging beef relies on three key elements temperature, humidity and airflow. Ideal conditions are 34-38°F with 75-80% relative humidity. At this temp range, enzymes in the meat tenderize connective tissues while the low humidity slowly evaporates moisture from the surface. Air circulation ensures the meat dries evenly.
Over time, the beef loses moisture, concentrating flavors. The natural enzymes also break down tough connective tissues, resulting in a more tender final product. A dry aged steak will offer a deeply beefy, almost nutty flavor and “melt in your mouth” texture.
Can A Dehydrator Dry Age Beef?
While a dehydrator can’t precisely control humidity and temperature like a commercial aging fridge, it can mimic the process fairly well The key is gently removing moisture from the exterior while preventing the interior from fully drying out
To dry age in a dehydrator:
- Trim and cut a large primal or subprimal cut into 2-3 inch sections
- Lightly salt the meat and pat dry
- Arrange in a single layer on dehydrator trays without touching
- Set temp to around 130°F maximum
- Dry for 36-48 hours, rotating meat and blotting every 12 hours
- Vacuum seal and refrigerate 1-4 weeks to age
- Trim dried exterior before cooking
Choosing the Right Cut of Beef
Select a well-marbled primal or subprimal cut like ribeye, sirloin, tenderloin or strip loin. Pieces should be 2-3 inches thick. Avoid lean cuts or pre-cut steaks. The bone can be removed after aging when trimming.
Step-By-Step Instructions
Follow these steps for properly dry aging beef in a dehydrator:
-
Trim – Remove any large excess fat or silver skin, leaving a thin protective layer.
-
Cut – Slice the meat into 2-3 inch sections to expose more surface area.
-
Salt – Apply ~1 tsp kosher salt per pound. Let sit 1 hour to draw out moisture.
-
Arrange – Place in a single layer on dehydrator trays without touching.
-
Set Temp – 130°F max. Use a thermometer to monitor temp.
-
Dry – Dehydrate 36-48 hours. Rotate and blot meat every 12 hours.
-
Seal – Vacuum seal and refrigerate 1-4 weeks to age.
-
Trim – Remove any dried surface crust before cooking.
Regulating Temperature
Controlling temperature is critical when dry aging beef in a dehydrator. Ideal temp is 130°F. Much hotter can start cooking the meat. Monitor with a thermometer and adjust unit settings as needed.
Blotting and Rotating the Meat
Every 12 hours, rotate trays and blot meat with paper towels to absorb surface moisture. Consistent drying requires rotating and blotting.
Checking Doneness
After 36-48 hours, the exterior should feel dry but not hardened. Interior should still look moist. Drying time varies based on humidity, cut size, and marbling.
Vacuum Sealing to Age
Once dried, vacuum seal the meat and refrigerate for 1-4 weeks to age. The sealed environment allows flavor and texture to continue developing.
Trimming Aged Beef
Before cooking, use a sharp knife to trim any dried, discolored areas on the meat exterior caused by the dehydration. These will be concentrated with flavor but unpleasantly chewy in texture.
Duration for Maximum Flavor and Tenderness
2-4 weeks total time is ideal – 48 hours dehydrating then 1-3 weeks sealed aging. Up to 6 weeks can be done for large cuts like whole rib primals. Excessive drying negatively impacts moisture and yield.
Pros and Cons of Aging Beef in a Dehydrator
Pros:
- Adds concentrated flavor and tender texture
- More feasible for small households than large primal cuts
- Dehydrator evenly dries meat exterior
- No specialized equipment required
Cons:
- Unable to precisely control temp and humidity
- Increased risks of uneven drying or spoilage
- Takes weeks requiring patience and monitoring
- Must trim aged meat, reducing yield
- Size limited by dehydrator capacity
Tips for Best Results
Follow these tips when using a dehydrator to dry age beef:
- Choose an adjustable dehydrator with a thermostat and fan
- Use thermometer to ensure temp under 140°F
- Cut meat into uniform sizes to dry evenly
- Blot and rotate meat every 12 hours
- Start with the minimum 36 hour dehydrating time
- Do not overfill trays – allow airflow
- Sanitize dehydrator before and after use
- Trim any unappetizing mold growth
- Use well-marbled primal cuts, not lean meat
- Take detailed notes to perfect the technique
How Does Dehydrator Dry Aging Compare to Traditional?
While dry aging fridges are still best, dehydrators can get decent results at home. Traditional methods yield more complex flavor, superior tenderness, minimal moisture loss, longer aging, better temperature control, higher yield, and reduced food safety risks. But with care, a dehydrator can dry age beef for improved concentration of beefy flavors.
Frequently Asked Questions
What cuts are best to dry age in a dehydrator?
Well-marbled primal or subprimal cuts like ribeye, tenderloin, strip loin, or sirloin work best. Avoid lean cuts or pre-cut steaks.
Can you dehydrate age then sous vide the beef?
Yes, you can dehydrate age the beef then sous vide it to further tenderize and cook it perfectly.
How long does dry aging take in a dehydrator?
36-48 hours dehydrating then 1-4 weeks (or up to 6 weeks for large cuts) sealed aging. Monitor closely.
What temperature should you set the dehydrator to?
Ideal dehydrator temp is around 130°F for dry aging beef. Do not exceed 140°F internal meat temp.
Is there a bacteria risk when dry aging in a dehydrator?
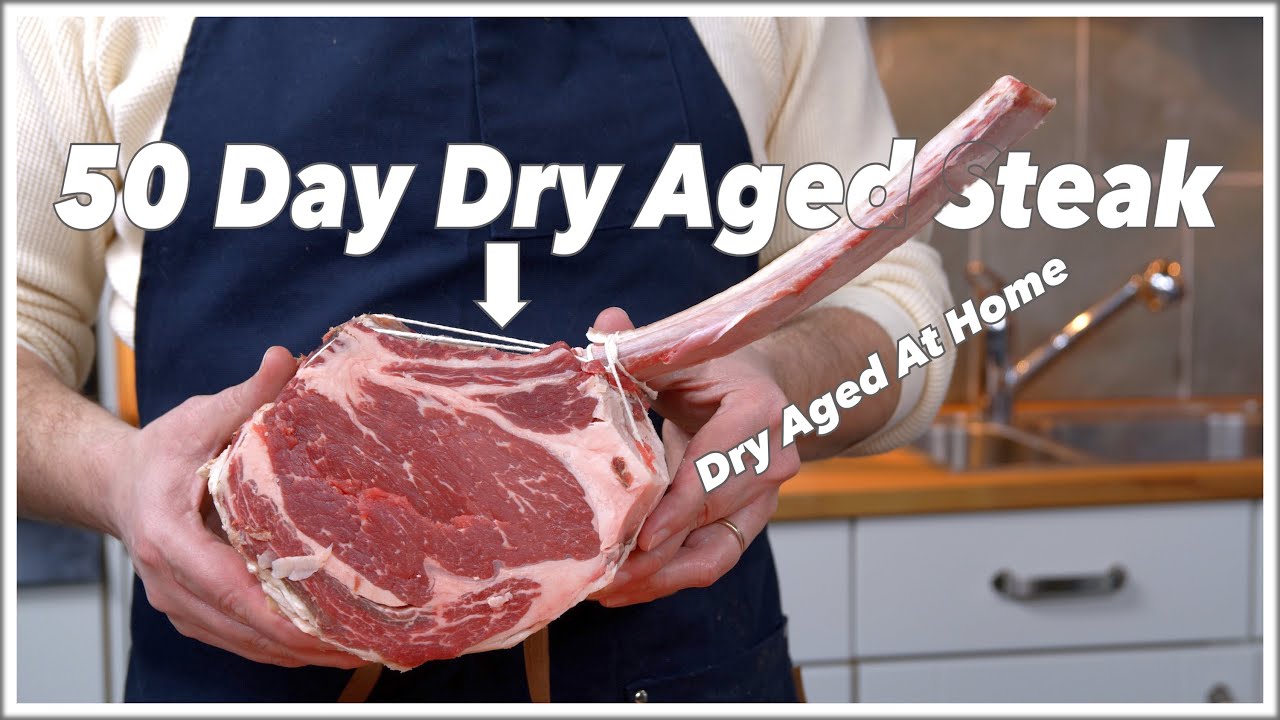
What Kind Of Steak Can You Dry Age at Home?
This is pretty important. You SHOULD NOT age individually cut steaks . Technically, you CAN age steaks that have been cut into individual pieces, but it’s a huge waste of time and money, and you’d be crazy to do it. Your meat will shrink vastly in size as it loses water through the aging process. With all the trimming of the rind that needs to be done and the smaller size, you’ll only be left with a thin slice of steak.
What you SHOULD be dry aging are subprimals – or larger whole muscles. For example, a strip loin shell (bone in), or a 107/109 rib (basically a giant slab of bone in ribeye). It doesn’t matter whether it is grain or grass fed – that’s just a case of personal preference. You want to look for meat that is on the bone, not because it tastes better, but because you can cut the bone away during trimming and not lose any meat. If you keep reading, I’ll explain why you cut the bone away, rather than cook the meat on the bone.
The quality of the meat also matters. You should use Choice grade or higher meat that has at least some marbling, and you should avoid cuts that are too lean, like the Round. Lean or lower grade meat does not develop any significant intensification of flavor, because the marbling is slight. Since fat makes food taste good, not having any means you’re missing the base of flavor you need to build on.
If you want to try different cuts, like beef ribs, just remember that you WILL need to cut off any rind. For instance, dry aging might not work for a brisket because the flat might already be too thin to cut away and give up any more. CAB also found that dry-aged brisket didn’t take on any smoke flavor in their own tests. They came to the conclusion that drying briskets for BBQ wasn’t worth the time.
It may seem like a no-brainer, but since this is an attempt at a full guide, all dry aging should happen with meat that has not been wrapped or bagged, and the cuts should be put into the fridge “naked.” Leaving meat in a vacuum bag is wet aging. To learn more about the difference between Wet and Dry Aging, read this article.
The Dry Aging Set Up:
THE FRIDGE: You’ll need a dedicated fridge for your dry aging. When I say dedicated, I mean it. Do not store any extra items that need to be kept cool here—not beer, not birthday cakes, and not freshly killed deer quarters. You’re trying to create and maintain an ideal microclimate for your beef to get funky. Protect your atmosphere! Also, storing things next to each other may cause flavor profiles to mix, which can show up in the fat.
I chose the 8.6 cubic feet Edgestar model, because it’s large enough for me to have a “starter” piece, plus 2-3 additional pieces aging at one time. It seemed to me that any smaller model would not allow me enough space to have a reasonable selection actively aging. And if you’re going to spend the money, then give yourself the extra space. Also take note to make sure the interior widths aren’t too narrow – the pieces of meat you’ll be aging are wide and will need extra room for air flow around the edges. Conversely, a fridge that is too large (if you’re only aging 1-2 pieces at a time) may have more trouble with humidity levels. You’ll notice this unit also has wire shelves – you’ll need these (as opposed to solid glass shelves) to make sure airflow is sufficient.
Finally, the unit I chose also has a glass door – which isn’t necessary, but is preferable for two reasons. 1) it allows you to check progress without opening the door. 2) it looks cool AF. This fridge is slightly cheaper than the Edgestar but still has a glass door. Obviously there are even more budget options, but here are some things to watch out for. You may need to pay extra $ to swap out glass shelves; if it has a built in freezer that detracts from overall usable area, and if it has a veggie crisper drawer you may also lose some space where otherwise the fan could have gone.
Make sure your fridge is clean before you use it for the first time. I cleaned all the inside surfaces with a mixture of water and bleach.
THE AIRFLOW: Airflow is a crucial component to your dry aging set up. The good news is, ensuring you have adequate circulation is easy, and cheap. Just add a standalone fan. I chose this one – it was cheap, the perfect size for my fridge and offers 360 swivel of the fan head.
I actually placed my fan on a sheet pan to catch any meat drips (for easy cleaning), and angled the fan to face straight up towards the shelves. The cord will come straight out of the front of the fridge, just make sure it’s sitting as flat as possible against the seal.
The recommended humidity range by Certified Angus Beef is 20–75%, which is within the levels of humidity listed in the Dry Aging of Beef Executive Summary, which was written for the National Cattlemen’s Beef Association by Dr. Jeff Savell of Texas A&M.
It’s important to keep your humidity levels in this optimal zone. Too much humidity can lead to spoilage, with bacteria growth producing nasty odors and also spoiled flavor. Too little humidity will cause the product to shrink too much, and drying too quickly can damage the muscle structure by leaving gaps and air pockets.
There won’t be a problem with humidity in many parts of the United States because it will be easy to keep the level at or above 80%. For instance, in the winter, you would just make sure that your fridge is full, so the water in the fresh (also called “green”) food would help the humidity. You will need a humidity control on your fridge if you live in a place where the air is either very dry or very wet. Although not cheap, the simplest solution is to look for a wine fridge that has this feature.
If you’re just flirting above the 85% mark, an easy solution to control humidity is to install a giant salt block somewhere in your fridge. This will help lower humidity, can act as a air purifier and assist with controlling unwanted or “bad” bacteria.
THE TEMPERATURE: Your refrigerator needs to be set to below 40f and above 29f. I have mine set to 37f, just to account for any potential inaccuracies in the built in thermostat. The sweet spot is 36-39f. Although my fridge has a temperature display, it’s a great idea to invest in a stand alone thermometer which will monitor the temp. Anything above 40f will lead to faster spoilage and oxidization… aka rancidity. I’m sure you are aware that rancid meat is not a good thing. I’d rather pay an insurance premium of $15 for this Thermoworks unit (that you simply leave in the fridge) than lose expensive meat or get sick from it being held at incorrect temperatures. If you’re looking for something to display both temperature and humidity, consider this model.
