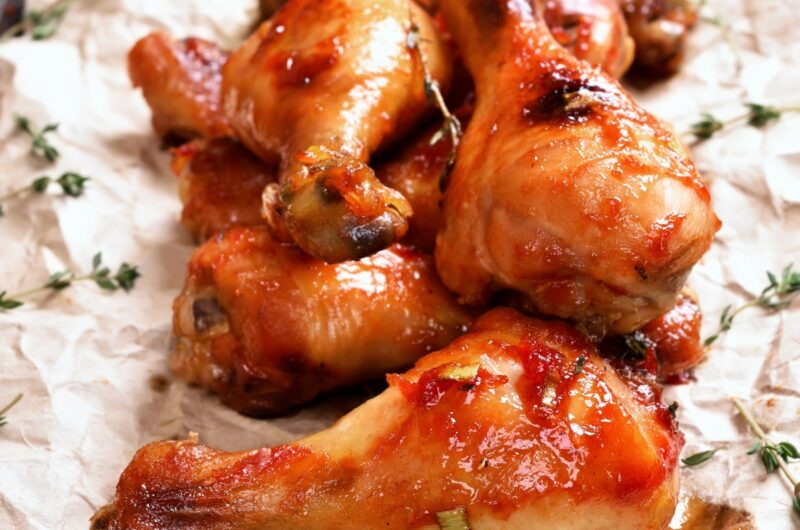
You will love this easy oven recipe for crispy chicken legs or drumsticks. I love the crispy skin on fried chicken, but it is a lot more work and mess for me.
In a cast iron pan, you can bake these chicken legs or drumsticks in the oven. They get the same delicious crunch as frying them.
Hey there, fellow food lovers! I’ve been experimenting with chicken legs in my trusty Dutch oven lately, and let me tell ya – I’ve discovered the perfect cooking times for that juicy-on-the-inside, crispy-on-the-outside chicken that everyone craves. Whether you call ’em drumsticks or chicken legs (I use both terms interchangeably), this guide will help you nail the timing every single time.
The Perfect Cooking Time for Chicken Legs in a Dutch Oven
For short, it takes about 45 minutes to cook chicken legs all the way through in a Dutch oven. But the details matter! Let’s break it down:
For the crispy method
- 15 minutes on stovetop (skin-side down)
- 15 minutes in oven at 375°F (skin-side up)
For the baked method
- 25 minutes at 450°F
- Flip and baste with butter
- Another 20 minutes of cooking
In both cases, you’ll know they’re done when the internal temperature reaches 165-170°F. Don’t skip checking with a meat thermometer – nobody wants to serve undercooked chicken or overcooked rubbery drumsticks!
Why Dutch Ovens Work So Well for Chicken Legs
Dutch ovens are perfect for cooking chicken legs because
- They retain heat evenly
- They can go from stovetop to oven seamlessly
- The heavy lid traps moisture when needed
- The cast iron creates a beautiful crispy skin
My personal Dutch oven is a 5.3L Le Creuset that I’ve had for years, but any good quality Dutch oven will do the trick.
Prepping Your Chicken Legs for Dutch Oven Success
Get those chicken legs ready right away, before you even think about cooking times. Here’s what I do:
- Pat the chicken legs completely dry with paper towels (this is SUPER important for crispy skin!)
- Season generously (more on this below)
- Let them dry out in the “ice box” (that’s what my grandma called the refrigerator) for 15-30 minutes uncovered
- Pat dry one more time before cooking
It may seem like a lot of drying, but trust me, it’s the only way to get that crispy skin we all want from restaurants.
Two Foolproof Methods for Cooking Chicken Legs in a Dutch Oven
I’ve got two methods that never fail me. Choose whichever suits your cooking style!
Method 1: The Stovetop-to-Oven Approach (30 minutes)
This method from Beyond Umami is quick and gives amazing results:
- Preheat oven to 475°F
- Pat dry chicken legs and season with salt, pepper, and a drizzle of olive oil
- Add a small amount of cooking oil to a COLD Dutch oven
- Arrange chicken legs in a single layer, skin-side down
- Place Dutch oven on stovetop over medium-low heat
- Cook UNCOVERED for 15 minutes (don’t touch them during this time!)
- Flip chicken so skin side is facing up
- Transfer Dutch oven to the preheated oven and reduce temperature to 375°F
- Bake for another 15 minutes
- Serve immediately
The magic here is starting with a cold Dutch oven, which helps render the fat slowly for extra crispy skin.
Method 2: The Kent Rollins Baked Approach (45 minutes)
This method gives you extra-crispy, seasoned chicken legs:
- Pat dry chicken legs and let them dry in the refrigerator for 15-30 minutes
- Preheat oven to 450°F
- Dip chicken in a buttermilk and egg mixture
- Coat with seasoned flour mixture (details below)
- Place on a wire rack and let sit for 5 minutes
- Bake for 25 minutes
- Baste with melted butter, flip, and baste the other side
- Bake for another 20 minutes or until internal temp reaches 165-170°F
- Let cool for 3-4 minutes before serving
The key difference here is the coating and the butter basting, which adds incredible flavor.
Seasoning Ideas for Your Dutch Oven Chicken Legs
Don’t be boring with just salt and pepper (though that works too!). Here’s some of my favorite seasoning combos:
For a basic savory mix:
- 1 tablespoon smoked paprika
- 1 tablespoon garlic powder
- ½ tablespoon ground mustard
- ½ tablespoon chili powder
For extra crispy coating:
- ½ cup all-purpose flour
- 4 tablespoons cornstarch
- Your favorite seasoning blend
The cornstarch is a secret weapon – it helps the batter stick to the chicken skin and creates that extra crunch we all love.
My Personal Tips for Perfect Dutch Oven Chicken Legs
After making this recipe about a million times, I’ve learned a few things:
- Grease the wire rack before placing chicken legs on it – this prevents the skin from sticking and tearing off when you flip them
- Keep chicken legs a few inches apart so air can circulate and crisp the skin all over
- Don’t skip the butter basting – it adds amazing flavor and helps with browning
- Let the legs rest for 3-4 minutes before serving – this helps the juices redistribute
- If cooking over a fire, you’ll need to keep the lid on the Dutch oven
A Budget-Friendly Family Meal
One thing I love about chicken legs is how affordable they are. I recently found a decent-sized package of meaty chicken legs for around $7 at the grocery store. Pair that with some creamy baked mac & cheese, and you’ve got a filling meal for several people for about $10 total.
In these times when grocery prices keep climbing, recipes like this that stretch your dollar are worth their weight in gold. As my mama always said, “A good cook can make a feast out of humble ingredients.”
Troubleshooting Common Dutch Oven Chicken Leg Problems
Even experienced cooks run into problems sometimes. Here’s how to fix common issues:
Skin not crispy enough?
- Make sure you’ve dried the chicken thoroughly
- Your oven might not be hot enough
- Try starting with a cold Dutch oven on the stovetop
Chicken too dry?
- You probably overcooked it – next time, check the temperature earlier
- Make sure you’re basting with butter
- Don’t let the chicken sit uncovered too long after cooking
Coating falling off?
- Let the coated chicken sit for 5 minutes before cooking
- Make sure you’re using cornstarch in your flour mixture
- Don’t flip the chicken too early
What to Serve with Your Dutch Oven Chicken Legs
These chicken legs pair perfectly with:
- Creamy mac and cheese
- Roasted vegetables (you can add these to the Dutch oven for the last 15-20 minutes)
- Buttermilk biscuits
- Coleslaw
- Mashed potatoes
- Corn on the cob
Final Thoughts
One of my favorite ways to cook this cheap cut of meat is in a Dutch oven chicken legs. The crispy skin and juicy meat go well together, and it’s easy to do as long as you know when to do it.
Whether you go with the quick 30-minute method or the extra-crispy 45-minute approach, you’ll end up with delicious chicken that’ll have everyone asking for seconds.
So grab your Dutch oven, pick up some chicken legs, and get cooking! And remember – the most important thing is to check that internal temperature. Aim for 165-170°F and you’ll have perfect chicken legs every single time.
What’s your favorite seasoning for chicken legs? Drop me a comment below – I’m always looking for new flavor ideas to try!
Can fully cooked chicken have any visible pink inside?
According to the USDA, chicken is fully cooked when all of its parts have reached a temperature of at least 165°F. Use a meat thermometer to make sure you’ve reached the right temp.
So it is possible that there may be some visible pink. You can cook it a bit longer but know that color does not necessarily indicate doneness.
What spices are best for baked chicken drumsticks?
I use my special blend of Homemade Seasoning Salt for this recipe. There is really no way to season it wrong, but don’t skip the seasoning! Other spices I love to use are Lemon Pepper, Garlic Powder, Sage, Thyme and Onion Powder. Of course you always want Salt and Pepper.
Dutch Oven Spicy Chicken Thighs – Enameld Cast Iron
FAQ
How long does chicken take in the Dutch oven?
Place the chicken, breast-side up, on top of the vegetables and cover the Dutch oven with the lid. 3Roast the chicken, covered, for 35 minutes. Take off the lid and keep roasting until a thermometer inserted into the thickest part of the thigh reads 165°, which should take about 20 to 25 minutes. Jan 3, 2024.
Is it better to bake chicken legs at 350 or 400?
Baking chicken legs at 400°F (204°C) is generally preferred over 350°F (177°C) for achieving crispier skin and a quicker cook time, while still maintaining juicy meat.
Are Dutch ovens good for chicken?
Cast-iron Dutch ovens are particularly useful for roasting chicken. The lid controls the browning process, the sides keep the chicken moist, and the material makes sure the whole chicken cooks evenly.
How long does it take for raw chicken legs to cook in the oven?
Arrange the drumsticks on a baking sheet spaced out enough so they are not touching. You can line the baking sheet in parchment for easier cleanup if desired. Turn the drumsticks over once halfway through the cooking time, or until the internal temperature reaches 175ºF.