Once Pat uncovers the grill for the season, it’s time to bust out my favorite recipe: beer can chicken! I rub a whole chicken in the most delicious beer can chicken seasoning and grill it to tender, juicy perfection sitting atop a can of beer. I’m obsessed with this easy grilled chicken recipe for summer cookouts. It turns out so moist and flavorful every time. You can even roast it in the oven if the weather isn’t cooperating!.
Welcome, grill warriors! If you want to step up your BBQ game and wow your family and friends, beer can chicken on the grill is the way to go. Picture a whole chicken standing tall on a can of beer. It’s cooking up juicy, tasty, and with that golden skin that makes us all drool. I’ve been playing around with this method for years and have burned a few birds along the way. Now I’m going to tell you all my tricks for cooking beer can chicken on the grill like a pro. Let’s fire up that grill and get to it!.
What’s Beer Can Chicken Anyway?
Before we dive into the nitty-gritty, let’s chat about what makes this dish so freakin’ cool. Beer can chicken is a grilling trick where you prop a whole chicken upright on an open can of beer (or other liquid, but we’ll get to that). The idea is that as it cooks, the beer heats up, creates steam, and keeps the meat moist while addin’ a subtle flavor kick. Plus, the upright position helps the heat hit every side evenly, so you don’t end up with raw spots or overdone bits. Some folks argue the beer don’t do much, callin’ it a gimmick, but I’m tellin’ ya, even if it’s just for the looks, it’s worth a shot. And when that skin crisps up? Oh, man, it’s heaven.
Why You Gotta Try Grillin’ Beer Can Chicken
I ain’t just hypin’ this up for no reason, Here’s why we at [Your Company Name or just “we”] think beer can chicken deserves a spot on your grill
- Juicy as Heck: That steam (or at least the idea of it) keeps the meat from dryin’ out.
- Flavor Blast: Different beers or seasonings can switch up the taste in wild ways.
- Crispy Skin Goals: The mix of direct and indirect heat gets that skin golden and crackly.
- Looks Insane: Your guests will flip when they see a chicken standin’ proud on the grill.
- Easy-Peasy Setup: Minimal stuff needed—just a bird, a can, and some spices.
No fancy chef skills required. If I can do it after a few trial-and-error disasters, so can you!
Step 1: Pickin’ the Perfect Chicken
First things first, let’s grab the right bird Not just any ol’ chicken will do for this grill party Here’s what I look for when I’m at the store
- Size Matters: Go for a whole chicken between 4 to 6 pounds. Too small, it cooks too fast and dries out; too big, it’s a pain to balance and takes forever.
- Fresh is Best: Skip the frozen stuff if you can. Fresh chicken got better texture and flavor. Look for plump, moist skin—no weird spots or extra fat hangin’ around.
- Quality Counts: If you can swing it, grab an organic or free-range bird. I swear, the taste is richer, like it’s got more soul.
Once you’ve got your chicken, give it a quick rinse under cold water and pat it dry with paper towels. Dry skin means crispier results, trust me on this.
Step 2: Choosin’ Your Beer and Seasonings
Now for the fun part—pickin’ the beer and jazzin’ up that bird with flavor, Here’s how I roll
- Beer Vibes: Grab a 12-ounce can of a lighter beer like a pilsner or pale ale. These won’t overpower the chicken with heavy tastes. Darker beers work too if you want a deeper, richer vibe, but I stick to light stuff most times. Puncture the top of the can a couple times with a church key or knife to let steam escape easier.
- Seasonin’ It Up: Mix up some salt, pepper, garlic powder, and paprika. Slap that rub on good, inside and out. Don’t be shy—rub it under the skin if you’re feelin’ extra. For a bonus kick, I stuff the cavity with goodies like lemon wedges, garlic cloves, or fresh herbs like rosemary. Smells amazing while it cooks!
- Weird Tip: Sometimes I half-drink the beer (ya know, for “taste testing”) so the can ain’t too full. Less chance of spillin’ on the grill.
Set that can aside for now—we’ll get to the weird balancing act in a sec.
Step 3: Settin’ Up Your Grill Like a Pro
It’s not enough to just throw chicken in a beer can on the grill and hope for the best. You gotta set up right. Here’s my go-to method:
- Clean That Grill: Make sure your grill—whether it’s charcoal or gas—is clean and free of old gunk. Ain’t nobody want last week’s burger bits on their chicken.
- Preheat to Medium: Get that grill to a steady 350°F to 375°F. Too hot, and you’ll char the outside before the inside’s done. Too low, and you’re waitin’ all day.
- Indirect Heat Magic: This is key, y’all. Set up for indirect cookin’ by placin’ the chicken on one side of the grill and havin’ the heat source (burners or coals) on the other side. This way, you avoid flare-ups and get even cookin’. If you’re on charcoal, pile the coals to one side. Gas grill? Just turn on half the burners.
- Stable Spot: Pick a flat spot on the grill for the chicken to stand. I’ve had a bird tip over mid-cook, and it ain’t pretty. Some folks use a special vertical rack or drip pan for extra stability—more on that later.
Step 4: Positionin’ the Chicken on the Can
Putting that beer can somewhere the sun won’t shine is the part that makes people laugh. It’s easier than it looks:
- Insert the Can: Take that open beer can and slide it into the cavity of the chicken. The bird should sit upright, with the can actin’ as a lil’ stand. Make sure it’s balanced—use the legs to form a tripod if needed.
- Check Stability: Give it a lil’ nudge. If it wobbles too much, adjust or set it in a drip pan for extra support. I’ve used a cheap aluminum pan before to catch drippin’s and keep things steady.
- Place on Grill: Carefully set the whole setup on the grill over the indirect heat zone. Close the lid if you got one—this traps heat and cooks it nice and even.
Step 5: Cookin’ Time and Temp Check
Now we cook! Patience is your friend here. Don’t be like me—I rushed this once and got a half-raw chicken. Here’s the deal:
- How Long?: Grill that beer can chicken for about 1 to 1.5 hours. A 4 to 6-pound bird usually takes around 1 hour 15 minutes at 350-375°F. Your grill might cook faster or slower, so keep an eye out.
- Check the Temp: Grab a meat thermometer (best grill tool ever, swear by it) and stick it in the thickest part of the thigh or breast. You’re lookin’ for 165°F to know it’s safe to eat. Don’t guess—raw chicken ain’t worth the risk.
- Signs It’s Done: Besides the temp, check if the juices run clear when you poke the thigh with a knife. Also, the leg should pull away from the body easy-like. Skin lookin’ golden and crispy? You’re prob’ly good.
Here’s a quick table for reference, ‘cause I know y’all like visuals:
| Chicken Weight | Grill Temp | Cook Time | Internal Temp |
|---|---|---|---|
| 4-6 lbs | 350-375°F | 1 to 1.5 hours | 165°F |
Step 6: Restin’ That Bird (Don’t Skip This!)
Once it’s off the grill, don’t just dive in with a fork. Let that chicken chill for a bit. Here’s why I always wait:
- Juice Lock-In: Rest the bird for 10-15 minutes on a cuttin’ board or platter. This lets the juices settle back into the meat. Cut too soon, and all that good stuff runs out, leavin’ you with dry bites.
- Safety First: It’s hot as heck right off the grill. Let it cool a tad so you don’t burn your fingers tryin’ to carve.
I usually tent it loosely with foil to keep it warm while I get the sides ready. Speakin’ of sides…
Step 7: Servin’ Up a Feast
Beer can chicken ain’t just about the bird—it’s the whole dang meal that makes it a party. Here’s how I serve it up to wow my crew:
- Carvin’ It Right: Carefully pull the can outta the cavity (it’s hot, use tongs or a towel) and carve the chicken into pieces. Lay ‘em out nice on a big platter.
- Sidekicks to Pair: I love grillin’ some veggies like zucchini or bell peppers alongside. Toss ‘em in oil, salt, and pepper—done. Other faves are creamy potato salad (cools down the hot chicken), crunchy coleslaw for contrast, and buttery corn on the cob straight off the grill.
- Drink Match: Pour the same kinda beer you used for cookin’. It ties the flavors together. Light lagers or pale ales are my go-to, but a fruity cider works if you’re feelin’ fancy.
- Presentation Pop: Throw some fresh parsley or rosemary on top for color. Serve with a side of BBQ sauce or garlic dip for extra yum.
Troubleshootin’ Common Hiccups
Even with all my grillin’ know-how, stuff goes sideways sometimes. Here’s how I fix common beer can chicken woes:
- Chicken Tips Over: If it’s wobbly, use a drip pan or a vertical rack. I’ve even propped it with a potato once in a pinch. Just make sure it’s stable from the start.
- Skin Ain’t Crispy: If the skin’s soggy, your heat might be too low or you got too much steam. Next time, crank the temp a bit at the end or use less liquid in the can. Some folks skip liquid altogether for max crisp.
- Undercooked or Overdone: Always use that thermometer. If it’s under, keep cookin’ in 10-minute bursts. If overdone, well, sauce hides a lotta sins. Lesson learned for next time—check earlier.
- Beer Spills: Half-empty the can before startin’ to avoid mess. Spills happen, just clean the grill after.
Variations to Spice Things Up
Once you got the basics down, play around! I’ve tried a buncha twists on beer can chicken over the years:
- Switch the Liquid: Not a beer fan? Use soda, apple juice, or even broth in the can. Gives a different sweetness or savoriness. I did cola once—kinda wild but tasty.
- Rub Experiments: Beyond salt and pepper, try cajun spice for heat or a sweet BBQ rub. Mix it up ‘til you find your jam.
- Vertical Rack Option: Some grill buddies of mine swear by metal racks instead of cans. They say it crisps better since there’s no steam softenin’ the skin. I’ve got one on order to test—will report back!
- Aromatics Galore: Stuff that bird with whatever you got—onions, thyme, even orange slices. Changes the vibe every time.
Debunkin’ the Beer Myth
Gotta address the elephant in the backyard—does the beer really do anythin’? I’ve heard plenty of grillers say it’s just a parlor trick, that the liquid don’t vaporize much ‘cause the chicken insulates it. They argue the upright position is what makes it cook even, not the steam. I ain’t no scientist, but I’ve done it both ways—with beer and without—and I think there’s a lil’ somethin’ to the moisture idea. Even if it’s just in my head, the ritual of poppin’ a can and settin’ that bird up is half the fun. You decide what works for you.
Gearin’ Up for Success
A quick word on tools—I don’t got a fancy setup, but a few basics make life easier:
- Meat Thermometer: Don’t grill without one. Guessing doneness is a rookie move.
- Tongs and Gloves: For handlin’ hot cans and chickens. I’ve singed my fingers too many times.
- Drip Pan or Rack: Optional, but saves mess and helps if your bird’s a tippy one.
- Good Grill: Gas or charcoal, don’t matter. Just know how to control the heat on yours.
Why Beer Can Chicken is My BBQ Staple
I keep comin’ back to this method ‘cause it’s a crowd-pleaser every dang time. There’s somethin’ about pullin’ that upright chicken off the grill that gets folks hyped. Plus, it’s low-effort for high reward—I can sip a drink and chat while it cooks, no babysittin’ needed. Whether it’s a lazy Sunday with the fam or a big ol’ cookout, beer can chicken never lets me down. I’ve messed up plenty in my grillin’ journey, but this one’s become my ace in the hole.
Safety Stuff (Don’t Be Dumb Like I Was)
Real quick, let’s talk safety ‘cause I’ve learned the hard way:
- Hot Can Hazard: That beer can gets scorchin’. Don’t grab it bare-handed when removin’ it. Use tools or wait ‘til it cools.
- Grill Smarts: Keep kids and pets away from the hot grill. I’ve had a close call with a curious dog—don’t need that stress.
- Food Safety: Wash hands, tools, and surfaces after handlin’ raw chicken. And double-check that 165°F temp to avoid tummy troubles.
Final Thoughts from the Grill Pit
Cookin’ beer can chicken on the grill is more than just a recipe—it’s a whole vibe. It’s about experimentin’, laughin’ at the weird setup, and enjoyin’ a killer meal with your people. We at [Your Company Name or just “we”] believe anyone can master this with a lil’ patience and the right tips. So, grab a bird, pop a can, and get that grill fired up. I promise, once you nail this, you’ll be the BBQ hero of the block. Got questions or your own funky twist on this dish? Hit me up in the comments—I’m all ears for new grill hacks!
Now, go make some memories (and some damn tasty chicken). Happy grillin’, y’all!

How to Make Beer Can Chicken on the Grill Step by Step
Prep: Gather up everything you need to begin. Make sure your beer is at room temperature, and preheat your grill to medium-high (375-450°F) heat.
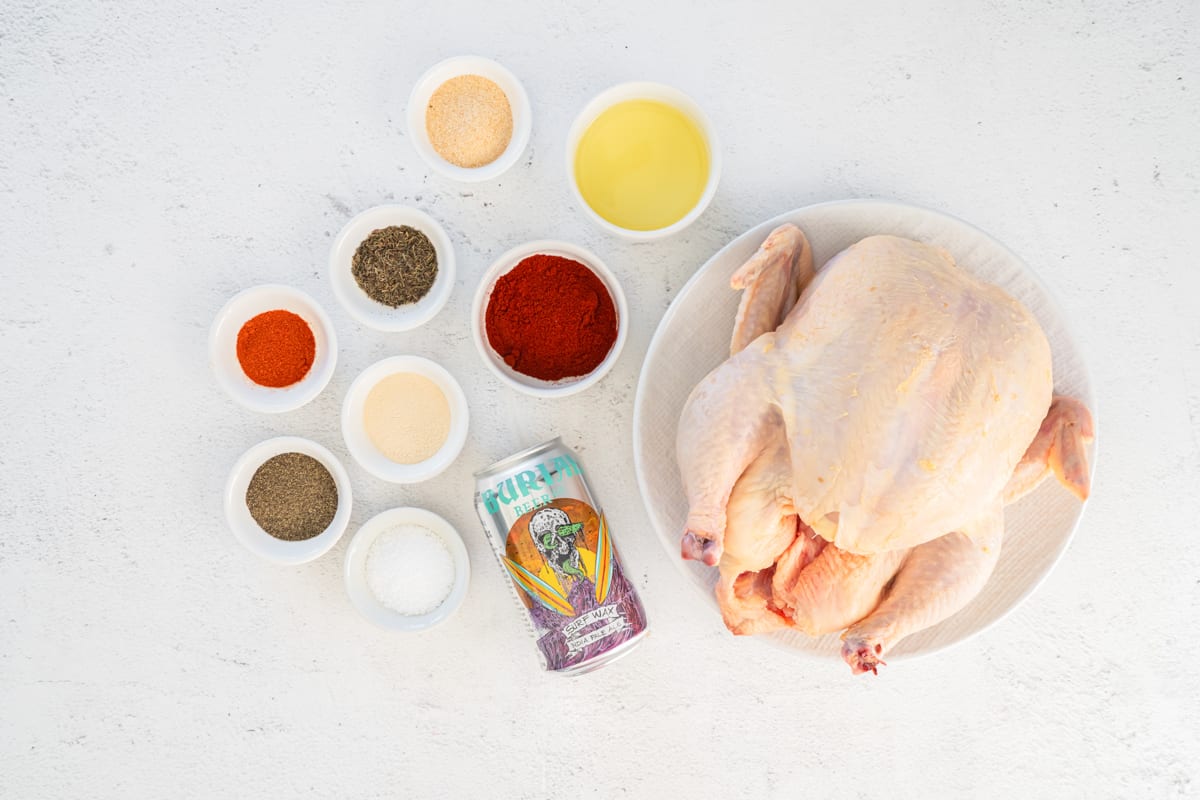
Make the Beer Can Chicken Seasoning: In a small bowl, combine 2 tablespoons of ground paprika, 1 tablespoon of kosher salt, 1 tablespoon of ground black pepper, 1 tablespoon of onion powder, 2 teaspoons of dried thyme, 2 teaspoons of garlic powder, and ½-1 teaspoon of cayenne pepper.
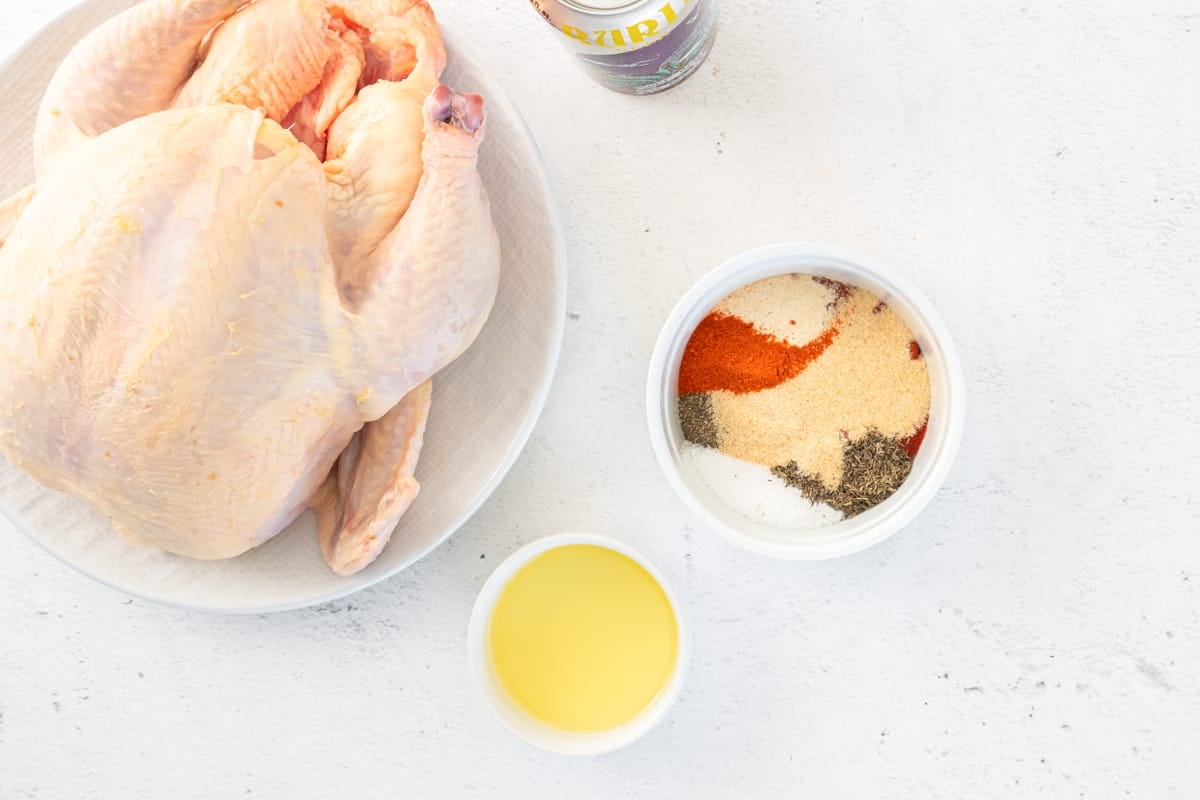
Rub 2 tablespoons of olive oil over the whole chicken and under the skin. Pat a 4-pound whole chicken dry with paper towels. Sprinkle the seasoning over the whole thing.
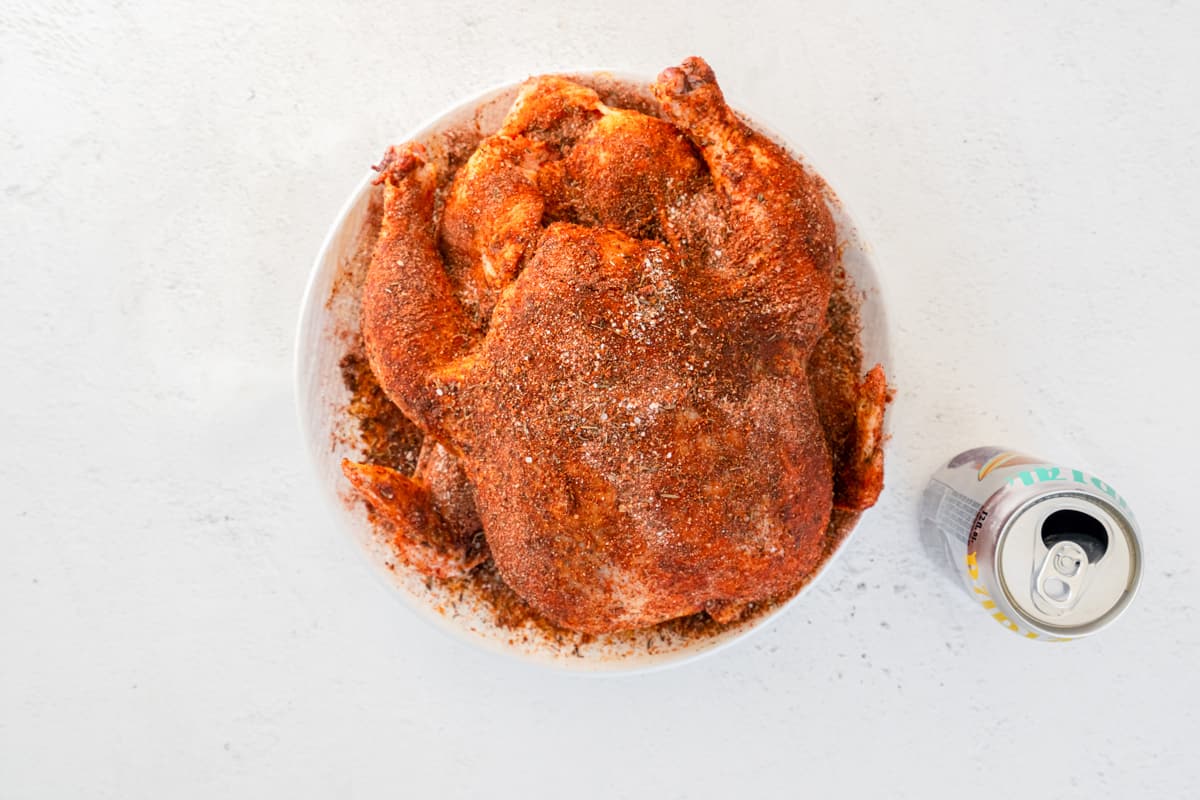
Put the chicken on the grill. Pour out half of a 12-ounce beer can, and then place the chicken on top of the half-full can. Place the chicken in the center of the hot grill and close the lid. Cook the chicken for 1 hour, undisturbed, then check the temperature every 15 minutes until an instant-read thermometer reads 165°F. Carefully transfer the chicken and can to a baking tray, cover loosely with foil, and rest for 10 minutes before carving and serving.

Beer Can Chicken in the Oven
You can make this tasty, easy roasted chicken in the oven if you’d rather, but I like to do it on the grill. Preheat your oven to 350°F and place the seasoned beer can chicken in a large roasting pan. Bake the chicken until the juices run clear and the breasts register 165°F, about 65 minutes. To make room for the bird, I suggest moving the oven racks to the top and bottom positions or taking out the top rack completely.
How to Make Beer Can Chicken on the Grill | Weber Grills
FAQ
How long do you cook beer can chicken on the grill?
Stand the chicken and can upright on the barbecue, either in the roasting tin or directly on the grill, on the side with no coals. In a 1 hour and 20 minute cooking time, the chicken should be browned, the meat should be soft, and the juices should run clear. If the juices aren’t clear, cook for a further 10 mins, then check again.
How do you cook a chicken with a can of beer?
Crack open the beer and pour out around two-thirds of it (or drink it!), then carefully lower the chicken cavity onto the can so it looks like it’s sitting up. Set the chicken on a roasting tray so that it is standing up. Put it in the oven and cook for about 1 hour and ten minutes, or until it is golden and cooked all the way through.
How long does it take to cook a beer can chicken on a Weber grill?
Carefully balance the chicken on its two legs and the can. Put the meat on the grill over indirect medium heat with the lid on. Cook for 1¿ to 1½ hours, or until the juices run clear and the temperature inside the thickest part of the thigh (not touching the bone) reaches 160° to 165°F.
How do you grill chicken on a propane grill?

Grilling chicken on a propane grill involves preheating the grill to medium-high heat, searing the chicken over direct heat, and then moving it to indirect heat to finish cooking.
How do you cook Beer can Chicken on a grill?
Preheating ensures that the chicken cooks evenly and reduces the cooking time. What temperature should the grill be? Maintain a medium heat on your grill, around 350°F to 450°F (175°C to 230°C), for proper cooking of beer can chicken.
How long to cook Beer can Chicken?
Optimal Cooking Time: Grill beer can chicken for 1 to 1.5 hours at a consistent temperature of 350°F to 375°F for best results. Internal Temperature Check: Always ensure the internal temperature reaches 165°F in the thickest part of the chicken for safe consumption.
Can you cook chicken with beer?
Cooking with beer offers distinct advantages, especially for beer can chicken. The infusion of beer not only enhances flavor but also helps maintain juiciness and tenderness in the meat. Beer acts as a natural moisturizer during the cooking process.
What temperature should Beer can Chicken be cooked at?
Maintain a medium heat on your grill, around 350°F to 450°F (175°C to 230°C), for proper cooking of beer can chicken. Should I use indirect heat or direct heat? Indirect heat is preferable for cooking beer can chicken. This means placing the chicken on the grill away from the direct heat source, allowing it to cook slowly and evenly.
How does beer make chicken tender?
The steam created by the beer inside the can fills the cavity of the chicken, preventing it from drying out. As the beer heats up, it releases moisture that circulates around the meat, ensuring even cooking. This results in a chicken that’s juicy and tender, satisfying even the pickiest eaters.
What is beer can chicken?
Beer can chicken is a unique grilling technique that combines flavor and moisture to create a delicious dish. This method involves placing a can of beer inside a whole chicken and grilling it upright. This process infuses the chicken with flavor while the steam keeps the meat juicy.