Hello, snack lovers! If you want a tasty, protein-packed bite that doesn’t make a mess and lasts a long time (kind of), chicken jerky is your new best friend. I’ve become hooked on making this at home, and let me tell you, it’s great. It’s not only better for you than eating red meat jerky, but it’s also a lot less expensive than buying it in a store. You can also try different flavors until you get the right mix. I’ll show you how to make chicken jerky step by step in this post. It’s easy enough that even someone who has never cooked before can do it. Ready to get jerkin’? Let’s dive in!.
Why Chicken Jerky Rocks
Before we get our hands dirty let’s chat about why chicken jerky deserves a spot in your snack stash. For starters it’s leaner than beef or pork, so you ain’t loadin’ up on fat. It’s got a punch of flavor, especially when you marinate it just right, and it stores like a dream—no fridge needed for a couple weeks if ya do it proper. Best part? It’s a DIY project that makes you feel like a freakin’ chef. But heads up, chicken’s gotta be handled with care to avoid nasty bugs like salmonella, so we’ll cover safety too. Alright, enough yappin’—let’s get to the good stuff.
What You’ll Need to Whip Up Chicken Jerky
First things first, let’s round up the gear and grub. I like to keep things simple, but you can change things as you go. Here’s the rundown:
- Chicken: Go for boneless chicken breasts—grab whatever’s on sale. Whole breasts are usually cheaper than pre-cut pieces, and you wanna avoid fatty cuts ‘cause fat spoils fast. I usually pick up 3-4 big ones for a batch.
- Marinade Ingredients: This is where the magic happens. My go-to mix is:
- 1 cup of soy sauce (for that salty kick—key for preservin’ it)
- 1 ½ tablespoons lemon juice (adds a lil’ zing)
- ¼ cup Worcestershire sauce (for depth, ya know?)
- 1 teaspoon garlic powder (can’t go wrong with garlic)
- 1 ½ tablespoons red pepper flakes (if ya like heat)
- 1 teaspoon black pepper (just a touch)
- Optional Flavor Twists: Sometimes I splash in some liquid smoke for that smoky vibe or a pinch of ginger for somethin’ different. Play around ‘til you find your jam!
- Equipment:
- A sharp knife (trust me, a dull one’s a nightmare)
- A dehydrator with temp settings (ideal, but not a must)
- Or an oven if you ain’t got a dehydrator
- Freezer bags or a big bowl for marinatin’
- Wire racks or trays for dryin’
- Tin foil (if usin’ an oven)
Got all that? Sweet. Don’t worry if you’re missing something; we’ll figure out ways to get around it as we go.
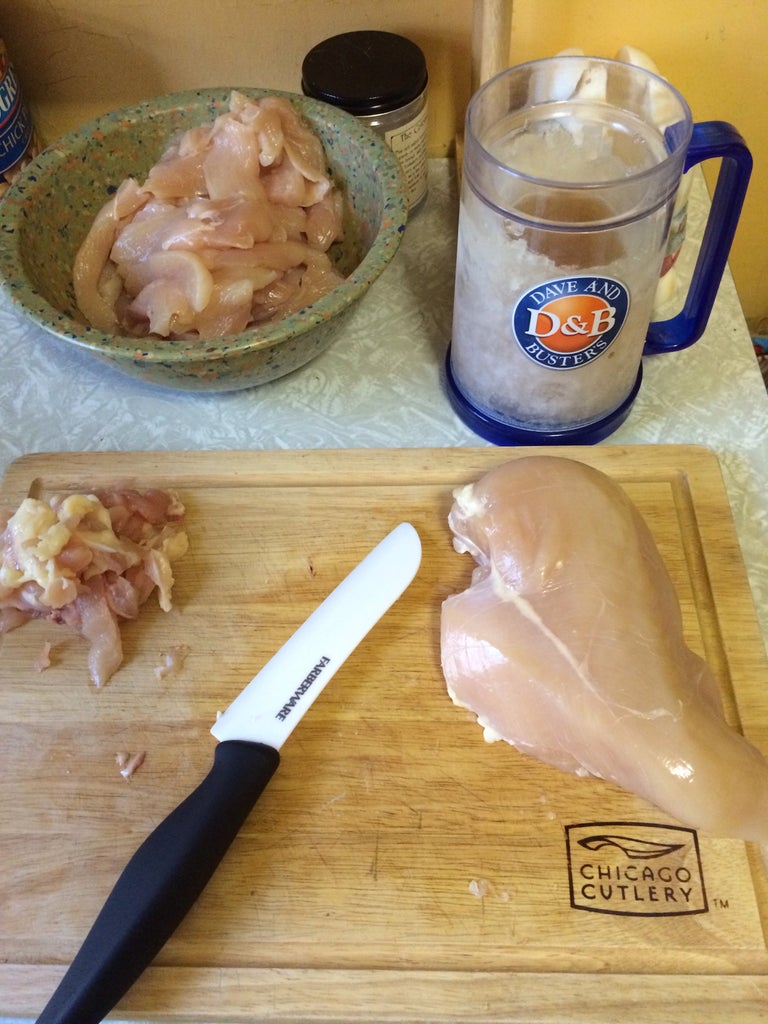
Step 1: Prep That Chicken Like a Pro
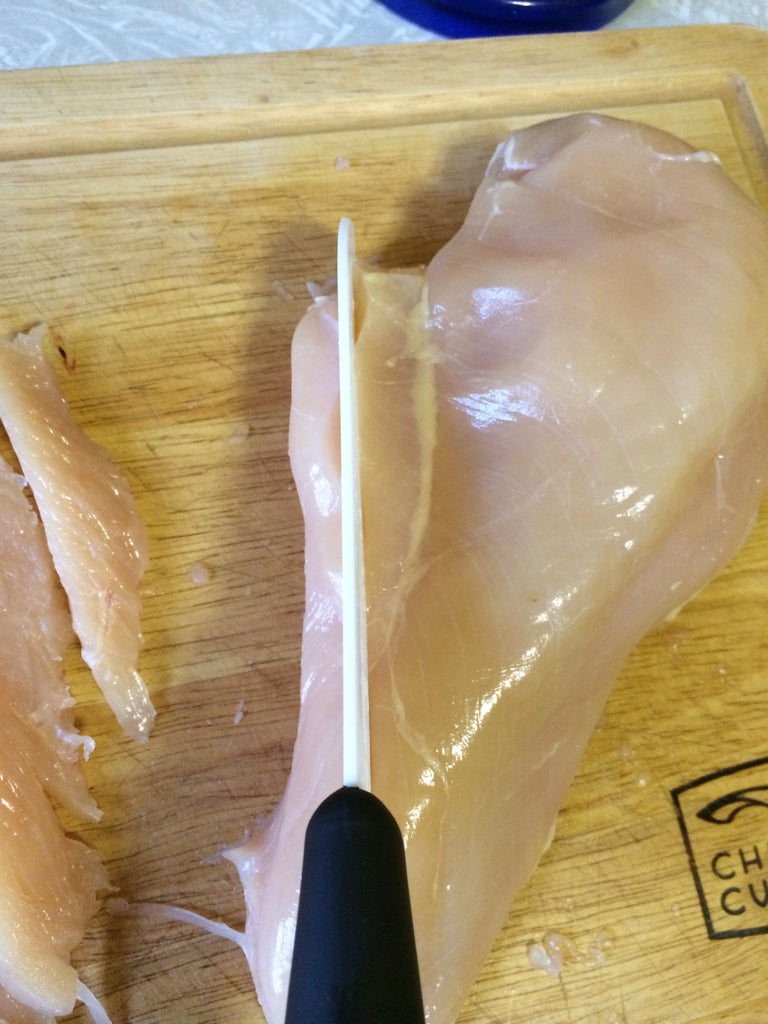
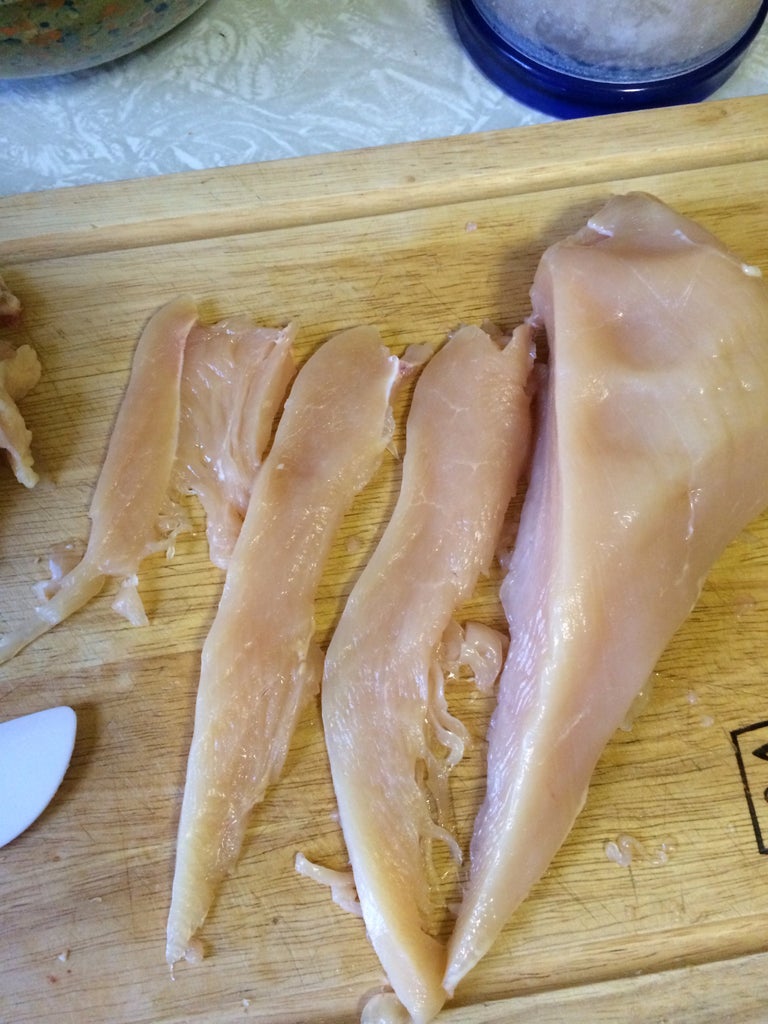
Alright, let’s get this party started by preppin’ the chicken. Cut off all the fat you can see on your breasts. We don’t want this jerky to go bad quickly, so fat is the enemy. Once it’s clean, cut it into very thin strips, about ¼ inch thick or less. Thinner strips dry faster and more even.
Pro tip: If cuttin’ feels like a chore, pop the chicken in the freezer for 15-30 minutes beforehand. It firms up and makes slicin’ a breeze. I used to butcher the heck outta my pieces ‘til I figured this out—total game-changer. Oh, and use a real sharp knife. I got one that cuts like butter, but be careful not to nick yerself!
Step 2: Marinate for Maximum Flavor
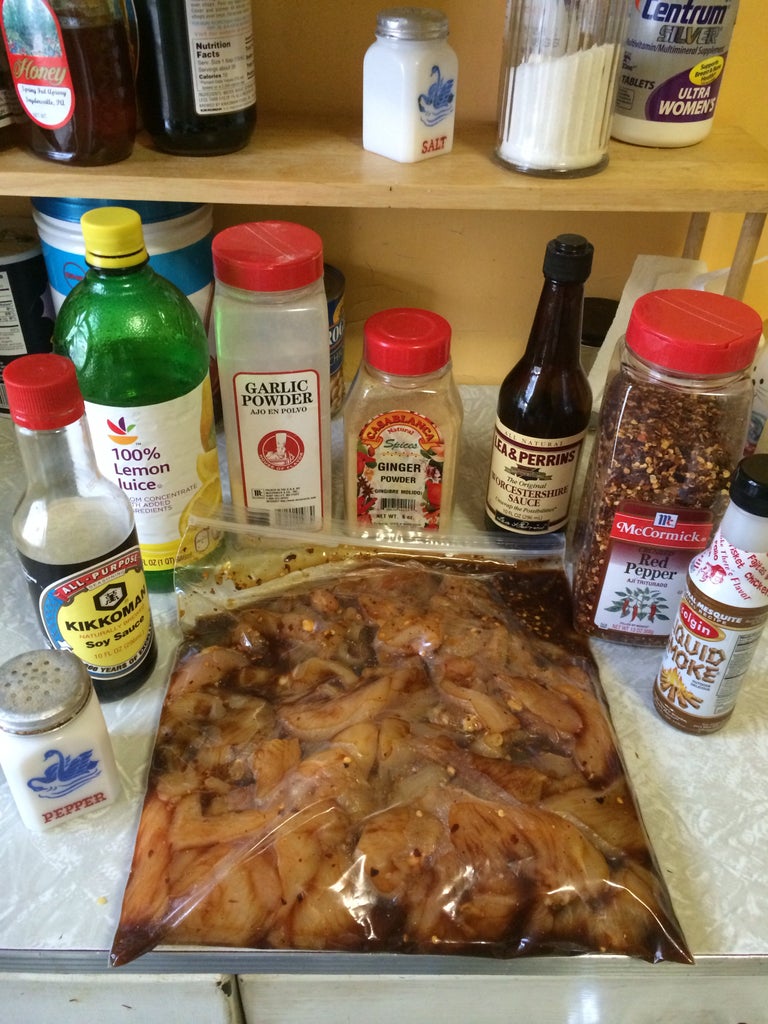
Now that your chicken’s all sliced up, it’s time to soak it in some serious flavor. Dump all them marinade ingredients I listed into a freezer bag or a big bowl. I prefer bags ‘cause you can squish out the air and massage the mix into every nook and cranny of the chicken. If you’re usin’ a bowl, just stir it around a lot to coat everything.
Toss yer chicken strips in there and let it sit for 30-60 minutes. Don’t leave it too long—chicken ain’t like beef; it don’t need hours to soak up the goodness. I usually set a timer and get on with other stuff while it marinates. If you ain’t a fan of soy sauce, swap it for somethin’ else salty—salt’s gotta be in there to help preserve the jerky and keep nasty bacteria at bay.
Step 3: Set Up for Dryin’ (Dehydrator or Oven)
Here’s where we turn that marinated chicken into jerky. You got two options: a dehydrator or an oven. I’ll break both down so you can pick what works for ya.
Usin’ a Dehydrator
If you got a dehydrator with adjustable temps, you’re golden. Lay out yer chicken strips on the trays, makin’ sure they don’t overlap. Overlappin’ pieces won’t dry right and will slow ya down. Set the temp to at least 160°F—super important for killin’ off any salmonella or other yucky stuff. Pop it somewhere outta the way and let it run for 5-8 hours. Mine usually takes about 6 hours, but thicker pieces might need an extra hour. Check on it now and then to see how it’s doin’.
Usin’ an Oven
No dehydrator? No prob. Your oven works just fine, though it takes a bit longer. Line the bottom of yer oven with tin foil to catch drips—saves a ton of cleanup. Place the chicken strips on a wire rack so air can get all around ‘em. Set the oven to 200°F and prop the door open a smidge with a wooden spoon or somethin’ heat-safe. This lets moisture escape. If you got a small fan, point it into the oven to help air move around. Check it every hour or so, and pat off any moisture on the strips with a paper towel to speed things up. Expect it to take 6-10 hours dependin’ on thickness.
Safety note: Whether you’re usin’ a dehydrator or oven, don’t skimp on the heat. Chicken’s gotta hit that safe internal temp to avoid makin’ ya sick. If yer dehydrator don’t got a temp settin’, I wouldn’t risk it—stick to the oven method.
Step 4: Check for Doneness and Cool It Down
So, how do ya know when yer jerky’s ready? I like mine a bit crispier than most, so I wait ‘til I can bend a piece and it starts to crack or peel a lil’. If you prefer it chewier, take it out when it’s firm but still bends without breakin’. Taste test a piece if ya wanna—warm jerky straight from the dehydrator is freakin’ delicious, though I gotta stop myself from eatin’ it all right then and there.
Once it’s done, let it cool down to room temp before packin’ it up. Don’t be tempted to bag it while it’s hot—moisture will build up in the container and mess with the shelf life. I learned that the hard way when my first batch went soggy after a day. Let it chill out on the counter for a bit first.
Step 5: Store It Right to Keep It Fresh
Speakin’ of shelf life, let’s talk storin’ this bad boy. Once yer jerky’s cooled, pack it into airtight bags or jars. At room temp, it should last about 2 weeks—perfect for tossin’ in a backpack or keepin’ on the counter for quick snacks. If ya wanna stretch it longer, stick it in the fridge for up to a month. And if you’re worried it didn’t cook through proper, play it safe and store it in the freezer. That’ll keep any nasties from growin’ and ruin yer hard work.
I usually split my batch—some in a jar for now, some in the fridge for later. Just don’t forget where ya stashed it. I’ve found old jerky in the back of my pantry before, and let’s just say it weren’t pretty.
Bonus Tips for Next-Level Chicken Jerky
Wanna kick things up a notch? Here’s a few tricks I’ve picked up over time:
- Flavor Experiments: Try addin’ stuff like honey for sweetness, hot sauce for extra spice, or even a splash of apple cider vinegar for tang. I once threw in some crushed pineapple juice, and dang, it was weird but awesome.
- Cut Consistency: If yer strips ain’t dryin’ even, next time make sure they’re all the same thickness. Uneven cuts are my biggest pet peeve.
- Texture Control: If it’s too tough, ya mighta dried it too long. Pull a test piece out early next batch to see what ya like.
- Safety First: Always wash yer hands, knife, and cuttin’ board after handlin’ raw chicken. Ain’t worth riskin’ cross-contamination.
Here’s a quick table for my go-to marinade recipe, just to keep it handy:
| Ingredient | Amount |
|---|---|
| Soy Sauce | 1 cup |
| Lemon Juice | 1 ½ tablespoons |
| Worcestershire Sauce | ¼ cup |
| Garlic Powder | 1 teaspoon |
| Red Pepper Flakes | 1 ½ tablespoons |
| Black Pepper | 1 teaspoon |
Feel free to mess with this ‘til it’s your kinda flavor. That’s half the fun!
Troubleshootin’ Common Jerky Fails
Even with a solid plan, stuff can go sideways. Here’s how to fix a few hiccups I’ve run into:
- Jerky’s Too Wet: Didn’t dry long enough, prob’ly. Pop it back in for another hour or two and check again.
- Tastes Bland: Might need more marinade time or a bolder mix. Next time, up the spices or let it sit a tad longer.
- Uneven Dryin’: If some pieces are done and others ain’t, rearrange ‘em on the tray or rack to get better airflow. And like I said, cut ‘em even next go.
- Smells Off: If it don’t smell right after a few days, toss it. Better safe than sorry with chicken.
Why I’m Obsessed with Homemade Jerky
I gotta be real with ya—makin’ chicken jerky ain’t just about the snack. There’s somethin’ satisfyin’ about turnin’ a plain ol’ chicken breast into somethin’ so dang good. It’s like a lil’ science project, mixin’ flavors and watchin’ it transform in the dehydrator. Plus, when I bring a bag of my homemade stuff to a party, folks lose their minds. “You made this?!” Yup, and it weren’t even that hard.
Another thing—store-bought jerky costs a fortune, and half the time it’s loaded with junk I can’t pronounce. With this, I know exactly what’s in it. If I wanna go low-sodium or skip the spice, I can. Total control, baby.
Variations to Keep Things Fresh
If ya get bored with the basic recipe, switch it up! Here’s a couple ideas I’ve toyed with:
- Teriyaki Twist: Swap some soy sauce for teriyaki sauce and add a spoonful of brown sugar. Sweet and savory, can’t beat it.
- Spicy BBQ: Mix in some BBQ sauce and a dash of cayenne. Smells like a cookout while it’s dryin’!
- Herb Vibes: Toss in dried rosemary or thyme with the marinade. Sounds fancy, tastes amazin’.
Each batch is a chance to try somethin’ new. I keep a lil’ notebook of what I’ve tried and what worked—nerdy, I know, but it helps.
Final Thoughts—Get Jerkin’!
So there ya have it, the full scoop on how to make chicken jerky that’ll have everyone beggin’ for more. It’s easy once ya get the hang of it, and the payoff is worth every minute. Grab some chicken, mix up a marinade, and let that dehydrator (or oven) do its thing. Just remember to keep safety in mind—cook it to the right temp, store it proper, and don’t skimp on cleanin’ up after raw meat.
I’d love to hear how your batch turns out. Got a killer marinade idea? Run into a snag? Drop a comment or shoot me a message. We’re all in this snack-makin’ journey together! And hey, if ya nail it, share a pic—I’m a sucker for food brags. Catch ya later, and happy jerkin’!

Step 2: Trim Your Chicken
Step 1: Equipment Needed
How To Make Chicken Jerky – Start To Finish
FAQ
Is it safe to make chicken jerky in a dehydrator?
It is safe to dry as long as the inside temperature reaches 165°F. Should I use curing salt? I recommend using curing salt when making turkey or chicken jerky. It’s another step to make sure the chicken jerky is safe.
Is homemade chicken jerky good?
Chicken jerky typically is a little more tender than beef or pork jerky and takes flavor better than even turkey jerky. Chicken jerky is an excellent snack food that provides a good protein kick and offers delicious flavor. Once you start making it at home, you probably won’t be buying much jerky at the store anymore.