NOTE: Please be aware that this blog post contains photos of the chicken butchering process. If you’re uncomfortable seeing these s, this post isn’t for you!.
Now it’s time to learn how to butcher your chickens. Processing our free-range chickens means a much better completion of the process for our meat than the factory alternative.
Follow along as I teach you how to butcher a chicken at home from beginning to end. Learn how to kill, pluck, clean, and skin it with or without expensive equipment. Video included for both methods!.
Raising your own chickens for meat can be a rewarding experience. Not only do you know exactly how your birds were raised, but you get the satisfaction of providing food for your family with your own two hands.
However, the process of actually killing and cleaning the chickens can seem daunting, especially if you’ve never done it before. Don’t worry – with some preparation and the right technique, you can ensure a quick and humane end for your birds.
This detailed guide will walk you through the whole process, step by step. With this information, you can be sure that you are killing your chickens in the most humane way possible.
Things You’ll Need
Before getting started, make sure you have the necessary supplies:
- A sharp knife or hatchet for killing the chickens swiftly
- Large pot or buckets for scalding water
- Plucking station set up with cones/hooks for hanging birds
- Cutting board and knives for butchering
- Pots or buckets for chilling the processed birds
- Freezer bags, jars or other storage containers
It’s also a good idea to have running water available to rinse away mess during the process. And don’t forget the all-important ice for chilling down the meat afterward!
Catching the Chickens
Step one is to gather your chickens in a small area to make them easier to catch. I like to do this the night before butchering day.
Feed, water, and roosts should be left in their pen so they are good to go overnight. Just restrict access to the coop so they can’t escape!.
In the morning, move slowly and deliberately when catching chickens to avoid stressing them unnecessarily. Cover their heads with one hand while gently grasping both legs with the other.
Carry them upside down to the killing cone.
Humane Slaughter
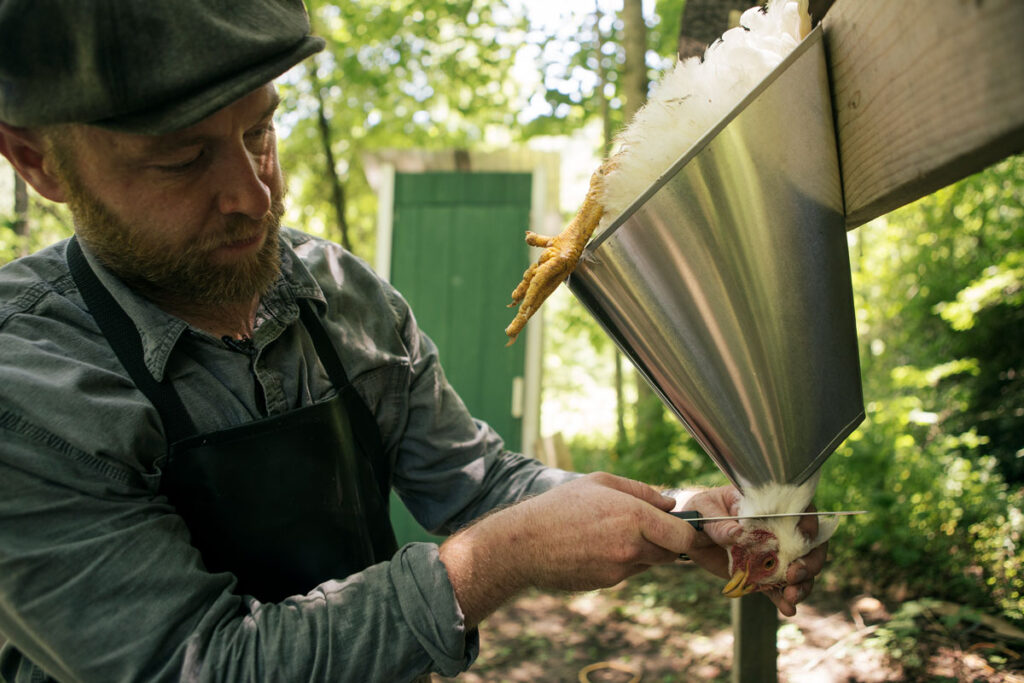
For a quick, humane kill, I recommend using killing cones and slicing through the arteries in the neck.
Hang the cones near your processing area and place a chicken head-first into each one. The cone should be snug to cover and contain the wings.
Pull the head down to expose the neck. Cut the arteries with a swift slice on both sides of the neck. This will cause rapid blood loss, and death within seconds.
Let the body bleed out thoroughly before moving to the next steps.
Scalding and Plucking
Once the chickens have bled out completely, it’s time to loosen the feathers for plucking. You’ll need hot – but not boiling – water for this.
Test the temperature by dipping your wrist or elbow in the water. It should be hot, but not scalding.
Dunk each bird in the hot water for about 30 seconds. This will begin to loosen the feathers.
Once the feathers are loose, you can start plucking. It works best to do this right after scalding. The wing and tail feathers are the hardest to get rid of, so work on them first.
I like to do an initial plucking by hand, then go back with a propane torch to singe off any hairs or remaining feather bits. This helps remove all traces of the feathers.
Make sure you pluck against the direction of growth to get the entire feather out.
Evisceration
With the feathers removed, it’s time to remove the internal organs and prepare the carcass.
Start by cutting off the head, feet and oil gland at the base of the tail. Then, make an incision just below the breast bone being careful not to cut into the intestines.
Reach inside the body cavity to loosen and remove the organs. Scoop out the innards in one motion if possible. The lungs may need gentle cutting to remove.
Thoroughly rinse the body cavity, letting water run all the way through. Check for any remaining bits of lung, heart or other organs stuck to the ribs or spine.
Finally, trim away excess fat if desired. Rinse the fully cleaned carcass and allow it to drain.
Now you have a cleaned, dressed chicken ready for chilling and storage!
Chilling and Storage
It’s important to cool down the chicken carcasses quickly to prevent bacteria growth. Keep them on ice or refrigerated for at least 24 hours before freezing or cooking.
You can store the meat in freezer bags, vacuum packs, mason jars, etc. I like to portion it into meal-sizes for easy thawing and cooking later.
Proper labeling with the date and type of chicken is also a good idea for your records.
The shelf life of fresh chicken stored in the freezer is 9-12 months. Canning or heavy salting can extend shelf life.
Always cook chicken thoroughly to 165°F minimum internal temperature before consuming to kill any bacteria.
Don’t Waste Anything!
Aside from the meat itself, don’t let any other parts of the chicken go to waste:
-
Save the bones and scraps to make nourishing chicken stock. This can be canned or frozen for later use in soups, stews and more.
-
Hearts, livers and other organs are full of nutrients. Cook them up or mix into ground meat.
-
Feathers can be composted or used as stuffing for DIY projects.
-
Fat and skin are perfect for rendering into nutritious schmaltz.
-
Feet can be cleaned, boiled and used for natural gelatin in stocks and broths.
With a little creativity, you can get the most value from your homegrown chickens.
Final Thoughts
If this is your first time slaughtering and processing chickens, don’t be afraid to ask an experienced friend for help or guidance. Having an extra set of hands (and some moral support!) can make the process go much more smoothly.
While killing animals is never pleasant, with the right approach, you can ensure your chickens have just one bad day from hatching to consumption. Providing a quick, low-stress death is the best way to honor the birds that nourish your family.
With practice and preparation, you’ll gain skill and confidence. Soon, you may even find yourself looking forward to butchering day and the bounty it provides. Nothing beats the flavor and nutrition of chickens raised in your own backyard.
So gather your supplies, say a prayer of thanks, and get ready to fill your freezer with homegrown goodness. Happy butchering!

Supplies Needed for Modern Approach
- A poultry transport cage is used to keep live chickens safe while the others are being processed. It’s important to catch the chickens and have them ready for easy access so that everything runs smoothly. The cage doesn’t have to be anything fancy. I’ve used a mobile pastured chicken pen next to where the food is being processed. For smaller animals, I’ve used an old cage I found lying around the farm. You could choose a poultry transport cage for ease of use.
- Restraining Cones – These are also known as killing cones. They hold the bird still well while it is being killed, and they also keep it still if the bird gets scared after the kill and starts to jump. So, there won’t be a “chicken running around with its head cut off.” “I think that turning them over makes the blood rush to their head, which makes them sleepy.” The chickens being “hugged” in the cones also seems to help calm them down. It’s important to keep the chicken calm before you kill it. If a chicken is stressed, it may lose glycogen, which will make the meat taste, be less tender, turn a bad color, and be of lower quality.
- Sharp Knives – Knives are essential. If you only have one, I recommend a five- to six-inch long boning knife that can be used for many things.
- Prune shears are used to cut off the stem and head. I like these high-quality Felco F-2 Class hand pruners.
- A waterproof apron is a great way to keep your body dry. When you gut the chicken, it’s easy to get water that is full of fleas. I finally bought this apron that is waterproof and easy to wash off with water.
- Waterproof Boots – You’ll be thankful for dry feet. I’ve been using a cheap pair of these Servas, but every year I lose about two pairs. If I bought a more expensive pair, I might have saved money. Other permaculturists have told me good things about these Muck Boots, so I might try them next. Muck even has a one-year warranty!.
- Buckets: Buckets are a classic farm tool that are very important to this operation. You might be able to find used buckets at the store or on Craigslist. You can get them at any store that sells farm, garden, or food supplies. For the slaughter, you can use buckets in a number of ways. To catch the drain water from the sink To catch blood underneath the restraining cones. For holding internal organs and other parts you aren’t keeping. To catch or store feathers.
- Scalder: This is another thing you need, and all you need is a big pot and an open fire. If you want to make things easier, you could use a gas stove outside. An outdoor turkey fryer has one burner that can be used to boil water. To make life easiest, use this Dux Industries electric scalder. The best thing about this scalder is that you can set the temperature you want and it will stay at that level automatically. If you’re a bigger business that processes 50 or more chickens at once, you might want to think about getting a commercial-grade scalder.
- Liquid soap: This will help ease the tension between the skin and feathers, which will make it easier to pull the feathers out. It can be used in hot water. If you want to use an eco-friendly soap, you can use any kind.
- Thermometer—A thermometer can help you keep an eye on the temperature of your boiling water. Even if your electric scalder has an automatic setting, you should still keep an eye on the warm-up process and check the temperatures several times during it.
- Scalding Poker—A scalding poker is a stick used to poke your chicken in the scalder and move it around. If you want to make chicken broth from the feet, you don’t want to scald the chicken by holding the feet. The feet will need a lot of time in the boiling water. I use a handheld 3-pronged cultivator.
- Extension Cords – Needed to connect to your power source.
- Power Strip – Used to connect electric scalder and plucker.
- When you need to pluck chickens, this tool can make it easy. If you only want to pluck a few birds at a time or are willing to do it by hand, you don’t need a plucker. One bird takes me ten minutes to pluck by hand, but my machine plucker can do it in thirty seconds. The Drill Plucker can be used to pluck one chicken at a time. If you’re currently doing it by hand, this would be an improvement. One chicken at a time can be plucked with this in about 30 seconds. I’ve taken mine out for as few as one bird and as many as fifty. This plucker is what I use, and I think it’s a great choice for the homestead level. This type of chicken plucker can pick three or more chickens at once. If you have to pluck a lot of birds, this will save you a lot of time. These are the chicken processors that Joel Salatin uses to kill a lot of chickens. Featherman makes a good commercial plucker.
- Large cooking pot: This can be used to quickly cool the bird down after it has been scalded and stop it from getting any hotter. You don’t have to use a cooling pot, but it will give you more control and won’t take much work.
- Sink and Processing Table—I can’t imagine butchering without these! For small jobs, you could use your kitchen sink, but most people like to have a separate sink for processing anyway.
- You can wash your hands and dry your hands at the sink if you need to take a break.
- Ice-cold water in a stainless steel bowl makes it a great way to separate and store feet, organs, and necks.
- Coolers, which are filled with ice water, are used to quickly cool down the chickens after they have been killed. You don’t have to do this if you’re only going to be processing a few birds, but put your chickens in cool water if you need to be away for a while.
- Transport trays—These are great for moving the chickens from the cooler if you need to. Birds are brought inside to my wife, Rebekah, on stainless steel trays. She cleans, dries, and gets them ready for the fridge. There are more chickens to process than can fit in the cooler, so I have to go inside more than once.
- Dry Rack or Towels: These are used to dry the chicken before putting it in bags to store it.
- Vacuum Sealer: To keep the food from freezing, you’ll need to get rid of the extra air in the storage bags. This vacuum sealer is similar to the one we use.
- Bags – Needed for storing the birds. Make sure you buy bags that are big enough for your birds and that work with your vacuum sealer.
- Food scale—you can weigh the finished birds with this if you want to. I just use a small packaging scale. We always use a Sharpie to write down their weight so we can plan when to cook them.
2 – 4 Hours Before
Get your scalder going in plenty of time to get to your desired temperature. It can take several hours for an electric model or a fire to heat water up to 145° F, so plan accordingly.
Butcher a Chicken Without Plucking
FAQ
How do you clean a chicken after killing it?
First, pull out the big tail and wing feathers. Then, make a plan for getting rid of the rest of the body feathers. Rinse the bird with water after removing most of the feathers. Using slight pressure, rub the carcass to remove any remaining small feathers and pinfeathers.
How do you kill and prepare a chicken?
1. Kill bird, cut off head, then quickly; 2. Hang by feet to let blood drain out; 3. Cut open, remove innards, and clean cavity with water, and; 4. Pluck, then; 5. Brine carcass for 4 – 8 hours, wash and pat dry; 6. Refrigerate overnight, uncovered. 7. Cook!.
How long should chickens not eat before butchering?
Feed Withdrawal Timeline Generally, research indicates that the optimal feed withdrawal time is between 8 and 12 hours prior to processing, as this withdrawal period yields the lowest occurrence of carcass contamination and carcass yield losses (Wabeck, 1972).
How to properly dispose of a dead chicken?
You can properly get rid of a dead chicken by burying it, setting it on fire, or throwing it away in the trash, depending on the rules in your area and your situation.