Pan seared chicken thighs are an excellent method of preparing juicy, tender chicken in a skillet. They can be ready in 15 minutes and are easily adaptable!.
This pan-seared chicken thighs is one of my favorite weeknight meals. It only takes 15 minutes to make and serve. The seasoning mix I use gives the chicken the best flavor, and I’ll share some tips for how to make sure you don’t overcook the chicken so it stays tender and juicy!.
These pan seared chicken thighs are easy enough to make for a weeknight meal, but they are also perfect for a more formal dinner. It’s easy to double or triple the recipe; just make sure the pan doesn’t get too full. I usually serve the chicken with some simple Lebanese rice and green beans for a nutritious well-balanced dinner!.
Frying chicken on the stovetop can seem intimidating but it’s one of the most rewarding cooking projects you can take on in your kitchen. When done right stovetop fried chicken yields insanely crispy, crunchy chicken with juicy, tender meat inside.
Here is a complete guide that will show you how to fry chicken on the stove from beginning to end. I’ve fried so much chicken over the years that I’ve lost count. I’ll show you all my best tricks for always getting juicy, delicious chicken.
Why Fry Chicken on the Stove?
There are a few reasons why frying chicken on the stove is better than deep-frying or baking it.
-
More control over temperature. When you fry chicken on the stove, you can carefully control the temperature of the oil, so the chicken doesn’t get too done or too raw.
-
Less oil needed. When you pan fry, you only need a small amount of oil—just enough to lightly coat the chicken pieces.
-
Quick cooking time. Chicken pieces fry up fast on the stove, ready to eat in about 20 minutes.
-
Easy cleanup. Unlike deep frying, there’s minimal equipment and mess when pan frying.
-
Unmatched crispiness. The direct contact with the skillet gives chicken an incredibly crispy crust.
Step 1: Choose Your Chicken Pieces
Bone-in, skin-on chicken pieces are best for pan frying. Thighs and drumsticks are ideal because they remain juicy and tender. Chicken breasts can also work if sliced thinly.
For 4 servings, use:
- 8 bone-in chicken thighs
- 8 drumsticks
- 4 boneless chicken breasts, sliced in half horizontally
Pat the chicken dry with paper towels. Let it sit at room temperature while you prep the other ingredients.
Step 2: Buttermilk Soak for Tenderness
Buttermilk contains lactic acid that tenderizes the chicken. Soaking the pieces in buttermilk for 30 minutes to overnight also adds delicious tangy flavor.
Pour 2 cups buttermilk into a bowl or zip top bag. Add the chicken and turn to coat. Refrigerate for at least 30 minutes and up to 24 hours.
Step 3: Create the Coating
A flour coating gives the chicken a crispy browned exterior. Whisk together:
- 1 1⁄2 cups all-purpose flour
- 1⁄4 cup cornstarch
- 1 Tbsp paprika
- 2 tsp garlic powder
- 1 tsp onion powder
- 1 tsp salt
- 1⁄2 tsp pepper
Dredge the buttermilk-soaked chicken in the flour mixture until thoroughly coated on all sides.
Step 4: Preheat Oil in a Skillet
Choose a large cast iron or nonstick skillet with high sides. Add 1⁄2 inch vegetable oil. Heat the oil over medium-high heat until shimmering but not smoking, 350-375°F on a deep fry thermometer.
Carefully add the coated chicken pieces skin side down. Do not overcrowd the pan. Fry in batches if needed.
Step 5: Fry Until Golden Brown
Fry the chicken undisturbed for 5-7 minutes until deep golden brown. Carefully flip and fry for 5-7 minutes more until the second side is browned and chicken is cooked through.
An instant read thermometer inserted into the thickest part should read 165°F.
Transfer the fried chicken to a wire rack or paper towel-lined plate. Let rest for 5 minutes before serving.
Repeat with remaining chicken. Maintain oil temperature between batches.
Step 6: Season and Serve
Sprinkle with a pinch of salt right after frying. Serve the crispy pan fried chicken hot alongside your favorite southern sides like mashed potatoes, collard greens, corn on the cob, or biscuits.
Dip in ranch or honey mustard for extra flavor. Enjoy!
Troubleshooting Fried Chicken on the Stove
If you encounter any issues while frying chicken on the stovetop, here are some quick fixes:
Chicken is undercooked: Fry longer, flipping occasionally, until internal temperature reaches 165°F.
Chicken is overcooked/dry: Avoid frying for too long. Thinner pieces may need less time.
Chicken is not crispy: Increase oil temperature, ensure dry chicken, and use sufficient coating.
Chicken is burnt: Oil was likely too hot. Lower heat and fry for less time.
Chicken sticks to pan: Let oil fully preheat before adding chicken. Don’t move chicken until browned.
Tips for the Best Pan Fried Chicken
-
Use a sturdy, heavy skillet like cast iron for even frying. Avoid nonstick pans.
-
Let oil heat gradually to the ideal frying temperature.
-
Pat chicken very dry before dredging to help coating adhere.
-
Flour your hands before coating chicken to prevent sticking.
-
Don’t overcrowd the pan. Fry in batches to allow even browning.
-
Turn chicken only once during frying for better crust formation.
-
Check oil temp between batches and reheat if needed.
-
Drain fried chicken on a wire rack or paper towels to remove excess grease.
-
Allow chicken pieces to rest before eating for juicier meat.
Fun Variations
Once you master the basics, try these fun ways to add new flavors to your fried chicken:
-
Buttermilk-Herb: Add 2 Tbsp fresh chopped herbs like thyme, rosemary, or sage to the buttermilk.
-
Spicy: Sprinkle cayenne and paprika in the flour coating or serve with hot sauce.
-
Lemon-Pepper: Add 1 tsp lemon zest and 1⁄4 tsp cracked black pepper to the flour.
-
Garlic-Parmesan: Mix 1 tsp garlic powder and 1⁄4 cup grated parmesan into the flour.
-
Cornflake Crusted: Crush cornflakes and use instead of flour for the crunchiest crust.
-
Ranch Fried Chicken: Serve with cool ranch dressing for dipping.
The possibilities are endless when frying chicken on the stove at home. Once you try this method, you may never go back to oven baked chicken again! With the right prep, temperature control, and technique, you can enjoy restaurant-quality crispy fried chicken any night of the week.
Tips for pan searing chicken thighs
- Allow time to marinate the chicken. The marinating time isn’t necessary because this is a dry rub, but it never hurts, and the flavor will only get better if you do. It should be at least 30 minutes, but up to 24 hours is fine too.
- Don’t overcrowd the pan. You want the chicken thighs to brown and cook evenly. If you don’t, the chicken juices nearby could make steam, which would mess up the searing process.
- Don’t turn the chicken while they’re cooking. This is especially important if you use a pan that doesn’t stick, like I did. When one side of the chicken is done cooking, it will remove itself from the pan easily, leaving nothing stuck. Plus this helps to get proper browning on both sides.
- Allow the chicken to rest for 5 minutes before cutting. This lets the chicken soak up the juices and become more juicy and tender.
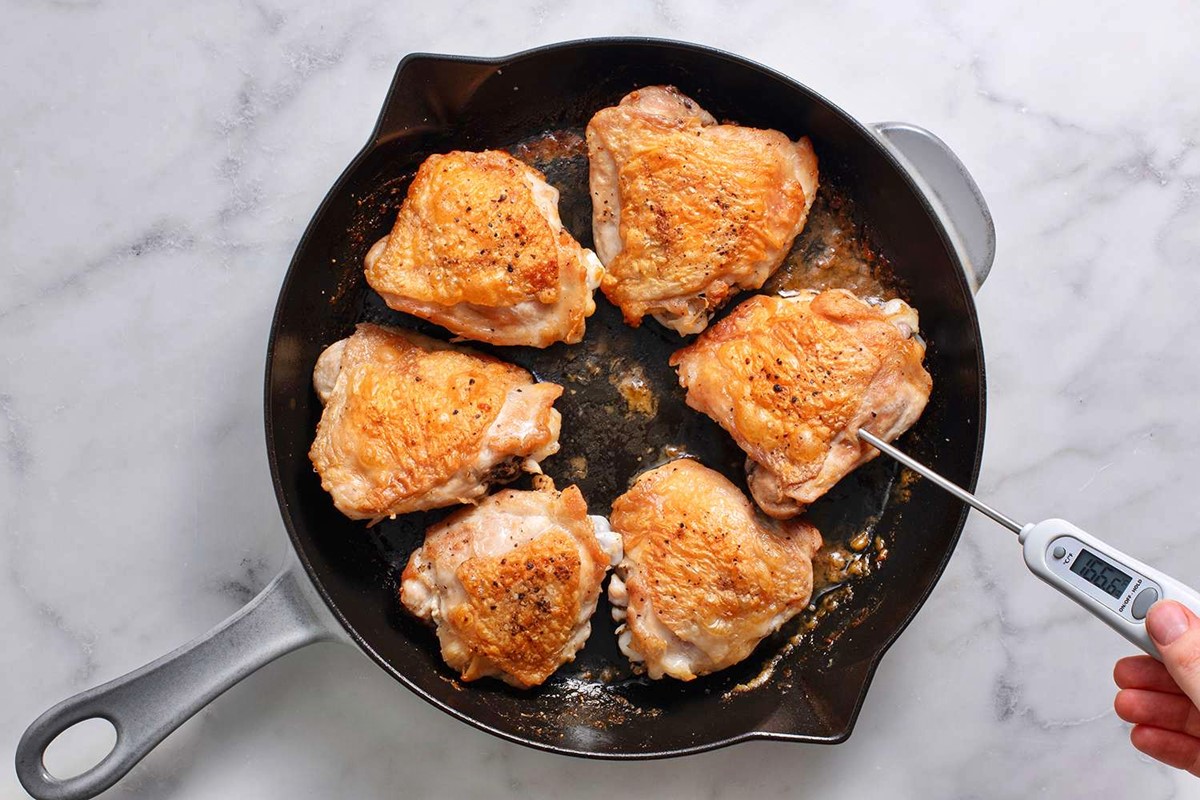
It’s important to remember, that unlike chicken breasts, thighs can look pinkish-brown even when cooked through. To test for doneness, press the meat, there should be resistance, if it is still very soft it is not cooked. Pierce the skin with a skewer or fork and the juices should run clear. If you have an instant read thermometer, it should register between 170ºf and 180ºf.
I prefer to eat the chicken as soon as it is cooked, but if you have leftovers you can reheat them once and the leftovers must be eaten in one sitting. You can reheat them in a frying pan, microwave oven or the barbecue. Leftover cold cuts can be kept in the fridge for 2 to 3 days and can be enjoyed cold on a salad.
This recipe is easily adapted to use with chicken breasts if you prefer. The recipe remains the same, but the cooking time will be slightly less.
These easy pan seared chicken thighs are one delicious and quick weeknight meal. Serve with all your favorite sides for a flavorful dinner that the whole family will love.
How to make pan seared chicken thighs
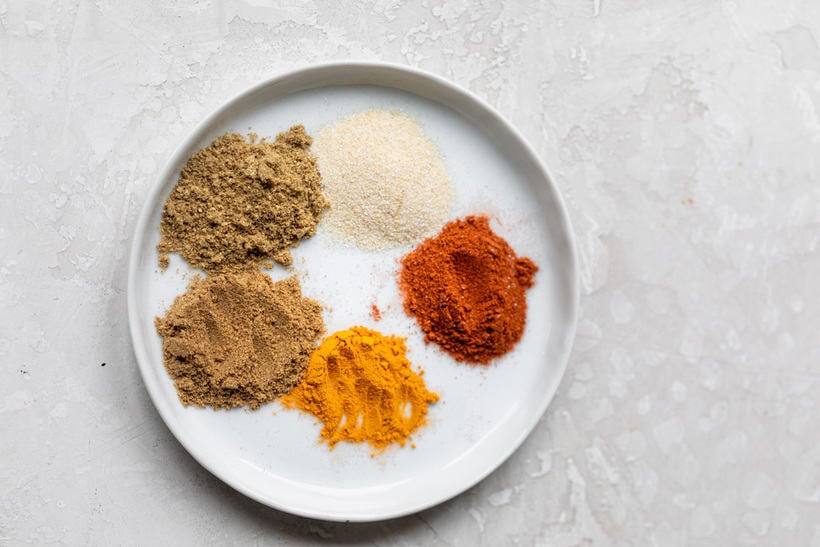
Start by measuring the spices and mixing them all together. This combination of spices is one of my favorites. I use equal amounts of onion powder, paprika, cumin and coriander and then a little less of turmeric. It turns a beautiful color when it’s cooked, and the spices give it a great sweet and smokey Mediterranean taste.
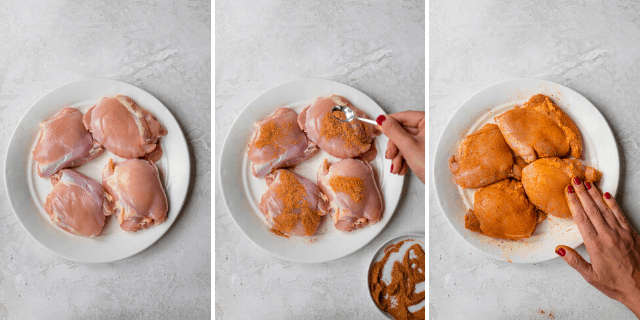
Next, pat the chicken thighs very dry with a paper towel. Since we’re pan searing the chicken, we want to make sure that they are dry so they get crisp when they hit the hot oil instead of soggy. Then use your hands to rub the seasoning on the dry chicken thighs.
When you’re ready to cook the chicken, make sure that the olive oil coats the bottom of the pan, usually 2-3 tablespoons will be sufficient. And then make sure the oil hot.
Next, place the chicken thighs with the smooth side down first and don’t touch it or move it until at least 5-7 minutes, depending on the thickness of the chicken. You will know when it’s time to flip it when it easily releases on its own. It will lift easily off the pan and nothing will be stuck to the oil.
Then flip it and cook it until the juices run clear or a a thermometer inserted into the chicken reads between 160°F and 165°F.

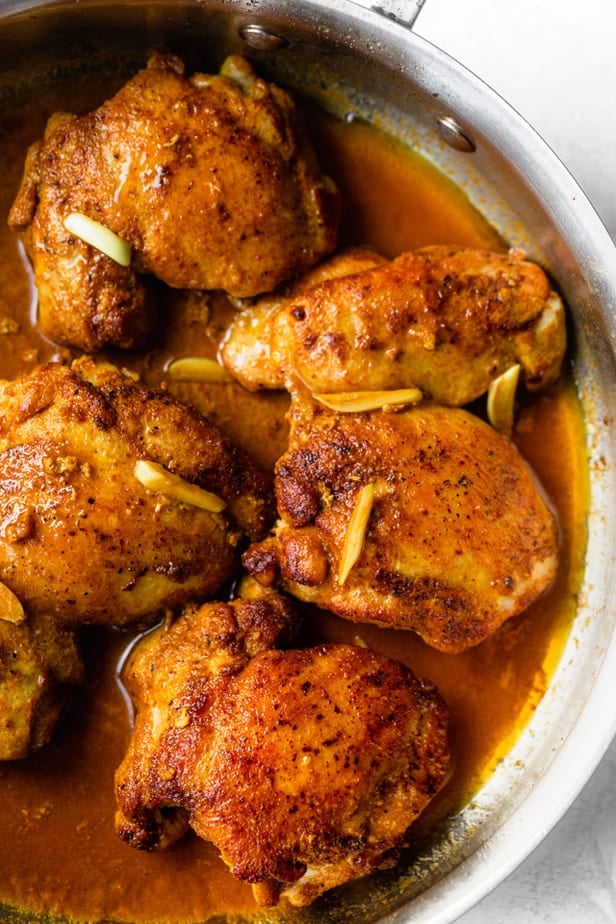
Finally add the garlic and cook it until it’s golden and fragrant. It only needs about 30 seconds. After that, add the chicken broth to clear out the pan. Cook for a few more minutes until the juices get a little thicker.
5 Steps To The Perfect Crispy Fried Chicken
FAQ
How long to fry chicken on a stove?
InstructionsStep. In shallow dish, mix flour, paprika, salt and pepper. In 12-inch nonstick skillet, heat about 2 cups oil (1/4 inch) over medium-high heat. Cook uncovered about 20 minutes, without turning, until juice of chicken is clear when thickest pieces are cut to bone (at least 165°F).
How long do you fry chicken for in oil on the stove?
Brown the chicken in HOT oil on both sides. Once the chicken is browned, turn down the heat and cover the pan. Let it cook for 30 minutes. The chicken will be done but not crispy. Remove cover, raise heat again, and continue to fry until crispy. Drain fried chicken on paper towels.
What is the best way to fry chicken on the stove?
InstructionsPat the chicken dry and season with salt and pepper. Heat the oil over medium-high heat in a large skillet. Carefully add the chicken to the hot pan and cook for 5 to 7 minutes. Flip the chicken and cook until it reaches 165°F, 5 to 7 minutes more. Slice and serve.
Can you fry chicken on the stovetop?
Frying chicken on the stovetop is an art form that can elevate any meal to culinary heights. This complete guide will teach you everything you need to know to make perfectly crispy, juicy fried chicken in the comfort of your own home, no matter how much experience you have on the stove.
What is stove top fried chicken?
Stove top fried chicken is a classic dish that can be enjoyed by people of all ages. With the right ingredients and techniques, you can create crispy, juicy, and flavorful fried chicken that will impress your family and friends. So, gather your ingredients, fire up your stove, and get ready to indulge in this delicious culinary delight.
How do you cook chicken in a frying pan?
Dip the chicken pieces into the flour mixture, ensuring they are evenly coated. Heat vegetable oil in a large skillet or Dutch oven to 350°F. Carefully place the chicken pieces into the hot oil and fry until golden brown and cooked through. Use a meat thermometer to ensure the internal temperature reaches 165°F.
How do you season stove top fried chicken?
A: There are many ways to season stove top fried chicken. Some popular options include salt and pepper, garlic powder, onion powder, paprika, cumin, and chili powder. You can also use your favorite herbs and spices to create a unique flavor profile.
How do you cook chicken on a stovetop?
The first step in stovetop chicken frying is selecting the best chicken. Opt for bone-in, skin-on chicken pieces such as thighs, drumsticks, or breasts. These cuts will provide a flavorful and juicy result. Seasoning your chicken is crucial for creating a tantalizing flavor profile.
How do you prepare fried chicken before frying?
Before you start frying, it’s important to properly prepare the chicken. Rinse the chicken pieces under cold water and pat them dry with paper towels. This will help the coating adhere better and prevent splattering. 3. Seasoning the Chicken: Seasoning the chicken is a crucial step in achieving flavorful fried chicken.