Beer can chicken is a fantastic way to cook a whole chicken on the grill or in the oven. The beer steams and flavors the chicken from the inside, while the outside gets beautifully browned and crispy. The end result is a juicy tender and flavorful chicken that looks impressive but is easy to make.
This page will show you step-by-step how to make beer can chicken at home. These tips will help you succeed every time, whether you’re grilling or baking. Let’s begin!
What is Beer Can Chicken?
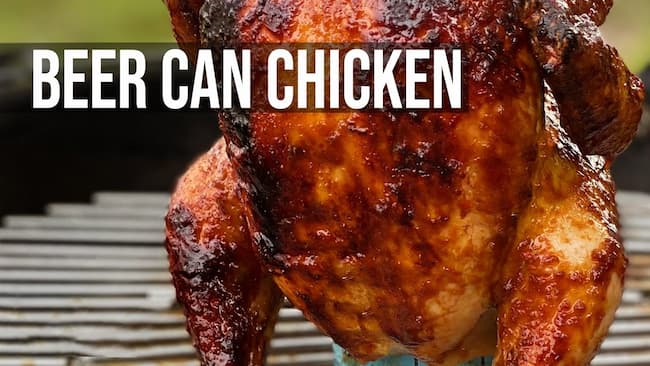
The term “beer can chicken” refers to cooking a whole chicken on an open beer can. The chicken is standing up on the can, and the beer can is stuffed inside the chicken. The beer keeps the meat very moist and gives it flavor as it steams and evaporates from the inside. The outside of the chicken roasts to golden brown perfection.
Cooking the chicken on a can vertically helps the air flow and makes the cooking more even. The breasts are farther away from the heat source than the thighs. This prevents the white meat from drying out. This makes a perfectly cooked bird from head to tail.
While beer is the most popular liquid used, you can also use wine, juice, soda or broth. The possibilities are endless for imparting flavor. Just make sure to use a flavorful liquid that will enhance the chicken.
Benefits of Cooking Beer Can Chicken
There are several advantages to cooking chicken this way:
-
Juicy, tender meat – The interior steam-bastes the meat, keeping it incredibly moist and tender.
-
With added flavor—Beer, wine, or other liquids give the meat a delicious flavor.
-
Crispy skin – The exterior gets nicely browned and crispy.
-
Cooks evenly – Vertical roasting promotes even cooking from breast to thighs.
-
Fun presentation – It looks impressive coming off the grill with the can inside.
-
Easy method – Very simple technique with foolproof results.
Step-by-Step Guide to Making Beer Can Chicken
Below are complete step-by-step instructions for making beer can chicken on the grill and in the oven.
Ingredients
- 1 whole chicken (3-5 lbs)
- 12 oz beer, room temperature
- 2 Tbsp olive oil or melted butter
- 1 tsp salt
- 1⁄2 tsp black pepper
- Herbs and spices (optional)
Equipment
- Aluminum roasting pan (for oven method)
- Instant read thermometer
- Beer can chicken stand (optional)
- Heavy duty aluminum foil
Grilling Method
-
Prepare the grill: Heat half the grill to medium-high heat (400°F) and leave the other half with no coals or turned off. This 2-zone fire allows indirect cooking.
-
Season the chicken: Pat the chicken dry and rub it all over with olive oil or melted butter. Generously season the cavity and outside with salt and pepper. Add any other desired herbs or spices.
-
Pour beer into can: Pour out (and drink!) half of the beer from the can. Insert a few herb sprigs into the beer if desired.
-
Insert chicken onto can: Place the chicken cavity directly over the can and slide it down to the base. The chicken should stand upright on the can.
-
** Grill over indirect heat:** Place the chicken upright on the cool side of the grill, with the legs facing the hot side. Cover and grill for 1-1.5 hours until 165°F.
-
Rest and serve: Carefully transfer chicken to a platter, cover with foil and let rest 10 minutes before carving.
Oven Method
-
Preheat the oven to 350°F. Pour out half of the beer from the can.
-
Season the chicken: Pat the chicken dry and rub it all over with olive oil. Generously season the cavity and outside with salt and pepper.
-
Insert chicken onto can: Place the chicken cavity directly over the can and slide it down to the base.
-
Roast in the oven: Place the chicken upright on the beer can in a roasting pan. Roast for 1-1.25 hours until 165°F.
-
Rest and serve: Carefully transfer chicken to a platter, cover with foil and let rest 10 minutes before carving.
Tips for Juicy, Flavorful Beer Can Chicken
Follow these tips for the best results when making beer can chicken:
-
Use a thermometer – This is the only way to ensure the chicken is fully cooked to a safe internal temperature of 165°F.
-
Maintain even heat – Uneven cooking can lead to overdone breast meat. Keep the temperature steady.
-
Choose flavorful liquids – Beer, wine, broth and juice all impart great flavor. Go bold!
-
Dry brine the bird – Salting the chicken a day in advance helps keep it super juicy.
-
Truss the legs – Tying the legs together helps the chicken cook evenly and stand upright.
-
Make a beer can stand – For stability, use an aluminum pie tin to hold the can up inside the bird.
-
Baste frequently – Brush on a savory sauce or melted butter to help achieve crispy skin.
FAQs
Is beer can chicken safe to eat?
Yes, it is completely safe. The USDA recommends cooking chicken to 165°F to destroy any harmful bacteria. As long as the chicken reaches the proper internal temp, it is safe to eat. The beer can method does not compromise food safety at all.
Do you have to use beer?
While beer is traditional, you can use any liquid you want. Wine, juice, broth and even soda will work. The liquid steams and flavors the chicken from the inside.
Does the chicken flavor get into the beer?
Absolutely! The beer takes on delicious chicken and seasoning flavors as it steams and evaporates. This beer can then be used to make a flavorful gravy.
Can you make this flavorful dish in the oven?
Yes! The oven method works just as well. Use a roasting pan fitted with a rack to hold the chicken upright on the can. Roast at 350°F until fully cooked through.
Final Thoughts
Beer can chicken is a fun, flavorful way to cook a whole bird with incredibly juicy meat and crisp skin. While it looks impressive, the technique is actually quite easy and reliable. Follow the directions above for foolproof results, whether grilling or baking. Let the sizzling aroma of chicken on the grill lure in your family for a fantastic meal. Crack open an ice-cold beer for yourself and get ready to enjoy the best beer can chicken you’ve ever tasted. Cheers!
Select And Prep The Chickens
Purchase two whole chickens weighing 3-1/2 to 4 pounds each. Remove the neck and giblets from the body cavity and pat dry inside and out with paper towels. Trim any excess fat from around the body cavity opening. Fold the wing tips back under the chicken to keep them from burning.
Prepare The Beer Cans And Apply The Rub
Wash 2 12-ounce beer cans with soapy water and rinse well. Open the cans and drink half the beer in each. Use a church key-style can opener to make two additional holes in the lid.
Now prepare a batch of the rub.
Wild Willy’s Number One-derful Rub
- 6 Tablespoons paprika
- 2 Tablespoons ground black pepper
- 2 Tablespoons salt
- 2 Tablespoons sugar
- 1 Tablespoon chili powder
- 1 Tablespoon granulated garlic powder
- 1 Tablespoon onion powder
- 1 teaspoon cayenne
Combine all ingredients and mix thoroughly.
Sprinkle the rub liberally inside the body cavity and the neck cavity, then all over the outside of the chicken. If you want, sprinkle some rub under the skin over the breasts and work it around with your fingers.
Place the chicken over the beer can, making sure it’s firmly seated inside the cavity as far as possible. Position the legs forward to form a tripod, keeping the chicken balanced.
Let the chickens sit at room temperature as you fire-up your Weber Bullet.