Canning chicken soup ensures you have a homemade batch of chicken soup on hand when you need it. That’s the best way to feel better when you’re sick, but it’s also a great meal any time.
Homemade chicken soup is just what the doctor ordered when you’re under the weather, but who has the energy to cook chicken soup from scratch when they’re sick?.
My mama’s 3000 miles away, and she’s not exactly dropping by with a care package when I’m sick. When my own kids are sick, I know that I’m next….
So what’s better than homemade chicken soup? Home canned chicken soup right on your pantry shelf when you need it!.
This simple chicken soup recipe can be canned and is easy to heat up and eat when you need it. I tend to turn it into chicken noodle soup for serving, and I’ll cook wide egg noodles separately and add them into the pot once it’s reheated.
You can also turn it into chicken and rice soup, or chicken and dumplings at serving.
(Just keep in mind, starchy ingredients like noodles, rice and dumplings are not safe for canning, and those will have to be added at serving. Boiling up a batch of noodles takes about the same amount of time as reheating the soup, and I always have noodles on my pantry shelf, so that’s no big deal. ).
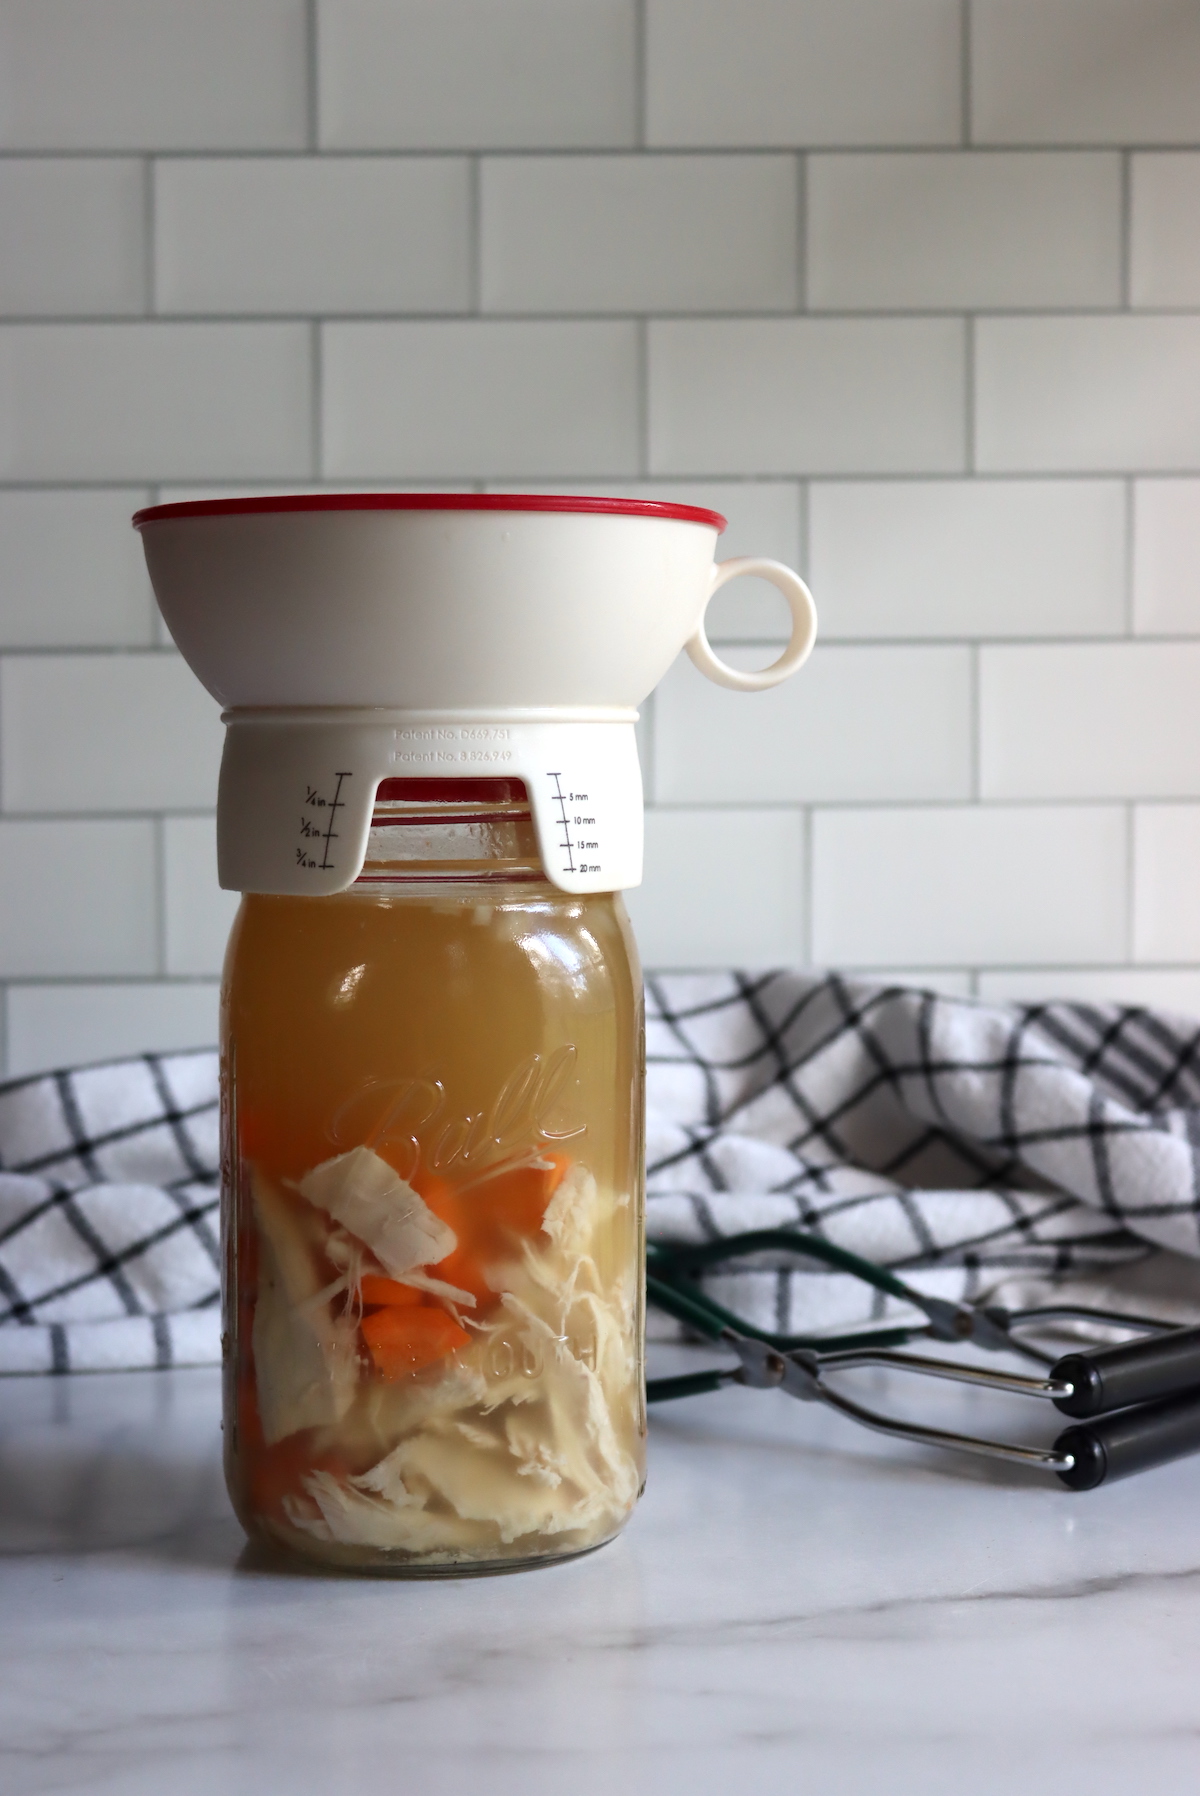
Since I posted this, I’ve been asked twelve times, “Where did you get that canning funnel?!?”
Homemade chicken soup is the ultimate comfort food. It’s warm, nourishing, and soothing – exactly what you need when you’re feeling under the weather.
Fresh chicken soup made from scratch is the best, but it’s not always possible to make a big pot of it when you need it. What a great idea! By pressure canning chicken soup, you can enjoy this tasty home-cooked soup all year long.
In this complete guide, we’ll cover everything you need to know about safely canning chicken soup at home with a pressure canner.
Why Choose Pressure Canning for Chicken Soup?
Pressure canning is the only safe method for canning low-acid foods like chicken soup. It allows the contents of the jars to reach temperatures above 240°F, high enough to kill any botulism spores that could produce deadly toxins.
The moist environment inside a sealed jar of chicken soup creates the perfect conditions for Clostridium botulinum bacteria to thrive. While boiling water bath canning is safe for high-acid foods like jams and pickles, it doesn’t get hot enough to prevent botulism in low-acid foods.
By using a pressure canner to achieve temperatures of 240°F and above, you eliminate the risk of botulism and can safely preserve chicken soup.
Step-by-Step Guide to Pressure Canning Chicken Soup
Follow these simple steps for safe, successful pressure canning:
1. Choose a Tested Recipe
Don’t just throw any chicken soup into the canner. Stick to lab-tested recipes from trusted sources like the USDA, Ball, and Bernardin.
Tested recipes control ingredients and acidity levels to ensure safety. Making changes can change the pH and put you at risk.
2. Prepare the Soup
Start with high quality, fresh ingredients. Bone-in chicken is recommended for canning as it adds minerals to the broth.
Follow the recipe to make the soup, but don’t add any milk, cream, flour, rice, pasta, or other thickeners before you can it. These ingredients can interfere with heat penetration.
3. Prep the Jars and Lids
Wash jars, lids, and bands in hot, soapy water. Rinse well. Simmer the jars in hot water to sterilize them and soften the lids. Keep them hot until ready to fill.
4. Fill the Jars
Pour the hot soup into the hot jars, leaving an inch of space at the top. Release any bubbles with a non-reactive utensil. Wipe the rims clean. Apply lids and bands fingertip tight.
5. Process in the Pressure Canner
Place filled jars in canner fitted with rack and 2-3 inches of water. Vent steam 10 minutes. Close the vent. Raise the pressure and process for the recommended time:
- Pints: 75 minutes
- Quarts: 90 minutes
6. Cool and Test the Seals
Turn off heat and allow canner to depressurize naturally. Wait 10 minutes before opening lid. Remove jars and check seals after 12-24 hours. If unsealed, refrigerate and use quickly.
Helpful Tips for Pressure Canning Chicken Soup
-
At altitudes above 1000 feet, increase pressure by 1 psi for every additional 2000 feet.
-
Always use tested recipes and follow instructions precisely. No shortcuts!
-
Skim fat before canning for best results. Excess fat can interfere with sealing.
-
Add noodles, rice, veggies when reheating. Don’t add before canning.
-
Pressure cookers like Instant Pot are not recommended. Stick to true pressure canners.
-
If a jar doesn’t seal, refrigerate and use quickly. Don’t reprocess after 24 hours.
-
Maximize quality by using within 2 years. Always inspect before consuming.
Is it Worth the Time and Effort?
Pressure canning does require diligence, patience, and some upfront equipment costs if you don’t already own a pressure canner. However, the benefits outweigh the work:
-
Convenience – skip the last minute scramble when sickness strikes
-
Cost savings – take advantage of sales on chicken and stretch your grocery budget
-
Quality – customize each batch and avoid preservatives
-
Safety – avoid foodborne illness with proper technique
-
Preparedness – build an emergency pantry and be ready for power outages
So grab your pressure canner and try your hand at canning chicken soup. The satisfaction of preserving your own harvest is priceless. Just be sure to follow instructions precisely for safe, shelf-stable results.
Frequently Asked Questions About Pressure Canning Chicken Soup
How do I know if my pressure canner is working properly?
Inspect your canner carefully before each use. Look for any signs of damage, deformation, or wear. Test dial gauges annually for accuracy. Ensure the vent pipe is clear. Follow all maintenance guidelines.
Can I substitute ingredients or leave some out?
No. Only make approved recipe substitutions from credible canning authorities. Changes to ingredients or acidity can be dangerous.
My jars didn’t seal. What should I do?
Refrigerate unsealed jars immediately and use within 3-4 days. You can reprocess with new lids within 24 hours. Don’t use jars that sat unrefrigerated for over 24 hours after processing.
How will I know if my canned soup has spoiled?
Do not use soup with mold, off odors, unusual appearances, leaking or bulging lids, or gassiness when opened. Botulism produces no obvious signs, but may cause serious illness. When in doubt, throw it out!
How should I store my canned chicken soup?
Store sealed jars in a cool, dark place between 50°F and 70°F. Avoid temperature extremes. Storing in a cupboard works well for most. Maximize quality by using within 2 years. Always inspect jars before consuming!
So there you have it – everything you need to know to safely pressure can chicken soup at home! Follow proper recipes, use extreme care, and enjoy the convenience of canned soup all year long. Just be sure to adjust for altitude, never take shortcuts, and always inspect jars before eating. Now grab your canner and preserve that homemade goodness!

Make Your Own Chicken Soup Recipe
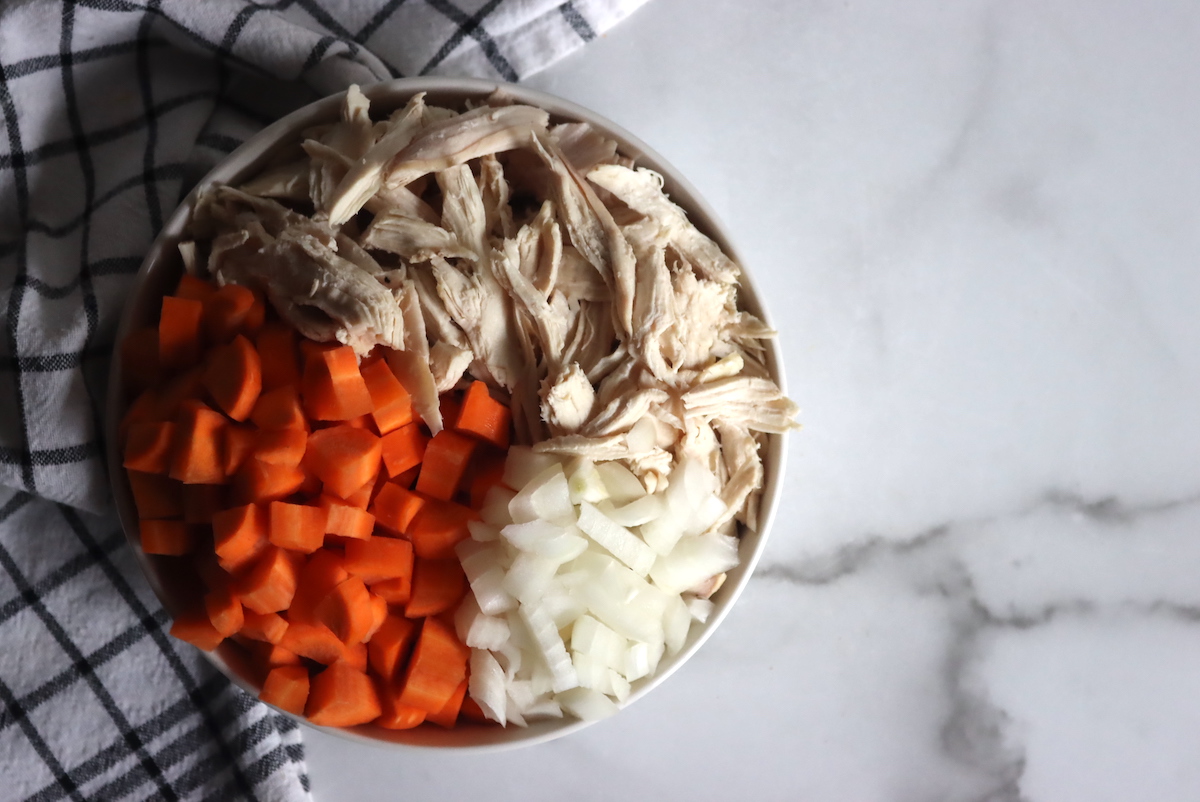
The ingredients for chicken soup are pretty simple, and start with a rich chicken broth, and add in:
- Shredded cooked chicken
- Carrots
- Onions
- Celery
- Salt, Pepper and Dry Spices of your choice
Personally, I can’t stand celery, so I don’t use it. That’s not a problem at all, as you’re almost always able to omit ingredients in soup canning recipes. This particular soup canning recipe is based on the USDA’s “Your Choice Soup Recipe” which allows you to make soup out of almost anything that has it’s own canning recipe.
Everything in this canning recipe is safe to use in this general soup recipe because they are all safe for canning on their own.
The main thing is that when using this canning approved recipe, the “solids” in the soup can only fill the jar half way. The rest of the jar is filled with broth, which works perfectly for chicken soup.
It’s easy to plan a batch because you can fill the jar halfway with any solids you want. I’m canning in quart jars, and for each quart, I’ll add in:
- 1 cup shredded chicken
- 3/4 cup sliced carrot
- 1/4 cup sliced onion
If you’re using celery, you can add that too. The main thing is, for each quart jar, you are adding in 2 cups of solids total.
The balance of the space in the jar is made up with chicken broth, which can be homemade or store bought. I tend to roast whole chickens to get the shredded chicken for this recipe, and then I use their bones to make my own chicken broth.
Store-bought broth or bullion cubes will also work, but be careful of the salt because they tend to be very salty.
For each quart, you’ll also need about 3 cups of chicken broth. I know, that’s 5 cups total in each jar, but the solids don’t take up all the space. “Two cups of solids” still leaves space for 1 cup of chicken stock in the nooks and crannies.
So to re-cap, for each quart jar of home canned chicken soup, you’ll need:
- 1 cup chicken, shredded
- 1/2 cup carrots, sliced
- 1/4 cup onions, diced
- 1/4 cup celery, diced
- 3 cups chicken broth
- salt and pepper to taste
If you don’t like one of the vegetables, as I don’t like celery, just make up the volume with other vegetables or more chicken. Either way, the solids should total 2 cups.
(If canning in pints, you’ll need half as much.)
Once you have your ingredients assembled, prepare your pressure canner. Next, add all the ingredients to a pot and bring it to a boil with the chicken stock. Cook for 5 minutes, and then use a slotted spoon to fill the jars half way with solids.
Top with broth, leaving 1 inch headspace.
Once you’ve assembled your ingredients, prepare your pressure canner for hot pack according to the manufacturers instructions. That usually means adding in the bottom trivet, along with several inches of water and bring it to a simmer.
Prepare the soup for hot pack by chopping all ingredients. Peel and chop the carrots, dice the onions and celery.
Combine all ingredients in a large stock pot and bring the ingredients to a boil. Simmer for 5 to 10 minutes, until ingredients are heated through.
Use a slotted spoon to evenly distribute the solids among 4 quart jars or 8 pint jars. Top with broth, leaving 1 inch headspace, and cap with 2 part canning lids.
Process the jars in a pressure canner for 75 minutes for pints and 90 minutes for quarts, adjusting for altitude (see below).
When the canning time is complete, allow the canner to cool to room temperature on it’s own before removing the jars.
Check seals, and store any unsealed jars in the refrigerator for immediate use. Properly canned and sealed jars will maintain peak quality on the pantry shelf for 18 months, and be good to eat long after provided they’re still sealed. Refrigerate after opening.
Ingredients for Canning Chicken Soup
This tested canning recipe for chicken soup is adapted from the Ball Blue Book of Home Canning.
To make 4 quarts (or 8 pints) of home canned chicken soup, you’ll need:
- 4 quarts chicken stock
- 3 cups cooked chicken diced (about 3 pounds of cooked chicken)
- 1 1/2 cups celery, chopped (roughly 3 stalks)
- 1 1/2 cups carrots, sliced (roughly 3 medium)
- 1 cup onion, chopped (1 large)
- Salt and pepper to taste
The recipe is hot packed, which means that all the ingredients are added to a stock pot and brought to a boil for a few minutes before being equally distributed among the canning jars, leaving 1” headspace.
There’s a bit more chicken stock than you’ll need here, but it’s always better to have a little extra in the pot than end up short. In reality, you need a bit more than 3 quarts.
The blue book recipe is almost identical to what you’d end up with if you opted for the “choose your own adventure” soup canning recipe from the USDA. I’ve outlined that process below, because it gives you the flexibility to change the ingredients as you see fit, adding in veggies or taking them away to suit your tastes.