People often cook a whole chicken on the grill in a beer can. The beer adds flavor and moisture to the meat as it steams and permeates it while it cooks. It’s tasty, but it can be hard to fit a tall beer can chicken on a Weber kettle grill. If you put the chicken on its side, the grill’s lid might not close properly. With a few tips and tricks, you can use a Weber grill to make beer can chicken that is very juicy and full of flavor.
What You Need
- Weber charcoal grill
- Aluminum drip pan
- Beer can chicken stand or other upright roasting device
- Tall beer can
- Whole chicken (4-5 lbs)
- BBQ rub
Setting Up the Grill
First, set up your Weber for indirect cooking by pushing the coals to one side of the charcoal grate. Place an aluminum drip pan on the empty side to catch drippings.
If your Weber grill has hinged cooking grates keep one side lifted up during cooking to further separate the direct and indirect heat zones.
Prepare the Chicken
Rinse the chicken and pat it dry all over, inside and out. Use a lot of your favorite BBQ rub to cover the outside of the bird. You can also stuff some rub under the skin.
Leave the neck and giblet packets removed from the chicken cavities.
Open and Fill Beer Can
Pour out about half of the beer from a tall boy can. Using a church key or can opener, poke 2-3 more holes near the top of the can. This allows steam to escape and permeate the chicken.
Set the open beer can on a flat surface. Lower the chicken cavity directly onto the can. The can should fit snugly inside.
Stand Up the Chicken
For the chicken to cook evenly, it must stand upright on the grill with the beer can centered inside.
A beer can chicken stand is ideal for keeping the bird upright. Look for one with an adjustable base to fit different can diameters.
Or, use a vegetable or fruit as a natural stand. Cut off the top third of a potato, onion, or orange. Put it on the grill grate and add the beer can chicken on top of it.
Add Wood Chips for Smoky Flavor
For 30 minutes, soak one to two cups of wood chips in water. For more smoke flavor, sprinkle soaked chips over the hot coals right before you start cooking. Chicken goes well with chips made from hickory, oak, or mesquite.
Grill the Chicken
Stand the chicken upright on the grill’s indirect side with the beer can centered in the cavity. Position the legs facing away from the direct heat to prevent overcooking.
Close the grill lid and cook for 1-1.5 hours until the internal temperature reaches 165°F in the thickest part of the thigh and breast.
Rotate the lid’s vent halfway through cooking to promote even circulation.
Let it Rest Before Serving
Carefully transfer the cooked chicken on its stand to a platter. Close the grill lid to let it rest for 10 minutes. The juices will redistribute through the meat.
Wearing insulated gloves, carefully lift the chicken off the beer can. Be mindful of hot steam and beer.
Slice into the chicken and serve it piping hot with extra BBQ sauce on the side if desired.
Tips for Juicy, Flavorful Chicken
-
Cook over a medium heat around 350-375°F. High heat can overcook the outer meat.
-
Add a splash of chicken stock or wine to the beer can for extra moisture.
-
Rub the skin with oil or butter before seasoning to help crispiness.
-
Use a digital meat thermometer with a probe for accurate temperature.
-
Let the chicken rest before carving to lock in juices.
-
Use indirect heat, keeping the chicken on the grill’s cooler side.
-
Try different beer styles like lagers, IPAs, or stouts.
-
Infuse wood chips or chunks for smoky complexity.
Common Problems and Solutions
Chicken is dry and overcooked: The grill was too hot. Cook over medium heat only. Check temperature with a grill thermometer.
Skin is pale and soggy: Increase heat to crisp up the skin or rub with oil first. Don’t let chicken touch juices.
Beer didn’t flavor chicken: Use more holes in can for steam release. Rotate chicken for even exposure.
Chicken fell over: Use sturdy stand like a veggie or buy a purpose-made holder. Check stability before closing lid.
Can doesn’t fit in the cavity: Buy a larger chicken around 5 lbs or try a slimmer can. Loosely tie legs together to widen cavity.
Alternate Grilling Methods
While beer can chicken is fun, you can cook a juicy whole bird in other ways on a Weber grill:
Spatchcock: Flatten chicken by removing backbone so it lies flat. Cook skin-side up over direct medium heat.
Vertical roasting: Insert a vertical roaster into cavity to hold upright. Cook indirectly.
On a plank: Set chicken on a soaked wood plank for full smoke flavor.
Beer can turkey: Cook a small turkey the same way as beer can chicken.
Halved: Cut chicken down backbone. Grill skin-side down then flip. Gets crispy.
Grill-roast: Cook chicken directly over a foil pan of beer, stock, or wine. Bastes itself.
Quartered: Divide chicken into leg and breast quarters. Gets nicely charred.
So grab a Weber grill, a cold one, and a whole chicken for your next backyard BBQ. Beer can chicken is a fun, fantastic way to make the juiciest, most flavorful grilled bird. Just take care to setup the grill properly and use indirect heat. With the right techniques, you’ll have perfectly cooked chicken ready to enjoy all summer long.
Select The Smoke Wood
Use 3 chunks of apple smoke wood. Each chunk should be small, for example 3″ x 2″ x 2″ or similar. Cherry, oak, or other mild fruit wood can be used if apple is not available.
There is no need to soak the wood or remove the bark before use.
Fire-up the cooker using the Minion Method. Fill the charcoal chamber 1/2 full with unlit Kingsford Charcoal Briquets. Light 20-40 briquettes using a Weber chimney starter and spread them over the unlit charcoal.
Fill the water pan with cold tap water and put it in the cooker. This will help you keep the temperature just right.
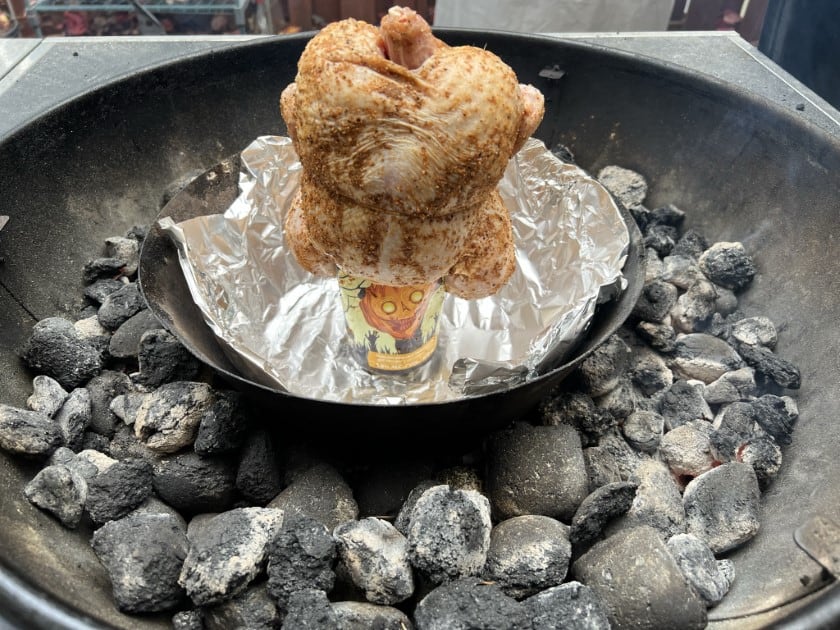
Assemble the cooker, add the smoke wood chunks, and put the chickens back-to-back on the top cooking grate.
Set the 3 bottom vents to 100% open. Open the top vent fully and leave it that way throughout the entire cook.
When the liquid level in the cooker reaches about 225%C2%B0F, open the bottom vents all the way so the cooker stays at that temperature, as measured at the lid. Adjust the 3 bottom vents as necessary to maintain this temperature range throughout the cooking session.
Cook for 2 hours, then baste the chickens with apple juice using a spray bottle. To make sure the chickens are cooking evenly, rotate them by carefully turning the grate 180°.
Cook for another hour, then baste again with apple juice.
Cook for another 30 minutes to 1 hour, then check the internal meat temperature using an instant-read thermometer. The chicken is done when the breast meat registers 160-165°F and the thigh registers 170-175°F.
There should be no need to add water to the pan during the cooking session.
Here’s how the cooker temperatures and vent settings went during my cook:
| Time | Lid Temp | Vent 1 % | Vent 2 % | Vent 3 % |
| 1:00 pm | – | 100 | 100 | 100 |
| 1:15 pm | 220 | 25 | 25 | 25 |
| 1:30 pm | 215 | 25 | 25 | 25 |
| 1:45 pm | 220 | 25 | 25 | 25 |
| 2:00 pm | 229 | 25 | 25 | 25 |
| 2:15 pm | 236 | 15 | 15 | 15 |
| 2:30 pm | 235 | 15 | 15 | 15 |
| 3:00 pm (r)(b) | 235 | 15 | 15 | 15 |
| 3:30 pm | 230 | 15 | 15 | 15 |
| 4:00 pm (b) | 235 | 15 | 15 | 15 |
| 4:30 pm | 242 | 10 | 10 | 10 |
| 5:00 pm | 232 | 10 | 10 | 10 |
(r) rotated meat (b) basted with premium apple juice
Note that the vent percentages represent the way I set the vents at the time indicated.
Using heat-resistant gloves, remove the chickens carefully from the cooker and let cool for 5 minutes before serving.
Since the beer in the can will be very hot, make sure to support the can as you lift the chicken off the grate. You can do this with your gloved hand, or you can grasp the can with tongs to support the chicken from below while using your other gloved hand to steady the chicken.
To remove the can, hold the chicken at a slight angle in the palm of one gloved hand, grasp the can with your other gloved hand, twist the can back and forth to loosen it, and pull it out carefully. Do this over the sink or a rimmed baking sheet pan to catch any spills.
Prepare The Beer Cans And Apply The Rub
Wash 2 12-ounce beer cans with soapy water and rinse well. Open the cans and drink half the beer in each. Use a church key-style can opener to make two additional holes in the lid.
Now prepare a batch of the rub.
Wild Willy’s Number One-derful Rub
- 6 Tablespoons paprika
- 2 Tablespoons ground black pepper
- 2 Tablespoons salt
- 2 Tablespoons sugar
- 1 Tablespoon chili powder
- 1 Tablespoon granulated garlic powder
- 1 Tablespoon onion powder
- 1 teaspoon cayenne
Combine all ingredients and mix thoroughly.
Sprinkle the rub liberally inside the body cavity and the neck cavity, then all over the outside of the chicken. If you want, sprinkle some rub under the skin over the breasts and work it around with your fingers.
Place the chicken over the beer can, making sure it’s firmly seated inside the cavity as far as possible. Position the legs forward to form a tripod, keeping the chicken balanced.
Let the chickens sit at room temperature as you fire-up your Weber Bullet.
How to Make Beer Can Chicken on the Grill | Weber Grills
FAQ
How long does it take to cook a beer can chicken on a Weber grill?
Carefully balance the chicken on its two legs and the can. Grill over indirect medium heat, with the lid closed, until the juices run clear and the internal temperature reaches 160° to 165°F in the thickest part of the thigh (not touching the bone), 1¼ to 1½ hours.
How long do you grill chicken in a beer can?
Pour out 1/4 of the beer and sit the chicken on top of the beer can. Place the chicken in the center of the hot grill and cover. Cook the chicken for 1 to 1 1/2 hours, or until an instant-read thermometer registers 165 degrees F. Once cooked, cover loosely with foil and let rest for 10 minutes before carving.
How much beer to leave in beer can chicken?
Season the whole chicken inside and out with the spice blend. Beer can the chicken! Working carefully, slip the half-empty beer can into the cavity of the bird until about two inches of the can is left out of the chicken.
How long to grill chicken on a Weber grill?
Grill for about 9-10 minutes. Flip the chicken breasts at the halfway point. I normally like to grill my chicken for about 10 minutes, flipping them at the halfway point in order to have beautiful sear marks on each side of the chicken.
How do you cook chicken on a Weber grill?
Prepare the Beer Can: Open a 12-ounce can of beer. You can choose a lager, pale ale, or your favorite craft beer. Drink half the beer, or pour it out, leaving enough to steam the chicken. Set Up the Grill: Preheat your Weber grill to medium heat, around 350°F to 400°F. If using charcoal, arrange coals to one side for direct and indirect cooking.
Can you make beer can chicken on a Weber grill?
Use a Foil Drip Pan: Place a foil pan underneath the chicken to catch drippings and prevent flare-ups while adding moisture and flavor to your meal. Avoiding common pitfalls ensures the best results when making beer can chicken on a Weber grill. Here are key mistakes to sidestep: Start with a cold, not room-temperature chicken.
How do you cook Beer can Chicken on a grill?
Preheating ensures that the chicken cooks evenly and reduces the cooking time. What temperature should the grill be? Maintain a medium heat on your grill, around 350°F to 450°F (175°C to 230°C), for proper cooking of beer can chicken.
How do you cook chicken in a beer can?
Lift the chicken carefully off the beer can, making sure to keep the can upright so that the hot beer doesn’t spill. Discard the beer. Cut the chicken into serving pieces. Serve warm. Check out this delicious recipe for Beer Can Chicken from Weber—the world’s number one authority in grilling.
What temperature should Beer can Chicken be cooked at?
Beer can chicken should be cooked over medium heat, which is about 350°F to 450°F (175°C to 230°C) on your grill. Should I use indirect heat or direct heat? Indirect heat is preferable for cooking beer can chicken. This means putting the chicken on the grill away from the heat source so it cooks slowly and evenly.
What is beer can chicken?
Beer can chicken is a popular cooking technique that involves placing a whole chicken upright on a partially filled can of beer. This method creates a unique and flavorful dish, especially for outdoor grilling. The beer steams the chicken from the inside while the grill’s heat cooks it evenly. The result is tender, juicy chicken with crispy skin.