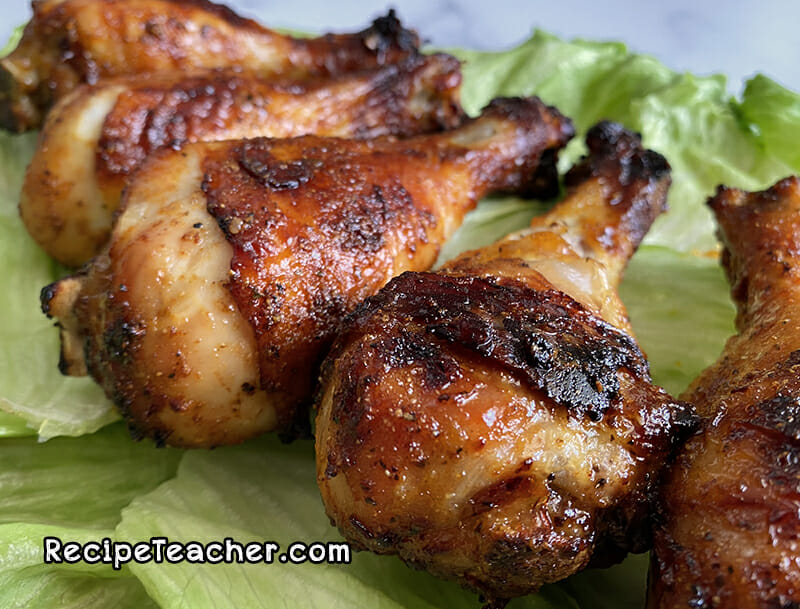
These air fryer chicken legs are seasoned with a simple blend of ingredients and cooked to absolute perfection. They are so juicy and have a crispy skin that’s out of this world addicting! I get excited when I have a recipe come out as good as this one. The seasoning, the timing, the temperature, everything comes together and makes a meal that is so unbelievably good! My air fryer has been one of my most used kitchen appliances ever, and recipes like this are the reason why.
Cooking chicken breast in a Ninja air fryer is a quick and easy way to prepare delicious and moist chicken breast without needing to use added oils or fats With the Ninja air fryer, you can achieve crispy, golden chicken breast in just 15-20 minutes using the appliance’s rapid air circulation technology
This guide will tell you everything you need to know to cook chicken breasts in your Ninja air fryer without any problems.
- Benefits of using a Ninja air fryer
- Step-by-step instructions
- Cooking times and temperatures
- Tips for best results
- Common FAQs
Why Cook Chicken Breast in a Ninja Air Fryer?
The Ninja air fryer has many benefits that make it an excellent choice for cooking chicken breast
-
Uses little to no oil: The Ninja air fryer uses rapid hot air circulation rather than oil to cook food. This allows you to enjoy crispy, fried-like results using minimal or no oil. Much healthier than deep frying!
-
Quick cooking: A Ninja air fryer can cook chicken breast quickly and evenly; it’s ready in 15 to 20 minutes. Far faster than baking or grilling.
-
The Ninja air fryer locks in moisture while crisping the outside, making the food juicy and tender. Chicken breast comes out incredibly juicy and tender.
-
Easy to use: The Ninja air fryer is very simple to use because it has simple controls and parts. Just set the time and temperature.
-
Versatile: You can cook a wide variety of foods in the Ninja air fryer. It’s not just for chicken!
Step-By-Step Guide to Cooking Chicken Breast
Follow these simple steps for perfectly cooked chicken breast:
1. Prepare the Chicken
-
Start with fresh, boneless, skinless chicken breasts. Pat dry with paper towels.
-
Pound the chicken to an even 1⁄2-inch thickness. This promotes even cooking.
-
Season as desired. Good options include salt, pepper, paprika, garlic powder, onion powder, Italian seasoning, etc.
-
Lightly coat with oil to help the seasoning stick. Use olive, avocado, coconut, or canola oil.
2. Preheating
-
Preheating is a must for evenly cooked, crispy chicken.
-
Preheat the Ninja air fryer at 400°F for 5 minutes.
3. Add Chicken to the Fryer
-
Place chicken breasts in the air fryer basket in a single layer without overcrowding.
-
For more than 2 breasts, cook in batches to allow air circulation.
4. Set Time and Temperature
-
Cook chicken at 390°F for 15-20 minutes, flipping halfway.
-
Adjust time as needed for thickness. Use a meat thermometer to confirm 165°F internal temp.
-
Let rest 5 minutes before serving.
Pro Tips for the Best Results
Use these pro tips for exceptionally juicy, tender and flavorful air fried chicken breast:
-
Marinate the chicken for added flavor and moisture. Buttermilk, lemon juice, herbs, and spices all work great.
-
Use a meat thermometer to avoid overcooking. Cook only to 165°F.
-
Don’t overcrowd the cooking basket. Air circulation is key.
-
Flip halfway through cooking for even browning.
-
Allow to rest before slicing for juicier meat.
-
Brush with sauce in the last 5 minutes only if using a sticky sauce.
FAQs About Cooking Chicken Breast in a Ninja Air Fryer
What temperature should I cook chicken breast?
390°F to 400°F is ideal. Higher heat ensures a crispy exterior.
How long does it take to cook?
Around 15-20 minutes is average, depending on thickness. Check internal temp.
Can I cook frozen chicken breasts?
Yes, increase temperature to 400°F and cooking time to 25-30 minutes.
Should I flip during cooking?
Yes, flip halfway through for even cooking on both sides.
Do I need to oil the chicken?
You can. A light brushing helps crisp the skin and browning.
What happens if I overcrowd the basket?
This inhibits air circulation, leading to uneven cooking. Always cook in batches.
Can I use a marinade?
Yes! Marinating infuses flavor and keeps the meat juicy. Avoid acidic marinades.
Get Crispy, Juicy Chicken Breast Every Time
Cooking chicken breast in the Ninja air fryer is an easy way to enjoy a quick, healthy meal with foolproof results. Follow the tips in this guide for tender, juicy interior and crispy browned exterior every time.
The air fryer allows you to skip the oil while infusing flavor with a simple seasoning or marinade. In just 15-20 minutes, you can enjoy restaurant-quality chicken breast from the comfort of your own kitchen.
So ditch the deep fryer and unlock the possibilities with your Ninja air fryer. Your taste buds will thank you!

Other Recipes You Might Like
If you like this recipe, you’re really gonna love a few more of our air fryer chicken recipes!
- Best Damn Air Fryer Chicken Wings. Oh my goodness! This wings recipe will make your homemade wings even better. We season the wings perfectly and then air fry them until they are crispy and juicy. No messy sauces either. For any event, these wings are sure to be a hit.
- Best Damn Air Fryer Chicken Thighs. Our air fryer chicken thighs are the tastiest because they don’t have any bones or skin on them. All you need are a few simple ingredients.
- Best Damn Air Fryer Chicken Tenders. There is no better way to enjoy chicken tenders than by cooking them in an air fryer. We use boneless, skinless chicken breast and a simple breading to make tenders that are just as good as any restaurant-made chicken tenders.
For this recipe the chicken must be defrosted or fresh.
The cayenne adds a little kick and helps boost the other flavors. You can omit the cayenne entirely if you want to heat at all.
Make sure that you pat the chicken legs dry with a paper towel first. Out of the package, there will be lots of water moisture. If the skin has too much water, it can steam, and we won’t get the Maillard reaction that makes the food look and taste so good. Also, temps can vary from appliance to appliance. If your chicken legs aren’t showing much color after 15 minutes, turn the temp up to 400° for the final minutes of cooking time.
We have a great recipe for Best Damn Oven Baked Chicken Legs!
Don’t Need to Use Sauce
For this recipe, we do not use sauce during the cooking. The ingredients are going to give you a nice barbecue flavor, while still letting the flavors of the chicken shine through. If you want to add sauce, you certainly can. Just add your favorite BBQ sauce in the last 5 minutes of the cooking time. But trust me, I don’t think you’ll need it.